|
 sam. 29 janv. 2011, 03:09 sam. 29 janv. 2011, 03:09
|
As we all know, iPad has no disks drive, so we do not watch DVD movie on iPad directly. So, if you have lots of DVD movies and would like to watch them on your new iPad, just get Aneesoft DVD to iPad Converter for Mac to rip and convert DVD movies to iPad supported video format. Here I will show you how to finish it. Things you'll need1. Aneesoft DVD to iPad Converter for Mac (Free for download trial version) 2. DVD movies Step 1: Download & install Aneesoft DVD to iPad Converter for MacWe'll be using a very nice iPad DVD ripping software called Aneesoft DVD to iPad Converter for Mac for ripping DVD movies to iPad compatible video format, head over here and download the free trial of Aneesoft DVD to iPad Converter for Mac. With this powerful iPad tool, you can easily rip and convert your DVD movies to MP4 videos ready for your iPad. Notice:If your computer runs Windows OS, please download the windows version- Aneesoft DVD to iPad converter. Step 2: Run Aneesoft DVD to iPad Converter for Mac and load DVD movies to convertRun DVD to iPad Converter for Mac and click "Load..." button to add DVD movies that you want to convert to iPad video formats. 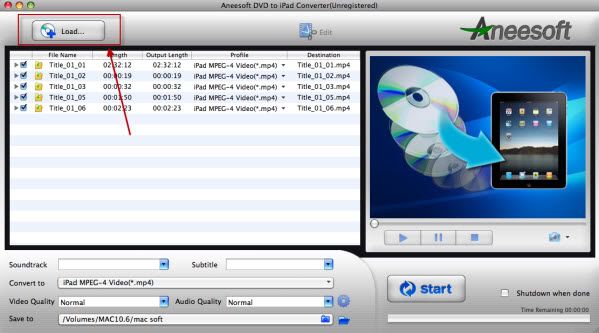 Step 3: Select the titles you'd like to convert and Set the iPad output profile format Step 3: Select the titles you'd like to convert and Set the iPad output profile formatA movie DVD usually has several titles. The shorter titles on the DVD are usually the video backgrounds used in the DVD menu screens and DVD extras like movie trailers. Unless you are a graphic artist, you probably don't want to convert these titles. There are lots of preset iPad supported video formats available for you to choose to convert for the iPad. You can choose MPEG-4 or H264 video according to your requirement. Here we set it as " iPad H.264 (720p) MPEG4 Video (*.mp4)". You may change the video parameters in the advanced settings, such as bit rate, resolution, frame rate and more.  Step 4: Edit your videos: trim, crop, effect, watermark and deinterlace(optional) Step 4: Edit your videos: trim, crop, effect, watermark and deinterlace(optional)This Aneesoft DVD to iPad video converter for Mac allows you to trim, crop your videos, which may help you removing the black edges around your video, so that you can watch your movies in full screen. You can also set different video effect such as grey, invert, gamma, sepia and so on, in addition, if you want to add watermark on your video, you can click "Watermark" tab and then check "Enable Effect" option box. You may add Text or Image watermark onto your video. 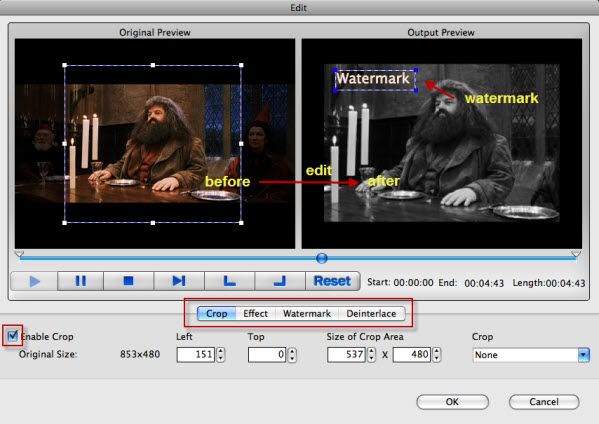 Step 5: Start ripping and converting DVD to iPad supported video format Step 5: Start ripping and converting DVD to iPad supported video formatFinally, click the big "Start" button to start converting DVD to iPad compatible video format. Once the convert is complete, Aneesoft DVD to iPad Converter for Mac will place on your Desktop a new iPad format version of your movies that will play on the iPad. Double-click the new file and play it to make sure it looks as you expect. If you're using the evaluation version of Aneesoft DVD to iPad Converter for Mac, it will only convert the first five minutes of your movies. You need to register it as a full-version to remove this limitation. Step 6: Make these videos syncing to iPadAfter converting DVD to iPad compatible formats, now we can import the converted files to iPad.First, you need to launch iTunes, click File option on menu, and add your converted files to iTunes library. Then, connect your iPad 4 to computer via USB cable, iTunes will detect your iPad. After that, click iTunes "File -> Sync iPad", and the files will be transferred to your iPad from iTunes library. When updating completed, you will find the videos on you iPad. Well, you can enjoy the movie on your IPad now. You may be interested in these topics:How to convert FLV to iPhone video How to convert YouTube to iPhone 4 video How to use HandBrake to rip your DVDs to iPhone for free Best multiplayer iPad games for free download Top 8 best iPad apps for kids What is iPad supported video, TV & audio format Jailbreaking for iPad Apple iPad Frequently Asked Questions Apple iPad Reviews: Is it as magical as Apple promised 10 iPad features you must know The worst 10 things about iPad iPad is best Christmas gift for Christmas 2010The best holiday movies & Christmas movies for iPad
ven. 28 janv. 2011, 04:01
|
The latest Sony, Panasonics and Cannon HD camcorder are using MTS/M2TS for saving recordings. Since the MTS video format is for the HD camcorders, and the portable multimedia devices do not support playing the M2TS video directly, if we want to play the MTS videos on the portable device we need an additional video converter tool. Aneesoft MTS to AVI Video Converter is such a video converter which can help users convert MTS to AVI videos. This article shows a step-by-step guide to convert MTS to AVI videos with Aneesoft MTS to AVI Video Converter. Follow our guide and try now! Things you'll need1. Aneesoft MTS to AVI Video Converter (Free for download trial version) 2. MTS video files Step 1: Download the Aneesoft AVCHD Video Converter. Install and run it. Aneesoft MTS to AVI Video Converter is a perfect and versatile MTS file converter that armed with a user-friendly interface and fast speed, it makes MTS to AVI conversion routine quite simple. head over here and download the free trial version.Next step is to install the program. Step 2: Import MTS video to MTS to AVI Video ConverterFirst copy the AVCHD (.MTS,M2TS) file from your video camera to your hard drive. then install and run Aneesoft MTS to AVI Video Converter, Click the "Add..." button to add the AVCHD videos which you want to convert, you may add as many videos as you want to convert to AVI videos. 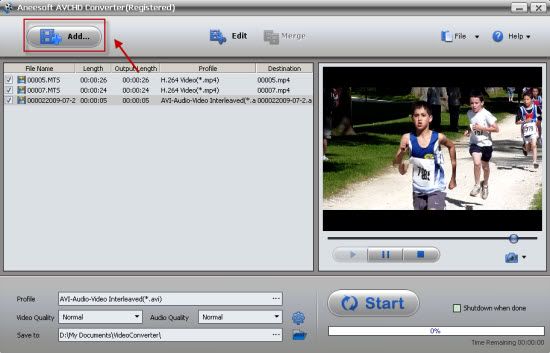 Step 3: Edit MTS videos to improve the output quality (Optional) Step 3: Edit MTS videos to improve the output quality (Optional)After importing AVCHD MTS/M2TS videos, please click "Edit" button to access to the Video Edit panel. To personalize your video, You can also try to add picture or text watermark with customized transparency, size and position in your videos. 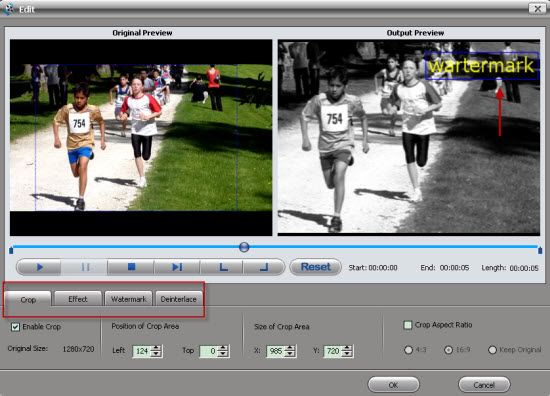 Step 4: Merge MTS videos to 1 single file (Optional) Step 4: Merge MTS videos to 1 single file (Optional)This is optional. But if you want to output 1 single file for easily playing on your portable device, simply click on the video titles you'd like to merge , then click 'Merge' button and uncheck the former separate files if you just need the single merged video file. You may see the image below to have an idea. Step 5: Change the output settings to convert MTS to AVI videos with best qualitySelect AVI format from the output formats list in "general video" drop-down list.and specify a directory on your computer to save the output files. You can change the output settings as you need. Remember that the output file size mostly depends on the Bitrate you set. Larger Bitrate, larger file size. 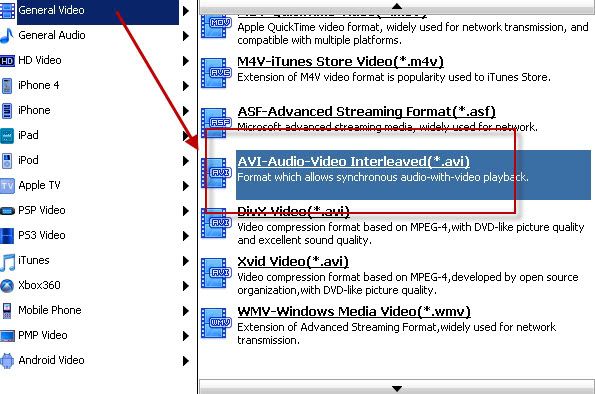 Step 6: Hit "Convert" to start the MTS/M2TS to AVI conversion Step 6: Hit "Convert" to start the MTS/M2TS to AVI conversionClick "Convert" button to start converting MTS files. Aneesoft MTS to AVI Video Converter runs fast in MTS/M2TS to AVI conversion, taking advantage of its support for batch and multiprocessing. It is clear to see the progress with estimation of remaining time on display. You may be interested in these topics:How to embed YouTube video to PowerPointHow to convert YouTube to iPadHow to convert AVI to WMV videosHow to convert MP4 to AVI videosHow to convert MKV to XviD videosHow to convert MKV to MPEG videosHow to convert DVD to iPad video formatHow to convert DVD to iPhone video formatHow to rip DVD to BlackBerry video formatHow to convert DVD to MOV video formatHow to convert DVD to PS3 video formatHow to convert DVD to WMV video formatHow to rip DVD to PSP video formatHow to convert HD video for your portable video playerHow to convert video to iTunes format for free
mar. 25 janv. 2011, 03:37
|
I have a large collection of MP4, MOV or VOB videos and now I always need to add them into Windows Movie Maker for editing. But the Windows Movie Maker doesn't support these formats. I have to convert them to WMV format, which is compatible with Windows Movie Maker. One of my friends recommended me a video converter tool which called Aneesoft WMV Video Converter. Aneesoft WMV Video Converter is the best video to wmv converter which designed to meet all your needs of converting files from AVI, MPG (MPEG), MP4, MOV, VOB, ASF, RM, RMVB, 3GP, 3G2 to WMV files. Extremely fast conversion speed and friendly user interface allows you to convert video files to WMV format with ease. It also has useful function making your converted videos more personal. You can trimming video, converting video clips, taking a snapshot, edit video with trim, crop, merge function, and even add watermark and special effects to video. Besides converting videos formats to WMV formats, it also allows you to extract audio files from your videos. Things you'll need1. Aneesoft WMV Video Converter (Free for download trial version). 2. MP4, MOV, VOB video files. Step 1: Download & install Aneesoft WMV Video ConverterWe'll be using the very nice video converter software called Aneesoft WMV Video Converter for converting videos to WMV video format, head over here and download the free trial version of Aneesoft WMV Video Converter. Next step is to install Aneesoft WMV Video Converter. Step 2: Run Aneesoft WMV Video Converter and add videos Now run Aneesoft WMV Video Converter and click the big button "Add..." to add videos from your hard disk, you may add as many videos as you want to convert to WMV video format. Only the titles you checked will be converted. 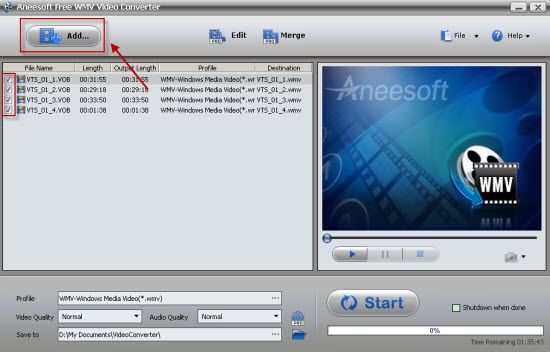 Step 3: Edit & merge videos: trim, crop, add effect, add watermark Step 3: Edit & merge videos: trim, crop, add effect, add watermark You're able to make your video personalized with Aneesoft WMV Video Converter if you want. Firstly, you should click on the button "Edit" to lauch the built-in video editing tool. And then you may find lots of features available for you to make the videos be your own style, such as crop, trim add watermark, etc. For example, if you want to add effect to your videos, you need to check the box "Enable Effect" and set the contrast & brightness. 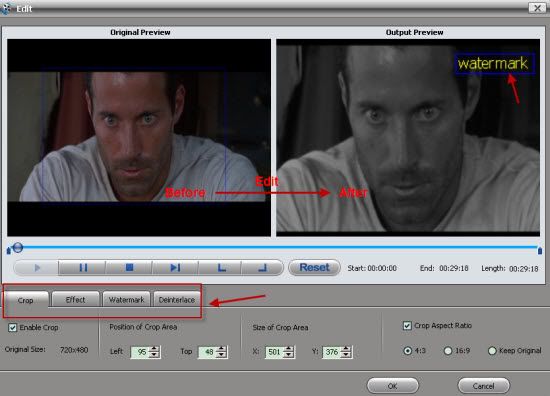 Notices: Aneesoft WMV Video Converter program has two versions. The free version- Aneesoft Free WMV video converter is function-limited. If you'd like to edit and merge your videos, you need to upgrade to the pro version. Step 4: Set the output WMV video formatThe fourth step before conversion is to set the output format. Select WMV profile by a click. You should notice that the output file size mostly depends on the bitrate you have set. Larger bitrate, larger file size. 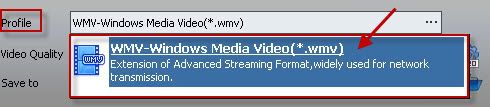 Step 5: Start converting Mp4, MOV, VOB videos to WMV video format Step 5: Start converting Mp4, MOV, VOB videos to WMV video format Now you may click the big button "Start" to begin converting videos to WMV video files. Once the convert is complete, Aneesoft WMV Video Converter will place on your Desktop a new WMV version of your video that can be imported into Windows Movie Maker. Double-click the new file and play it to make sure it looks as you expect. I bet you'll be surprise at the video quality, just like me. You may be interested in these topics:How to convert YouTube to iPadHow to convert AVI to WMV videosHow to convert MP4 to AVI videosHow to convert MKV to XviD videosHow to convert MKV to MPEG videosHow to convert DVD to iPad video formatHow to convert DVD to iPhone video formatHow to rip DVD to BlackBerry video formatHow to convert DVD to MOV video formatHow to convert DVD to PS3 video formatHow to convert DVD to WMV video formatHow to rip DVD to PSP video formatHow to convert HD video for your portable video playerHow to convert video to iTunes format for free
sam. 22 janv. 2011, 04:48
|
While you can load up YouTube videos on a Nintendo Wii or PS3, the Xbox 360 console doesn't make it such an easy task. You can use NXE with Windows Media Center to load a browser program, but that has its own limitations and needs you to keep on your computer. If you simply have Windows XP or similar and would like to be able to watch YouTube videos, then you can without Windows Media Center. Solution 1: Download YouTube videos for watching on Xbox 360This tutorial looks at downloading and saving YouTube videos (including HD YouTube videos) to your hard disk for offline viewing or further editing/converting. It uses free software called Aneesoft Free YouTube Downloader to achieve this task. It is a very basic and simple guide and should be easily understood by anyone with a basic knowledge of the web. Things you'll need1. Aneesoft Free YouTube DownloaderStep 1: Download & install Aneesoft Free YouTube DownloaderWe'll be using the very nice Windows free YouTube downloading software called Aneesoft Free YouTube Downloader to download videos from YouTube website. Next step is to install this Free YouTube Downloader software. Step 2: Run Free YouTube Downloader and add YouTube video URLsNow run Free YouTube Downloader and click the button "Add URL" to add the URL of YouTube video, you may add as many YouTube URLs as you want for saving onto your hard disk. Now HD videos from YouTube are available for download with Aneesoft Free YouTube Downloader. 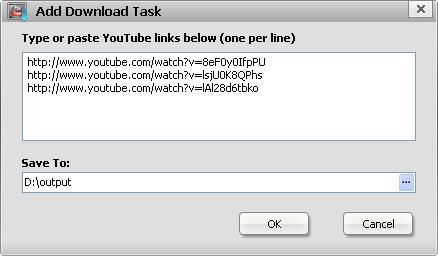 Step 3: Start downloading YouTube videos Step 3: Start downloading YouTube videosThe YouTube videos will start downloading automatically after you add the YouTube videos URLs. Make sure your Internet is connected to YouTube website and the URLs of YouTube videos are correct. You're able to download multiple YouTube videos all at once. 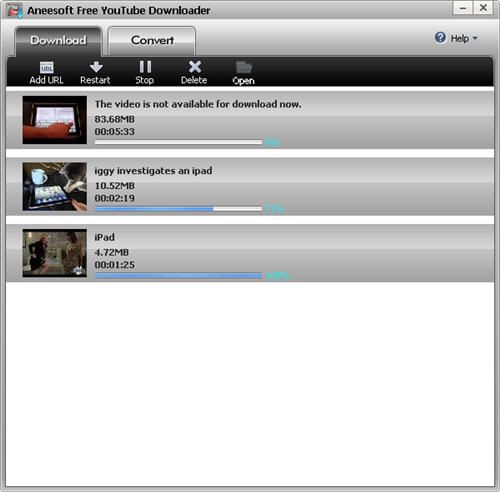 Step 4: Convert YouTube videos to other video format Step 4: Convert YouTube videos to other video formatThis free version doesn't support this feature. You must upgrade to Aneesoft YouTube Converter to convert all YouTube videos to other video format, like YouTube to AVI, YouTube to MOV, YouTube to MP4, YouTube to MKV, YouTube to M4v and more. Solution 2: Streaming YouTube videos on Xbox 360 via TVersityMicrosoft's Xbox 360 console does not offer a web browser like it's rivals, and so does not support watching YouTube videos. There are a variety of methods to watching YouTube on Xbox 360 however. This article looks at streaming videos directly from YouTube to an Xbox 360 over a home network (wired or wireless), and it will work for other sites too including Flickr and Google Video. Things you'll need1. TVersity Media Server 2. FFDShow DirectShow Filters 3. Windows Media Player 11 You obviously need an Xbox 360 console that is on the same network as the computer you will install TVersity on. This network can be wired or wireless. Your computer should be relatively modern, and capable of playing back video content. Step 1: Download & install TVersity Media Server/FFDShow DirectShow Filters/Windows Media Player 11The installations are pretty straightforward. Be aware the the Windows Media Player installation (may require a reboot) will perform a check to make sure your copy of Windows is genuine. If it is not genuine, it will not install. If you did not know your copy of Windows is not genuine (or have gotten a false positive) then check Google for instructions on installing Windows Media Player 11 on a pirated operating system. Step 2: Set up TVersityNow that TVersity, FFDShow and Windows Media Player have been setup, we can start adding YouTube content to the TVersity Library. Launch the TVersity client from a Desktop or Start Menu link. The TVersity interface is very basic. Across the top of the program we have buttons to take us to different areas of the interface. Under Library there are two main columns below the button bar. To the left we have our Sources and Library buttons, and to the right is a list of the actual content in the TVersity Library. It really couldn't be easier. Step 3: Add YouTube Links in TVersityWhen the Add Media Source box pops up, do the following... Type - Change Type to YouTube. YouTube Type - You can choose what kind of YouTube content you want to add. You can Add a User, or a tag, or choose Recently Added Videos. You can also leave this field blank and simply Add a direct link to any YouTube video. Video RSS - In here put the link to the YouTube video you want to Add to the Library. Title - The Title you choose here will be shown on the Xbox 360. Tags - You can add tags to the benefit of your Library if you wish to. When you have filled up the details, click the Submit button. 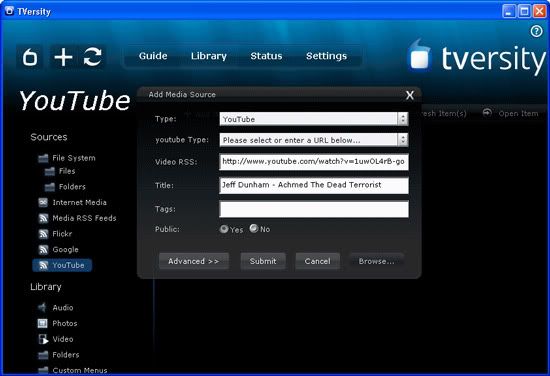 As shown in the picture above, click YouTube on the left hand side of the program to see the YouTube clips you have added to your TVersity library. You can add as many clips or other content as you wish to the Library and it will be available to stream to the Xbox 360 console. Step 4: Set up Xbox 360 Video Library and start streaming YouTube videosSo now we have setup the necessary software on the Windows computer that is on the same network as the Xbox 360 console, and have added YouTube links and other content to the TVersity Library. Now it is time to watch the content on the Xbox 360 console. First you must go to the Xbox 360 video library. On the NXE Dashboard, under the My Xbox menu, scroll across to the Video Library option. If everything has been done correctly, TVersity should be automatically recognised on your home network. If not, make sure that you have the Xbox 360 on the same network as the PC running TVersity. The video should now start playing full screen. You may be interested in these topics:How to download YouTube videos in HD formatHow to embed YouTube video to PowerPointHow to convert YouTube to iPadHow to convert AVI to WMV videosHow to convert MP4 to AVI videosHow to convert MP4 to MP3 audios How to convert MKV to XviD videosHow to convert MKV to MPEG videosHow to convert DVD to iPad video formatHow to convert DVD to iPhone video formatHow to rip DVD to BlackBerry video formatHow to convert DVD to MOV video formatHow to convert DVD to PS3 video formatHow to convert DVD to WMV video formatHow to rip DVD to PSP video formatHow to convert HD video for your portable video playerHow to convert video to iTunes format for free
ven. 21 janv. 2011, 07:11
|
I just bought the new Xbox 360 and it came with the newest Xbox dashboard. I used to watch videos all the time from a memory stick while being offline. But nowadays it forces me to be online. Whenever I try to play a video it tells me a system update is required to watch this content. If it asks me that I hook my Xbox to an ethernet connection and I sign in to Xbox Live. After that I can play the video but I don't ever download an update. I have done a lot of research,basically I have movies on the PC in .avi format,mostly all of them are. I am trying to watch them on my Xbox 360 through my network. When you go into the Media Center of Xbox 360 and look at the shared folder on the PC,does not see these videos,because it does not play .avi extensions. I have to find some program to convert my videos to Xbox 360 supported video formats before watching them with Xbox 360. Finally I have got one Xbox 360 video converter tool called Aneesoft Xbox 360 Video Converter which fulls my need very much. It is quite easy to use and can convert most common video file to Xbox 360 video format with excellent video quality and high conversion speed. Things you'll need1. Aneesoft Xbox 360 Video Converter (Free for download trial version) 2. Your videos Step 1: Download & install Aneesoft Xbox 360 Video ConverterWe'll be using a very nice video converter software called Aneesoft Xbox 360 Video Converter to convert videos to Xbox 360 video format. After you've downloaded the free trial,next step is to install the program. Step 2: Run Xbox 360 Video Converter and add video files to be convertedNow run Aneesoft Xbox 360 Video Converter and click the big button " Add..." to add video files from your computer. You may add as many videos as you wish to convert to Xbox 360 videos. Only the titles you checked will be converted to Xbox 360 video file. 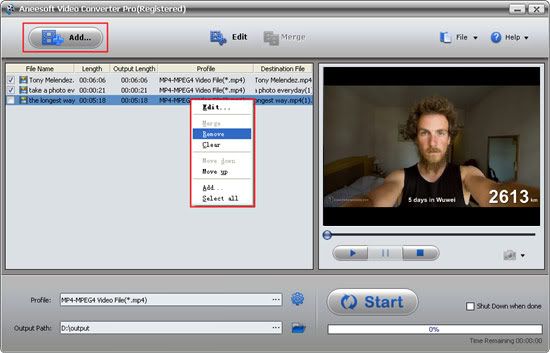 Step 3: Edit videos: crop,trim,add effects,add watermark Step 3: Edit videos: crop,trim,add effects,add watermarkWanna edit your videos to make it more personalized? Say add a watermark for your videos in Aneesoft Xbox 360 Video Converter.Just select the title you'd like to add watermark,then click the button ' Edit' to launch video editing window. If you want to crop video or add some special effects,click the first two tabs. 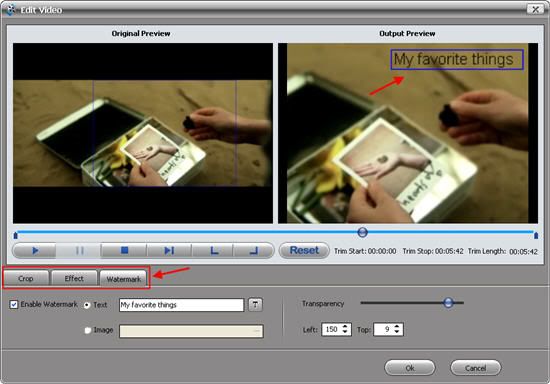 Step 4: Set the output settings for converting videos to Xbox 360 video format Step 4: Set the output settings for converting videos to Xbox 360 video formatChoose the most suitable Xbox 360 output format as you want. Besides to Xbox360 H.264 video(*.mp4) format,there are some other Xbox 360 supported video formats available for you to choose from. Remember that the output file size mostly depends on the bitrate you set. Larger bitrate,larger file size. 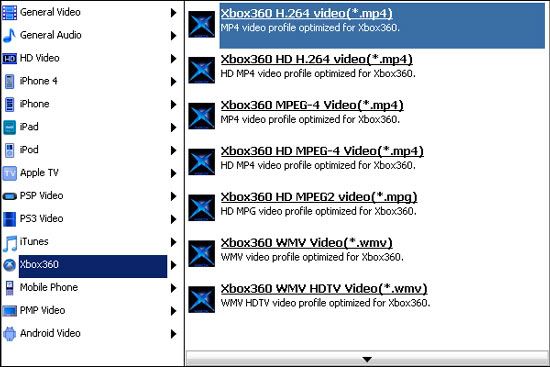 Step 5: Start converting videos to Xbox 360 video formats Step 5: Start converting videos to Xbox 360 video formatsNow you may click the big button " Start" to begin converting videos to Xbox 360 video formats. Once the conversion is complete, Aneesoft Xbox 360 Video Converter will place a new version of your video. Double-click the new Xbox 360 video file and play it to make sure it looks as you expect. You may be interested in these topics:How to convert YouTube to iPadHow to convert AVI to WMV videosHow to convert MP4 to AVI videosHow to convert MKV to XviD videosHow to convert MKV to MPEG videosHow to convert DVD to iPad video formatHow to convert DVD to iPhone video formatHow to rip DVD to BlackBerry video formatHow to convert DVD to MOV video formatHow to convert DVD to PS3 video formatHow to convert DVD to WMV video formatHow to rip DVD to PSP video formatHow to convert HD video for your portable video playerHow to convert video to iTunes format for free
mar. 18 janv. 2011, 04:46
|
This tutorial is telling you the way to convert FLV to MP4 formats,for you to enjoy videos downloaded from YouTube and Google Video,etc,and enjoy them on your mobile devices,such as iPod,iPhone,PSP etc. First of all,we must make it clear that the YouTube videos and Google videos are FLV file format. FLV (Flash Live Video file) is a preferred file format that is designed for web playback,offering high rates of compression to deliver video over the internet using Abobe Flash Player. FLV content cannot be played back directly. It must be embedded in a SWFfile. You create (or download) a "container" SWF file from which to play the FLV file. The most common approach is to use an SWF file to function as a media player with screen and playback controls. In order to put FLV videos in your mobile devices,you may need to convert them to other files,like to MP4. MPEG-4 extends the earlier MPEG-1 and MPEG-2 algorithms with synthesis of speech and video,fractal compression,computer visualization and artificial intelligence-based image processing techniques. To converter FLV to MP4formats,you need to download a converter software,here we recommend you Aneesoft FLV Converter for Mac.If your computer runs Windows OS,Please download the windows version- Aneesoft FLV video converter.Following we will use this software to show you how to convert FLV to MP4 video step by step. Things you'll need1. Aneesoft FLV Converter for Mac (Free for download trial version) 2. FLV video files Step 1: Download & install Aneesoft FLV Converter for MacWe'll be using the very nice video converter software called Aneesoft FLV Converter for Mac for converting FLV to MP4 format,head over here and download the free trial version.Next step is to install the program. Step 2: Run Aneesoft FLV converter for Mac and add FLV video filesNow run Aneesoft FLV Converter for Mac and choose "convert FLV to video". 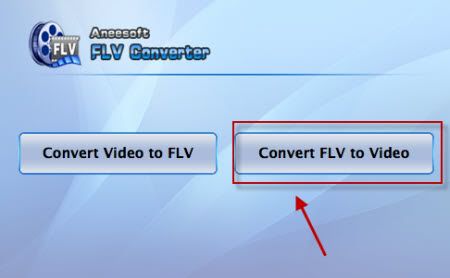 click the big button " Add..." to add FLV video files on your computer,you may add as many videos as you want to convert to MP4 videos. Only the titles you checked will be converted. So if there're some videos you don't want to convert,you need to uncheck them or ' Remove' them from the right-click menu. ' Clear' in the right-click menu means remove all titles in the list. 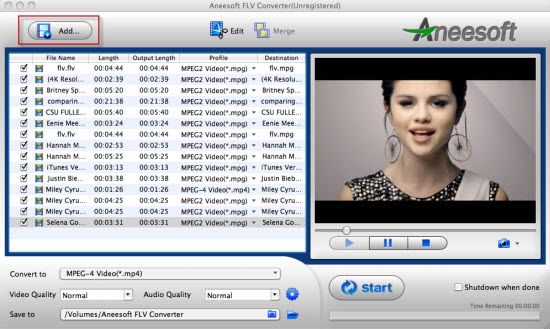 Step 3: Edit FLV videos: crop,trim,add effects,add watermark Step 3: Edit FLV videos: crop,trim,add effects,add watermarkWanna edit your videos to make it more personalized? You may add a watermark in Aneesoft FLV Converter for Mac. Just select the title you'd like to add watermark,then click the button ' Edit' to launch video editing window. If you want to crop video or add some special effects,click the first two tabs. You're able to add a text watermark or an image watermark (you may call it logo) on the output video. Adjust the 'Transparency' to make the watermark look better.  Step 4: Merge some separate FLV videos to 1 single MP4 video file Step 4: Merge some separate FLV videos to 1 single MP4 video fileClick on the video titles you'd like to merge to 1 single file,then click 'Merge' button and uncheck the former separate FLV video files if you just need the single merged MP4 video file. Here 'click on the video titles' is not just check the options,you need to click them to make them highlight. Step 5: Change the output settings to convert MP4 videos with best qualityThere are almost all common video formats available for you to choose to convert. You may convert FLV videos to different video formats for video editing or playback on your mobile devices,such as iPod,iPhone,PSP,cellphone,etc. Remember that the output file size mostly depends on the Bitrate you set. Larger Bitrate,larger file size. 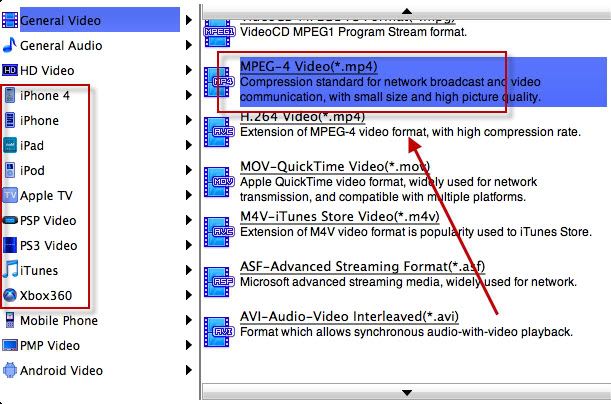 Step 6: Start converting FLV videos to MP4 videos Step 6: Start converting FLV videos to MP4 videosNow you may click the big button "Start" to begin converting FLV videos to MP4 videos. Once the convert is complete,Aneesoft FLV Converter for Mac will place a new version of your MP4 video. Double-click the new MP4 file and play it to make sure it looks as you expect. You may be interested in these topics:How to embed YouTube video to PowerPointHow to convert YouTube to iPadHow to convert AVI to WMV videosHow to convert MP4 to AVI videosHow to convert MKV to XviD videosHow to convert MKV to MPEG videosHow to convert DVD to iPad video formatHow to convert DVD to iPhone video formatHow to rip DVD to BlackBerry video formatHow to convert DVD to MOV video formatHow to convert DVD to PS3 video formatHow to convert DVD to WMV video formatHow to rip DVD to PSP video formatHow to convert HD video for your portable video playerHow to convert video to iTunes format for free
jeu. 13 janv. 2011, 07:31
|
We're not able to access Internet all the time. And sometimes we'd like to download and convert YouTube to MOV videos onto the hard disk for watching it later or transferring it to other mobile devices, like iPad, iPod. If you've got some videos from online video sharing websites and want to convert them to .MOV files, you need a tool like Aneesoft YouTube Converter for Mac to convert YouTube to MOV videos. This program can easily convert YouTube videos to MOV video format within minutes! Here I'll show you how to use Aneesoft YouTube Converter for Mac to download online YouTube videos and convert the YouTube videos to MOV format for watching on iPad/iPhone/iPod step-by-step. Step 1: Download & install Aneesoft YouTube Converter for MacWe'll be using the all-in-one YouTube downloading software called Aneesoft YouTube Converter for Mac to download YouTube videos and convert the videos to most video formats, head over here and download YouTube to MOV Converter. Next step is to install this YouTube to MOV Converter. Notice, If your computer runs windows OS, please download Aneesoft YouTube downloader. Step 2: Run Aneesoft YouTube Converter for Mac and add YouTube video URLsNow run Aneesoft YouTube Converter for Mac and click the button "Add URL" to copy the URL of YouTube video, you may add as many YouTube URLs as you want for downloading to your computer. Now HD videos from YouTube are available for download with Aneesoft YouTube Converter for Mac.  Step 3: Start downloading YouTube videos Step 3: Start downloading YouTube videos The YouTube videos will start downloading automatically after you add the YouTube videos URLs into Aneesoft YouTube Converter for Mac.Make sure your Internet is connected to YouTube website and the URLs of YouTube videos are correct. You're able to download multiple YouTube videos all at once in YouTube to MOV Converter. 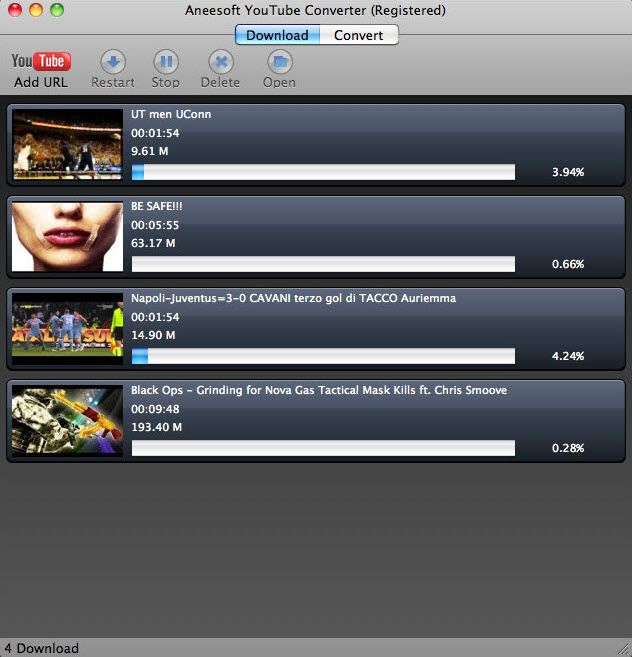 Step 4: Convert YouTube to MOV video format Step 4: Convert YouTube to MOV video formatOnce the YouTube video has been downloades successfully, it'll be removed from the "Download" tab and transferred to "Convert" tab. Change the output settings to MOV format to convert videos with best quality. You may convert YouTube FLV videos to any other common video formats for video editing or playback on your mobile devices, such as iPod, iPhone, PSP, cellphone, etc. Remember that the output file size mostly depends on the Bitrate you set. Larger Bitrate, larger file size. 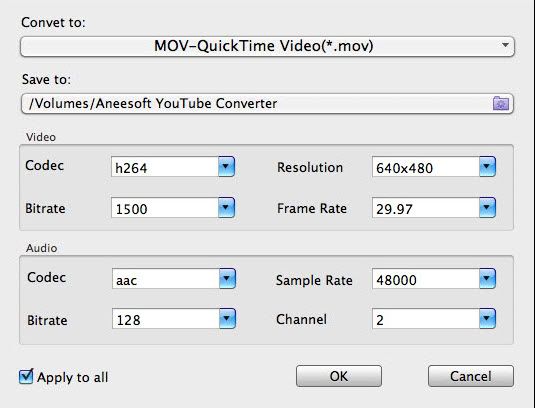 Step 5: Transfer and watch the YouTube videos anywhere Step 5: Transfer and watch the YouTube videos anywhereAfter the YouTube videos has been converted successfully, you may transfter the converted YouTube videos to your PC, Mac or most mobile devices, like iPad, iPad, PSP for watching the YouTube videos. You may be interested in these topics: How to download YouTube videos in HD formatHow to embed YouTube video to PowerPointHow to convert YouTube to iPadHow to convert AVI to WMV videosHow to convert MP4 to AVI videosHow to convert MKV to XviD videosHow to convert MKV to MPEG videosHow to convert DVD to iPad video formatHow to convert DVD to iPhone video formatHow to rip DVD to BlackBerry video formatHow to convert DVD to MOV video formatHow to convert DVD to PS3 video formatHow to convert DVD to WMV video formatHow to rip DVD to PSP video formatHow to convert HD video for your portable video playerHow to convert video to iTunes format for free
mar. 11 janv. 2011, 07:20
|
This tutorial will show you how to convert video among MP4, AVI, WMV, MPG, MPEG, MOV, TS, FLV and HD video like AVCHD (MTS/M2TS), MOD/TOD, HD WMV with Aneesoft video converter Pro for Mac , and you can convert video for most portable devices, such as iPad, iPhone 4, iPod touch 4, Apple TV, PSP, Nokia, blackberry and more. Before you start, you'll need to gather these elements: Aneesoft Video Converter for Mac Video files, almost any size, shape or formats Follow these simple steps:Step 1: Open the video you wish to convert using the Aneesoft video converter Pro for MacRun the program and click Add... button to select Videos. The Aneesoft video converter Pro for Mac software supports most of the popular Video formats including MTS, MOD, TOD, MOV, AVI, MKV, FLV, MP4, WMV and more. Notice: If you are using Windows OS, you can refer to Aneesoft Video Converter Pro. 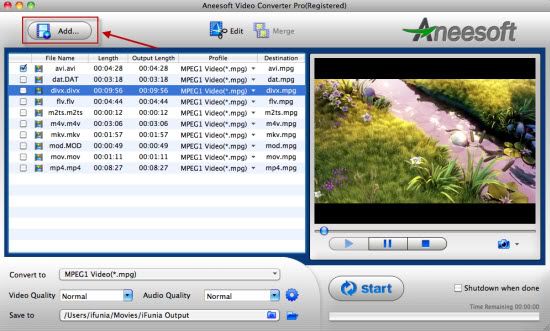 Step 2: Crop, trim or add special effects to the Video Step 2: Crop, trim or add special effects to the VideoThis step is optional. But when you come to review the video you taken, how often do you find it's too dark, or the focus is blurred? Now you can fix these flaws and apply artistic effects with the Edit video module of the program. Plus, with just a few clicks, you can crop the Video to remove black sides and trim the video easily as below. 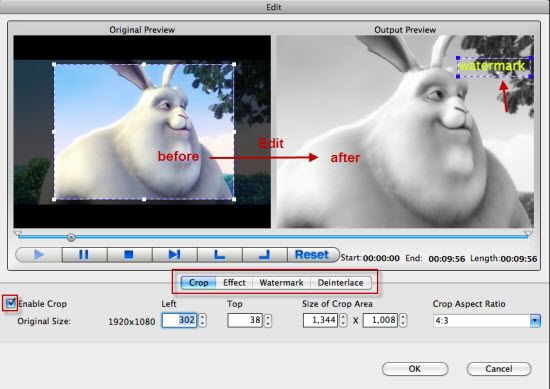 Step 3: Choose your preferred preset Step 3: Choose your preferred presetAfter you finish video source setup, you can select an output format for each video file and specify a directory on your computer to save the output files. In the left-hand section of the Aneeosft Video Converter Pro for Mac interface, select the right preset for your device in the drop-down menu. With the personalized profile provided in Aneesoft video converter Pro for Mac, you can easily select the format according to the device name, even 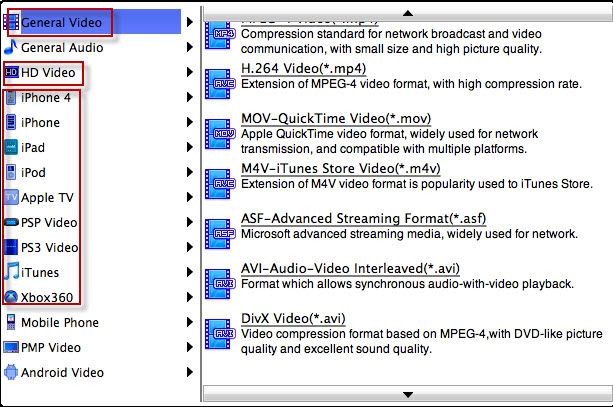 Step 4: Start Conversion in the Aneesoft video converter Pro for Mac Step 4: Start Conversion in the Aneesoft video converter Pro for MacClick Start and step away from the computer (processor performance will be seriously affected during conversion). See how easy it is!? System Requirements1.1G Hz or above Intel processor. 2.Mac OS 10.5 Leopard or Mac OS 10.6 Snow Leopard on iMac, MacBook, Mac Pro, etc. 3.512 MB physical RAM (memory) or more. 4.1024×768 or higher resolution display. Tips & TricksTips1: With batch conversion supported, you can append many tasks at one time and Aneesoft video converter Pro for Mac will convert them one by one for saving your time. Tips2: You can preview the video by selecting the video and clicking Play in the preview pane. You can also take snapshot and save them as jpg, bmp file while preview. Tips3: Join multiple video files into one by clicking "Merge" in Source Setup section. You need select the files first in the source list. You may be interested in these topics:How to convert WMV video to iPadHow to download YouTube videos in HD formatHow to embed YouTube video to PowerPointHow to convert YouTube to iPadHow to convert AVI to WMV videosHow to convert MP4 to AVI videosHow to convert MKV to XviD videosHow to convert MKV to MPEG videosHow to convert DVD to iPad video formatHow to convert DVD to iPhone video formatHow to rip DVD to BlackBerry video formatHow to convert DVD to MOV video formatHow to convert DVD to PS3 video formatHow to convert DVD to WMV video formatHow to rip DVD to PSP video formatHow to convert HD video for your portable video playerHow to convert video to iTunes format for free
ven. 7 janv. 2011, 08:42
|
I've downloaded lots of YouTube videos and would like to watch the videos on my iPad on the flight to New York next week. Now I'm finding a YouTube to iPad video converter software to convert my YouTube videos. All YouTube video converter software I could have found work on Windows PC, but not Mac. Finally I found a Mac YouTube to iPad converter tool called Aneesoft iPad Video Converter for Mac.It just takes a few clicks to convert YouTube to iPad MP4 files using this Mac YouTube to iPad Converter software. Here I'll show you how to convert YouTube to iPad supported H.264 videos on Mac for watching on the iPad step-by-step. Things you'll need1. Aneesoft iPad Video Converter for Mac (Free for download trial version) 2. YouTube video files Step 1: Download & install Aneesoft iPad Video Converter for Mac We'll be using the very nice Mac YouTube to iPad video converter software called Aneesoft iPad Video Converter for Mac to convert YouTube to iPad compatible video format, head over here and download the free trial version of iPad Video Converter for Mac. Next step is to install this Mac YouTube to iPad Video Converter software. Step 2: Run iPad Video Converter for Mac and add YouTube videos Now run iPad Video Converter for Mac and click the big button "Add..." to add YouTube videos from your hard disk, you may add as many YouTube videos as you want to convert to iPad H.264 videos for watching on iPad. Only the titles you checked will be converted.  Step 3: Edit & merge YouTube videos: trim, crop, add effect, add watermark Step 3: Edit & merge YouTube videos: trim, crop, add effect, add watermarkWanna edit your YouTube videos to make it more personalized? You may add a watermark in Aneesoft iPad Video Converter for Mac. Just select the title you'd like to add watermark, then click the button 'Edit' to launch video editing window. If you want to crop video or add some special effects, click the first two tabs. 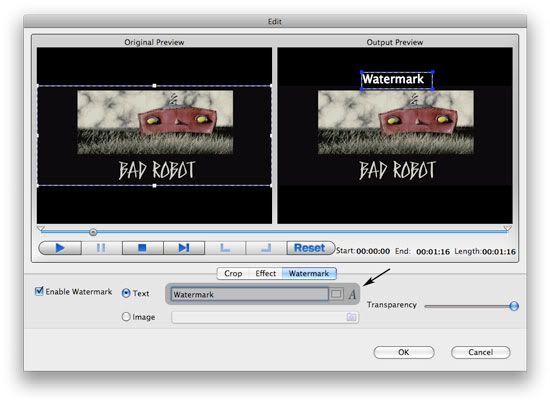 Step 4: Change the output settings to convert YouTube to iPad on Mac Step 4: Change the output settings to convert YouTube to iPad on MacYou'll find a wide range of preset video setting options avaiable for Apple iPad. You may select " iPad MPEG-4 (640*480) Video(*.mp4)" for converting YouTube to iPad supported videos on Mac. Remember that the output file size and converting speed mostly depends on the Bitrate you set. Larger Bitrate, larger file size and longer convertion time. 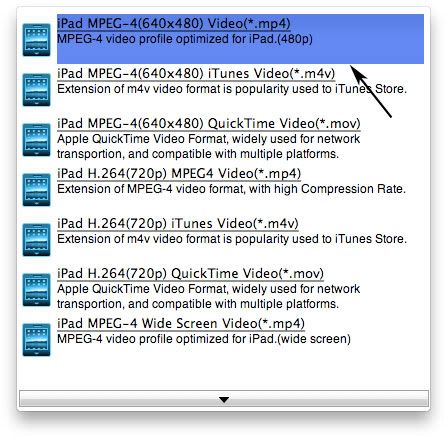 Step 5: Start converting YouTube to iPad video format on Mac Step 5: Start converting YouTube to iPad video format on MacNow you may click the big button "Start" to begin converting YouTube to iPad video files on Mac. Once the convert is complete, Aneesoft iPad Video Converter for Mac will place on your Desktop a new iPad format version of your video that will play on the iPad. Double-click the new file and play it to make sure it looks as you expect. Step 6: Transfer/Sync video to the iPadTo get the movie onto your iPad, launch iTunes. Drag your new converted movie file into your iTunes library in the folder or playlist of your choosing. Attach your iPad to your computer and sync the iPad with iTunes. Check the option "Automatically sync songs and videos to my iPad" so your music and video from the iTunes library will automatically snyc to your iPad. The sync may take a few minutes. When syncing is done, eject your iPad and take your movies with you. You may be interested in these topics: How to embed YouTube video to PowerPointHow to convert YouTube to iPadHow to convert AVI to WMV videosHow to convert MP4 to AVI videosHow to convert MKV to XviD videosHow to convert MKV to MPEG videosHow to convert DVD to iPad video formatHow to convert DVD to iPhone video formatHow to rip DVD to BlackBerry video formatHow to convert DVD to MOV video formatHow to convert DVD to PS3 video formatHow to convert DVD to WMV video formatHow to rip DVD to PSP video formatHow to convert HD video for your portable video playerHow to convert video to iTunes format for free
jeu. 6 janv. 2011, 08:15
|
 Aneesoft iPad Converter Suite for Mac Aneesoft iPad Converter Suite for Mac (Original price:$58, now $12)is an all-in-one iPad video converter package tailored for iPad fans and Mac users, including two iPad tools: iPad Video Converter for Mac (original price: $29, now $8.7) and DVD to iPad Converter for Mac.(original price: $29, now $8.7) With Aneesoft iPad Converter Suite for Mac, you can easily convert/rip all your DVD movies and videos to iPad supported H.264/MPEG4 video formats on Mac OS X. This Aneesoft iPad Converter Suite for Mac also allows you to edit your original videos by crop, trim, add special effects and text/image watermarks on them. With support for multi-core processing, multithreading and batch conversion, you can convert multiple files easily, quickly and with excellent output quality. Key features:1. Convert all popular video formats to iPad H.264/MPEG4 video formats on Mac OS like AVI, WMV, FLV, MKV, MPEG, 3GP, VOB, RMVB etc. 2. Rip/Convert DVD movies to iPad supported video formats for Mac users. 3. Now fully supports convert AVCHD (*.mts, *.m2ts) videos to iPad compatible video formats, e.g. convert AVCHD to iPad (720p) H.264 HD video. This special holiday offers are valid until January 15th, 2011 ,and you must purchase it on this special discount page: (Very important!) Aneesoft's biggest sale of the yearStepsPart1 How to convert DVD movie for your iPadStep 1: Download & install Aneesoft iPad Converter suit for Mac Step 2: Run Aneesoft DVD to iPad Converter for Mac and load DVD movies to convert Step 3: Select the titles you'd like to convert and Set the iPad output profile format Step 4: Edit your videos: trim, crop, effect, watermark and deinterlace(optional) Step 5: Start ripping and converting DVD to iPad supported video format Step 6: Make these videos syncing to iPad After convert DVD to iPad compatible formats, now we can import the converted files to iPad. First, you need to launch iTunes, click File option on menu, and add your converted files to iTunes library. Then, connect your iPad 4 to computer via USB cable, iTunes will detect your iPad. After that, click iTunes "File -> Sync iPad", and the files will be transferred to your iPad from iTunes library. When updating completed, you will find the videos on you iPad. Part2 How to convert any videos to iPad supported formatStep 1: Download & install Aneesoft iPad Converter suit for Mac Step 2: Run this program and add videos that you want to convert Step 3: Edit & merge these videos: trim, crop, add effect, add watermark Step 4: Change the output settings to convert videos to iPad on Mac
| |


