|
 mer. 24 déc. 2014, 03:44 mer. 24 déc. 2014, 03:44
|
Copy "The Lego Movie(2014)" Blu-ray onto Western Digital My Book Live for roku streaming with Mac OS X Can I backup Blu-ray to Roku 3 for streaming on Mac OS X Tags:backup blu-ray on mac,copy bd onto My Book Live,stream blu-ray to roku,put bd onto Western Digital My Book Live,make a copy of blu-ray disc Summary: This article introduces how to backup or copy "The Lego Movie(2014)" Blu-ray disc to Western Digital My Book Live on Mac, so that you can watch the movie on Roku without format problems. Review: Everything About 'The Lego Movie" It would have been so much easier, and so much safer, for directors Phil Lord and Christopher Miller to just make the kind of Lego Movie that you probably expected from the marketing. They could have crafted a simple heros journey, crammed with celebrity cameos and postmodern humor, and called it a day while watching the money roll in and the toy sales shoot through the roof. And there are all of these elements in this particular Lego Movie, but there is also something more. The film goes in some wonderfully unexpected directions and takes real storytelling risks. I cannot say how everyone will respond to its narrative left turns and unexpected poignancy, but they elevate to the film far above a glorified toy commercial. The Lego Movie may in fact be brilliant. Expected release date for The Lego Movie DVD and Blu-ray discs is May-June, 2014. How to bacup "The Lego Movie(2014)" Blu-ray onto Western Digital My Book Live" on MacWith "The Lego Movie(2014)" to be released on Blu-ray, I have the question: how to digitize a blu-ray movie and put it on my western digital mybooklive device for streaming onto roku devices with Mac OS X? To copy my Blu-ray on My Book Live with Mac, it may take a lot of energy. Although, MacX DVD Ripper Pro Wondershare Video Converter Ultimate and iDVD can do this, none of them can be easier to use that Pavtube. The best BDMagic for Mac from Pavtube can help you back up Blu-ray and DVD movies to Mac hard drive, copy them to Home Server, NAS for storage and watching them on HDTV and HD Media player including PS3, PSP, Xbox, Dune HD Player, WD TV Live within few clicks. Really simple interface and powerful function. On the roku, I use the roksbox channel, configured to steam movies from the WD/apache server. Works really good on my home network. Great News!!! Pavtube Software officially released its 2014 Thanksgiving Deal. UP to 50% off is provided lasting to December 10. Don't miss it! And find more 2014 Thanksgiving Day, Black Friday Holiday Cyber Monday Crazy Promotion at Pavtube Facebook. Detailed steps to copy "The Lego Movie(2014)" Blu-ray to My Book Live on MacBefore copying Blu-ray discs check what you need: 1. An external Blu-ray drive. 2. Top Mac Blu-ray Ripper software - Pavtube Blu-ray Ripper for Mac 3. Internet connection. 4. "The Lego Movie(2014)" Blu-ray disc. You can also free download Pavtube Blu-ray Ripper for Mac and have a try. Step 1. Install and run the Top Blu-ray Ripper for Mac and insert Blu-ray disc into the Blu-ray drive, the Ripper will automatically load the disc information. Make sure you have enough space on your drive (depending on the disc, this could be up to 50 GB). 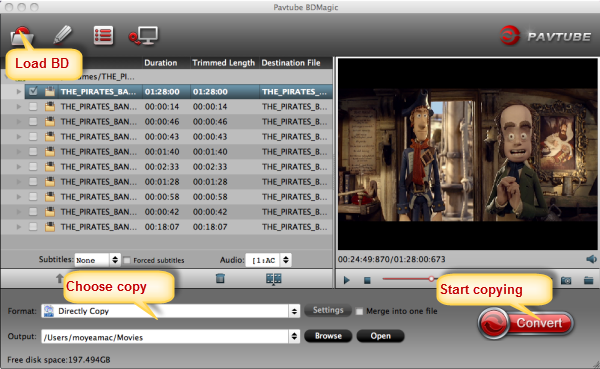 Step 2. To copy the M2TS/ VOB streams only without menus and ads, pls choose the "Directly copy" option in "Copy". (The main movie is selected by default.) Or you can click on Copy the entire disc button to back up Blu-ray movie to Mac. A 90 min. Blu-ray takes about 40 min to copy to Mac hard drive. The ripped Blu-ray directory contains two folders, BDMV and CERTIFICATE. Then the ruku is able to play the M2TS files from Blu-ray directory. 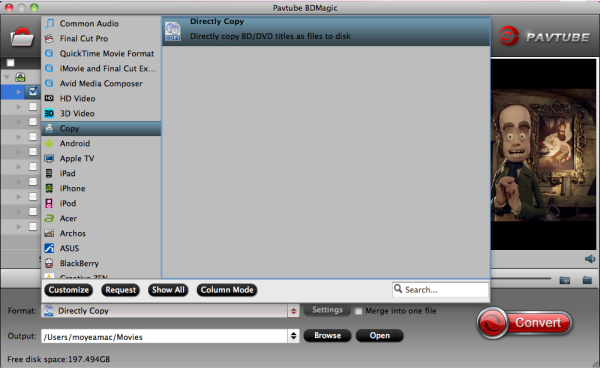 Step 3. Specify an output folder to save Blu-ray movie. Click Browse button and specify an output location. Make sure there is enough space for a whole BD movie (usually 25GB-50GB) when backing up Blu-ray disc to Mac HDD. Step 3. Back up Blu-ray/DVD for My Book Live on Mac. After the copying process completes, you can get the final output files by clicking Open button with ease, then copy resulting file to My Book Live and then stream onto your Roku. Additional TipsThe Top BDMagic for Mac can help you remove Blu-ray protection and rip "The Lego Movie(2014)" Blu-ray to common formats: MP4, AVI, MOV, MKV, WMV, SWF, FLV, F4V, etc. Most popular portable devices are also supported, so that you can enjoy Blu-ray movies on your iPhone 5S, iPhone 5C, iPad 4, iPad 3, Surface RT/Pro, Surface 3, Surface Pro 2, Sony Xperia Z2, Motorola Droid Mini, Moto X, Samsung Galaxy Tab 3 10.1/8.0, Galaxy Note 5, Google new Nexus 9, Kindle Fire HDX... Plus, Pavtube application takes advantage of the NVIDIA CUDA technology and AMD APP technology, and the conversion speed can be increased up to 6 times faster than ever before. Moreover, Pavtube programs support adding *.srt and *.ass subtitles into video and merge into one file for output. Money Saving Boundles: BDMagic($49) + Vidpie($29) = Only $49.9, Save $28.1 BDMagic($49) + DVD Creator($35) = Only $49.9, Save $28.1 DVDAid($35) + Vidpie($29) = Only $49.9, Save $14.1 DVDAid($35) + DVD Creator($35) = Only $35.9, Save $34.1 Related Articles: Play DVD/Blu-ray on PC With Multiple Audio Tracks/SubtitlesRip DVD to iPad Air/iPad Air 2 with the Subtitles or Closed Captioning burned on MacFree AVI Players for Mac (Mavericks & Mountain Lion Included)Best Tips for Playing Disney Animated DVD Films on Kindle Fire HDRoku 3 Not Playing Blu-Ray Rips?View The Expendables 3 Blu-ray on iPad Air 2 from NAS DriveSource: http://digisns.com/2014/08/stream-blu-ray-to-roku-3/
mer. 24 déc. 2014, 03:43
|
The way Adding multiple WMV video files to iTunes Library on Mac Tags: add WMV to iTunes library,can't transfer WMV to iTunes,put WMV to iTunes,move WMV to iTunes,does iTunes spport WMV videos Do you want to sync WMV Videos to iTunes for transferring to Apple devices? This article mainly introduces the easy solution to add multiple WMV files onto iTunes on Mac. 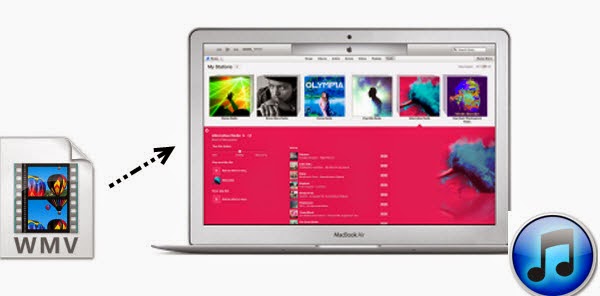 WMV is a widely-used video format on Windows. But as the typical Windows Media Video format, iTunes currently does not afford WMV files on Mac. So you may always fail whenever trying to sync WMV to iTunes. To solve this problem, the best answer is to convert WMV to iTunes compatible videos so you can transfer them to your iPhone, iPad, iPod, or stream to Apple TV etc for playback. Now let's go to learn how to do it. Great News!!! Pavtube Software officially released its 2014 Thanksgiving Deal. UP to 50% off is provided lasting to December 10. Don't miss it! And find more 2014 Thanksgiving Day, Black Friday Holiday Cyber Monday Crazy Promotion at Pavtube Facebook. How to convert WMV Videos to iTunes on Mac from syncing to Apple deviceStep 1. Run the Pavtube WMV to iTunes Converter for Mac, drag and drop source video to the program. Tips: If you are Windows users, try Pavtube Video Converter Ultimate. 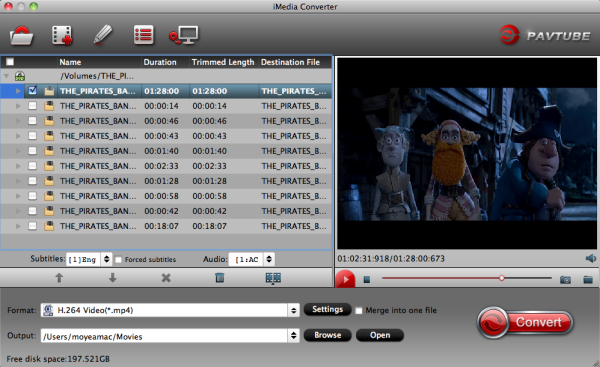 Step 2. Click on Format bar, and Choose iTunes compatible format for Apple devices. Choose the iTunes supported formats in the "Format" dropdown list. You can go to "Common Video" or "HD Video" options to find what you like. I think H.264 MP4 format is better for iTunes. 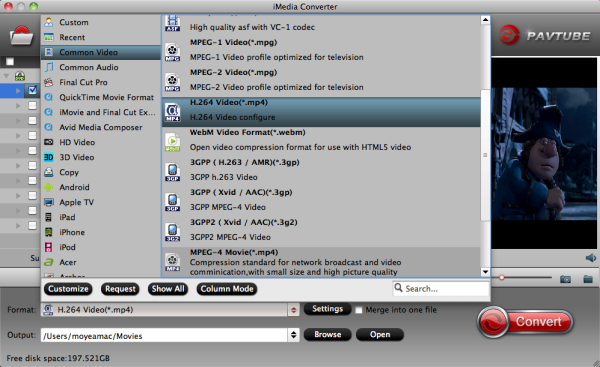 But, here you are recommended to choose the Apple devices like iPad, iPone, Apple TV, etc directly. Find a suitable format under these Apple devices options. Tips: For some advances users, you can go to adjust video and audio parameters like bitrate, resolution, channels, etc. Click "Settings" button you can go to check and change them as you like. Step 3. Press on Convert to start encoding WMV Videos to iTunes compatible video on Mac. Step 4. When conversion completes, press on Open to locate converted videos. Drag and drop these movies to iTunes. Now open your iTunes and then sync the converted WMV to iTunes library for convenient playback on Apple devices. Transfer videos to your iTunes library:Drag a file or folder from the desktop to the iTunes window. If you add a folder, all the files it contains are added to your library. In iTunes, choose File > Add to Library, locate a file or folder, and click Open. In this way, you can enjoy your favorite WMV Videos on your iPad/iPhone/iPod wherever you are. Money Saving Boundles: ByteCopy($42) + Video Converter Ultimate($65) = Only $79.9, Save $27.1 ByteCopy($42) + DVD Creater($35) = Only $44.9, Save $32.1 ByteCopy($42) + Vidpie($29) = Only $54.9, Save $16.1 Video Converter Ultimate($65) + DVD Creater($35) = Only $64.9, Save $35.1 You may also like:Rip/Sync Blu-ray to iTunes with forced subtitlesHow to Download DVD Movies Into iTunesConverting ISO image files to to iTunes 11 compatible videosSync Amazon Videos/Movies to iTunes for iPhone 5S/5C/5/4S, iPod 5Source: http://iappsnow.com/2014/12/add-mkv-videos-to-itunes/
lun. 22 déc. 2014, 10:24
|
Best way to rip and put CDs and DVDs to WD My Cloud With Pavtube BDMagic for Win/Mac, you can easily convert your CDs and DVDs files to WD My Cloud for storage and streaming freely. Instead of storing your files on the Internet, WD's My Cloud is a local networked repository for all your content so you can access it from your Mac (ideal for those of us that have a low capacity flash drive in our laptops) as well as your iPad, iPhone or Android device using free WD MyCloud apps. With Pavtube BDMagic for Win/Mac, you can easily convert your CDs and DVDs files to WD My Cloud for storage and streaming freely. Great News!!! Pavtube Software officially released its 2014 Thanksgiving Deal. UP to 50% off is provided lasting to December 10. Don't miss it! And find more 2014 Thanksgiving Day, Black Friday Holiday Cyber Monday Crazy Promotion at Pavtube Facebook. Instead of storing your files on the Internet, WD's My Cloud is a local networked repository for all your content so you can access it from your Mac (ideal for those of us that have a low capacity flash drive in our laptops) as well as your iPad, iPhone or Android device using free WD MyCloud apps. To avoid scratches and make it easy for management, many people digitalize their physical CD/DVD discs and save them on WD My Cloud for convenient access. In this guide, we show you how to rip CD/DVD video files to WD My Cloud. Software Requirement:Pavtube Pavtube BDMagic or BDMagic for Mac which is such a wise choice for you which enables you to rip Blu-ray discs to universal video and audio file types as you need. You can rip and convert Blu-ray to WD My Cloud with super fast conversion speed and excellent image and sound quality. What's more, with this Blu-ray ripping tool, you can easily backup your Blu-ray disc with whole content copy or backup main movie. Get it now to enjoy 2014 Halloween Promotion to buy BDMagic/BDMagic for Mac and get Pavtube Video Converter for Win/Mac free. Let's have a closer look at the basic steps. 1. Run Pavtube CD/DVD to WD My Cloud Converter, and click the disc botton to import the disc that you want to convert for viewing. 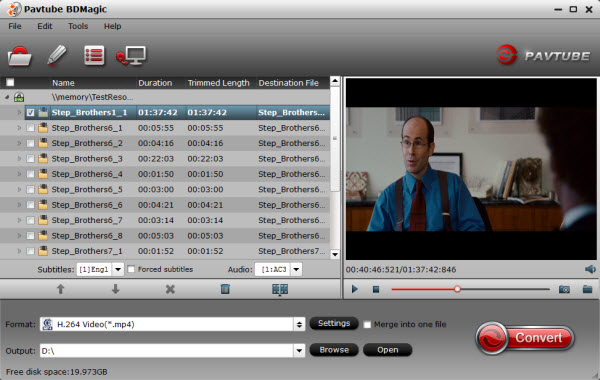 2. Highlight the movie title you want to rip, and then you can click the dropdown menu after Subtitles and Audio respectively to select your wanted subs and audio track to be preserved in the resulted files. 3.As My Cloud is powerful enough to almost all kinds of formats, you can choose the format according to your own needs. Or just search the device you want to stream to by enter the name in the serch box and find the profile. 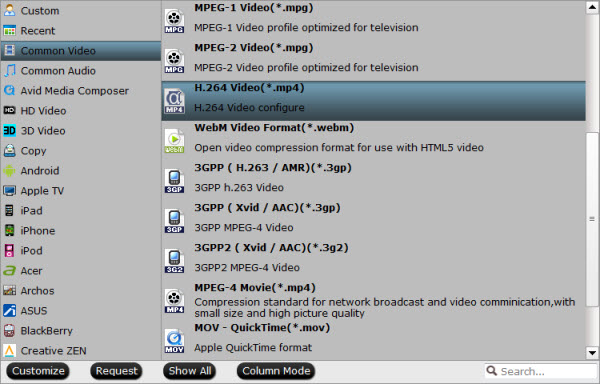 4. Click "Settings" button to configure file quality. After entering Profile Settings panel, you are allowed to adjust video and audio parameters such as bit rate, frame rate, sample rate and more. The recommended video settings have been presetted. Note: If you prefer a much better video quality and dont mind the output file size, you can rise the video bit rate higher. Generally speaking, the higher video bit rate will result in the larger output file size, and vice versa. 5. Click "Convert" button to start CD/DVD to WD My Cloud Conversion. As soon as the conversion is done, you can click Open button to get the generated files and transfer them to your WD My Cloud. Then stream your video onto any smart TV or devices in the house. In conjunction with the WD My Cloud disk you should be able to stream videos on holiday which will be great for the family members and friends. Just enjoy! Plus, getting DVD discs to External Hard Drive for playback on HDTV is so easy! If you have some Blu-ray discs, learn to backup them to access Home Entertainment System. Or read how to make perfect copies of my BD/DVD library with lossless mkv format. Money Saving Boundles: BDMagic($49) + Vidpie($29) = Only $49.9, Save $28.1 BDMagic($49) + DVD Creator($35) = Only $49.9, Save $28.1 DVDAid($35) + Vidpie($29) = Only $49.9, Save $14.1 DVDAid($35) + DVD Creator($35) = Only $35.9, Save $34.1 See also: Can I Keep iTunes Rental Movies Forever on my Computer, Tablet or Phone?Top 5 Free Online VOB to AVI ConverterStream M4V movies from iTunes Library to WiiComplete guide on freely Ripping Blu-Ray Collection for post-productionBest CUDA Video Converter: Convert Video via CUDA GPU AccelerationTech Specs & Video Formats & Tips for your Surface Pro 4 Source: http://multimediatips.jimdo.com/2014/11/04...to-wd-my-cloud/
lun. 22 déc. 2014, 10:23
|
How to Watch Video TS Files This article mainly discusses convert Video TS files from your DVD disc to play on Windows/Mac without limitation. The video files on a DVD are encoded using the MPEG 2 format, which can also be played on most computers using multimedia playback software. However, a DVD's file structure requires the MPEG 2 videos to be stored in a very specific way, beginning with the files all being added to a folder called "Video_TS." As all DVD discs are required to use this specific file and folder structure, most multimedia playback packages for your computer are able to recognize Video_TS folders and decode the MPEG 2 files stored within.  Option 1: GOM PlayerStep 1 Option 1: GOM PlayerStep 1Download an AC3 audio codec to your computer (see Resources), right-click the file and select "Extract Here." Step 2Double-click the setup file and allow the codec to install. This enables your computer to decode the audio component of the DVD files stored in the Video_TS folder. Step 3Download and install GOM Player on your computer, using the "Standard Installation" option when prompted (see Resources). This associates all compatible files with GOM Player, making it your computer's default multimedia player. Step 4Open the Video_TS folder on your computer and double-click the "VIDEO_TS.IFO" file. GOM Player automatically launches and displays the "Codec Finder" function. Click the "Find Codec" button. A search page opens in your computer's Web browser with a link to the required MPEG 2 video codec. Step 5Click the link to download the MPEG 2 video codec, and then double-click the file to install it once download has completed. Step 6Click the "VIDEO_TS.IFO" file in the Video_TS folder again. GOM Player automatically launches and playback of the Video_TS file begins. Option 2: KMPlayerStep 1Download and install KMPlayer on your computer and launch it once installation is complete (see Resources). Step 2Click the "File" menu and select "Add Folder." Step 3Navigate to the Video_TS folder on your computer, select it and click "Open." Playback of the files within the Video_TS folder begins. Opiton 3: Media Player Classic Step 1Download and install Media Player Classic on your computer and launch it once installation completes (see Resources). Step 2Click the "File" menu and select "Open." Step 3Navigate to the Video_TS folder on your computer. Step 4Click the "VIDEO_TS.IFO" file in the Video_TS folder and click "Open." Playback of the files stored within the Video_TS folder begins. Great News!!! Pavtube Software officially released its 2014 Thanksgiving Deal. UP to 50% off is provided lasting to December 10. Don't miss it! And find more 2014 Thanksgiving Day, Black Friday Holiday Cyber Monday Crazy Promotion at Pavtube Facebook. Tips - You may not need to install the MPEG 2 and AC3 codecs for a new multimedia playback package if they have previously been installed on your computer by a different multimedia package.
- Media Player Classic and KMPlayer have the MPEG2 and AC3 codecs built into their software, negating the need to install them separately.
- You do not need to select each individual file in the Video_TS folder. After clicking the "VIDEO_TS.IFO" file, your multimedia playback software detects the other files stored in the folder and opens them automatically as required during playback.
- An "Audio_TS" folder is also present on a DVD disc, but isn't typically required for playback on your computer.
However,due to codec issue, you will find that Video TS files are not supported by some media players or mobile devices by default. To play Video TS Files in Windows/Mac without any crashing issues when watching, a quick workaround is to convert the Video TS to common formats (like AVI, MOV, MPEG, WMV, etc) to fit the local media player with Video Converter Ultimate from Pavtube. Money Saving Boundles: ByteCopy($42) + Video Converter Ultimate($65) = Only $79.9, Save $27.1 ByteCopy($42) + DVD Creater($35) = Only $44.9, Save $32.1 ByteCopy($42) + Vidpie($29) = Only $54.9, Save $16.1 ByteCopy($42) + MXF MultiMixer($45) = Only $69.9, Save $16.1 If you are Mac users, you can try Pavtube iMedia Converter for Mac. Below is easy steps for you, you can convert Video TS files to compatible formats for watching on Win/Mac. Step 1: Add Video TS video files Run Pavtube Video Converter Ultimate, and then click "Add Video" add to import the Video TS video files to the converter. 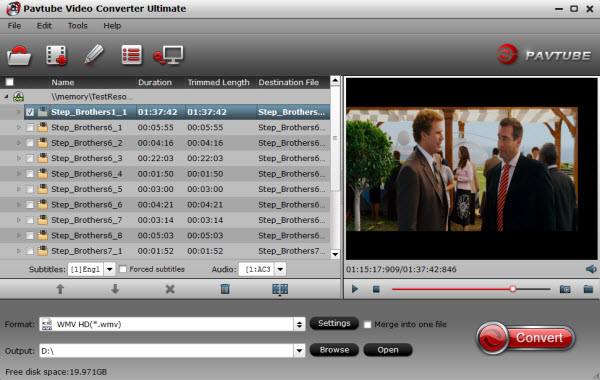 Step 2: Choose output format to fit your media player. In Format drop down list box, you may select best video format for plaing. For example, You can choose "WMV HD(*.wmv)" from "HD Video" for Windows Media Player. And select "MOV - QuickTime(*.mov)" from "Common Video" for QuickTime Player. 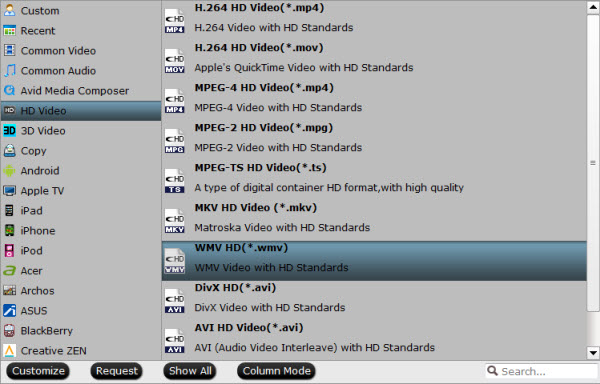 Step 3: Start Convert Click Convert in the main interface to start transcoding Video TS videos. After conversion, you can use converted Video TS files for playback easiliy and smoothly on your media player. Now choose the best method to play Video TS extension video files on PC and Mac! ReferencesGOM Lab: How Do I Watch DVDs With GOM Media Player?FileInfo.com: What is the Purpose of the VIDEO_TS Folder On My DVD?See also: Can WD TV (Live, Plus, Hub) play DVD VIDEO_TS folder?Best solution to view VIDEO_TS files on Windows 8.1/MavericksHow to Convert DVD Folder Video_TS to MKV formatPlay Video_TS files on Android and iOS tabletsSamsung Galaxy Note Edge Media Formats and Media Files TransferPavtube iPhone 6 Topic to Maximize Your Entertainment Source: http://device-camcorder-tips.blogspot.com/...pc-or-imac.html
lun. 22 déc. 2014, 10:20
|
How to Download DVD Movies Into iTunes Tags:DVD to itunes,download dvd to itunes,rip DVD to ipad,copy DVD to iphone,transfer DVD to ipod Want to rip DVD to iTunes supported video formats? Simply follow this article to rip and sync DVD movies to iDevice like iPhone, iPad, iPod, etc. with the top DVD Ripping software program. iTunes enables you to import and watch videos directly on your PC, but it doesnt include a feature for downloading content from a DVD. To help your easily add DVD movies to your iTunes library, you have to get aid of a DVD ripping applicaion at first to help you rip DVD to iTunes compatible videos before transferring them to your iPhone, iPad, iPod, or stream to Apple TV etc. for playback.  The process of extracting audio and video from a DVD is commonly referred to as ripping. Ripping also includes the process of encoding, which converts the DVD content to a specific digital file format, such as MP4. Here, the best program I can recommend is Pavube DVDAid- the Best DVD Ripping software program, which can help you rip DVD to iTunes supported video formats quickly and easily and with good video quality. Besides that, you can crop the black bars, add special video effects, split or merge videos, etc. as you like with the built-in editor. Just get it and rip DVD to iTunes supported videos for playback on your iPad Air, iPad Mini 2, iPhone 5S, iPhone SC, iPod touch, etc. in just a few mouse clicks! The equivalent Mac version is Pavtube DVD to iTunes Ripper for Mac. Just get the right one according to your situation. Great News!!! Pavtube Software officially released its 2014 Thanksgiving Deal. UP to 50% off is provided lasting to December 10. Don't miss it! And find more 2014 Thanksgiving Day, Black Friday Holiday Cyber Monday Crazy Promotion at Pavtube Facebook. Free Download the DVD to iTunes Ripper and follow the brief guide below to make your DVD playable on iDevice (iPhone/iPad/iPod) How to Watch DVD Videos on iPhone, iPad, iPod via iTunes Part 1: Convert DVD to iTunes Step 1. Run DVD to iTunes Converter; load DVD movies Click the disc button to browse and import DVD disc from ROM, or load the ISO/IFO files that you want to convert for viewing on Apple iOS-based devices. 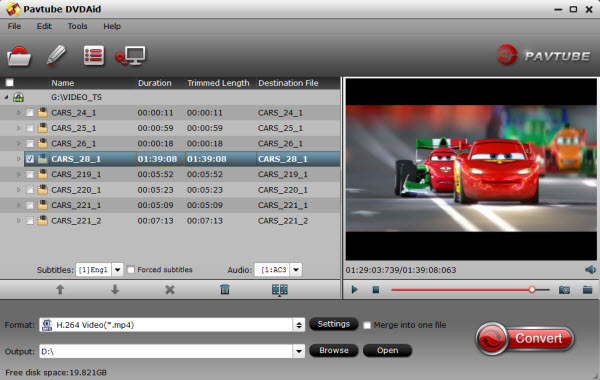 Pavtube DVDAid will detect and list the main title (the full length of this movie with all the chapters) and check it by default. So just keep it untouched and lets move on to Step 2. Step 2. Choose export formatYou can click the dropdown menu between Format and Settings, you will see many presets sorted of different device models and programs. Move your cursor over the left column to locate your device model/manufacturer, or you can try the small search box on the bottom right corner. 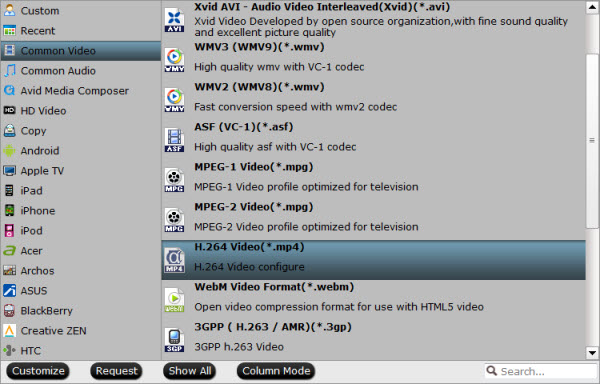 For example, if you own an iPhone, iPad, iPod, just choose the best profile from iPad/iPhone/iPod column. Step 3. Adjust specs or edit video before conversion (Optional) Click Settings button to configure target file quality. After entering Profile Settings panel, you are allowed to adjust video and audio parameters such as bit rate, frame rate, sample rate, etc.. If you prefer a much better video quality and dont mind the output file size, you can rise the video bit rate higher than 1500. Generally speaking, the higher video bit rate will result in the larger output file size, and vice versa. 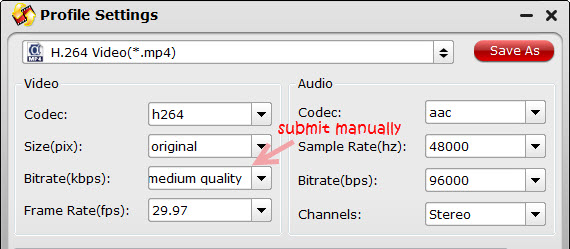 Step 4. Start conversion Step 4. Start conversionNow hit the big red Convert to start converting DVD movies to MP4 with best settings for playback on different idevices. After the conversion, you can get the converted DVD rips in *.mp4 format by clicking the Open or Open output folder icon. http://www.multipelife.com/sync-media-file...-to-iphone.htmlPart 2: Import DVD to iTunes library to sync to iPhone/iPod/iPad Requirement:iTunes (the latest version iTunes 11 is recommended); iTunes Store account; Internet access (if necessary) 1. Launch iTunes 11, add the movie video file to your iTunes library, create versions optimized for your device using the Advanced menu. 2. Click "Add to File" under "File" and browse and add the converted DVD video to your iTunes library. iTunes 11 will auto classify it in Movies category. You can play it directly on iTunes. 3. Drag the DVD movie to your iOS device including iPhone, iPad, iPod,etc. from iTunes library. Or you may sync the video to iPad iPhone iPod. After that, you have successfully transferred DVD video from iTunes to iOS device for playback. With DVDAid or DVDAid for Mac, you can have DVD videos in iTunes library as many as possible to enjoy HD videos without buying. It may help rip copy protected DVDs to iTunes11 on PC or Mac. It is fair legal to backup your own DVDs for non-commercial use. Money Saving Boundles: BDMagic($49) + Vidpie($29) = Only $49.9, Save $28.1 BDMagic($49) + DVD Creator($35) = Only $49.9, Save $28.1 DVDAid($35) + Vidpie($29) = Only $49.9, Save $14.1 DVDAid($35) + DVD Creator($35) = Only $35.9, Save $34.1 Related articles: Stream/Transfer Blu-ray to iTunes for Apple TV 3 with AC3 5.1 on MacGetting DVD (ISO) video files into iTunes for Apple TV 3 with Dobly Digital 5.1 audioRip DVDs to iTunes 11 on your Mac to watch movies freelyHow to Stream Audio and Video with VLC Player?How to Improve Your YouTube Viewing Experience on iOS Devices?No Trouble Importing and Editing with iMovie Source: http://multimedia-hive.com/2014/10/17/rip-...unes-12-on-mac/
ven. 19 déc. 2014, 12:00
|
5 Tips You Should Keep in Mind While Selecting Reliable DVD Ripper Tags:top dvd ripper,best dvd converter,select dvd ripper,converting dvds,play dvd on portable devices With so many DVD Rippers available on the market, it can be tough to know exactly which one to choose. Here are 5 Tips You Should Keep in Mind While Selecting Reliable DVD Ripper and select the best one for DVD entertainment. Portable devices bring entertainment to our life, like, games, music, video, TV shows, etc. Due to their high audio video quality and big memory, it will be a wonderful experience to watch movies and videos on the move. If you have a collection of DVDs, you can also watch beloved DVD movie on these mobile devices like iPhone, iPad, iPod, Apple TV, Android, PSP, PS3, Xbox, etc.  However, different multimedia devices support different formats, then you need a professional DVD Ripper to convert DVD movie to video formats which can fit for you portable devices, and your ripping process will become very easy if you have the correct software. With so many converting tools in the market which may make you lost and drop you into the dilemma because you dont know which one you should choose. Followed are 5 tips for you to help you find the most suitable converter.1. Select easy-to-use converter with intuitive interface and all the formats it supports should be clearly written in an understandable manner. 2. Choose the converter provided free trial since the easiest software is of no use if it doesnt seem easy particularly to you. 3. Make sure the converter is compatible with popular formats so that you can convert DVD to play on portable devices like iPhone, iPod, iPad, Samsung, HTC, Nokia, etc. 4. Purchase converter equipped with free lifetime technical support. 5. Make sure the converter can ensure high output audio & video quality. Here I will recommend Pavtube DVDAid - a powerful DVD Ripping & coping tool which is a reliable DVD ripping software and can fully meet these standards. Surprisingly we found it's on 40% off at Pavtube New Site Special. Overall, Pavtube DVDAid is designed as a professional DVD converting program which works with 1:1 backup solution and convert DVD to Apple/Android/Windows Devices for watching. Well I haven't got the chance to try every profile, but it's really the top DVD backup tool I've met ever; I mean it's ease of use, not fuss and simple to follow. Don't you like to have a try? They provide free trial (no time limitation) before purchase; and you can reach the Mac version here (Also 40% off now). Rolls off DVD disc protection and rip DVD to fit for your portable devicesStep 1. Run Best DVD Ripper and import disc. Click this icon to load disc from ROM, IFO/ISO or folder. I also noticed if you have a ISO file to import, it will recognize the ISO file automatically with no need to run virtual driver and mount ISO files firstly. Good design. 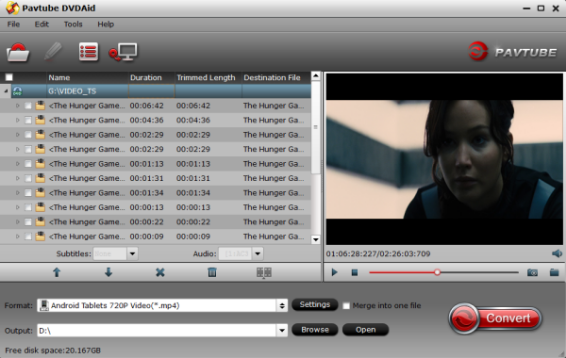 Step 2. Step 2. Choose format. Click "Format" drop-down list and choose proper format for different using. For people who want to watch DVD on Apple/Android/Windows devices, you can choose "Common Video > H.264 Video (*.mp4), or select corresponding video from iPad or Android or other option, to get a suitable video compatible with your device. 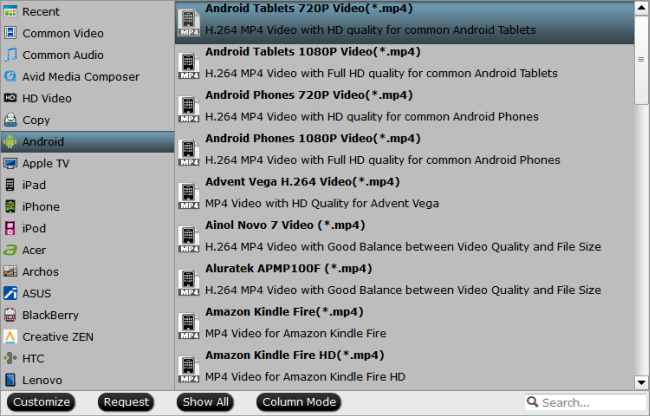 Tip: Tip: If you simply want to back up DVD to external hard drive, here are two solutions: 1. Click the "computer" icon on the top to output 1:1 DVD file exactly the same as original. 2. Select "Copy>Directly Copy" in format list to output an intact m2ts file of the main title. 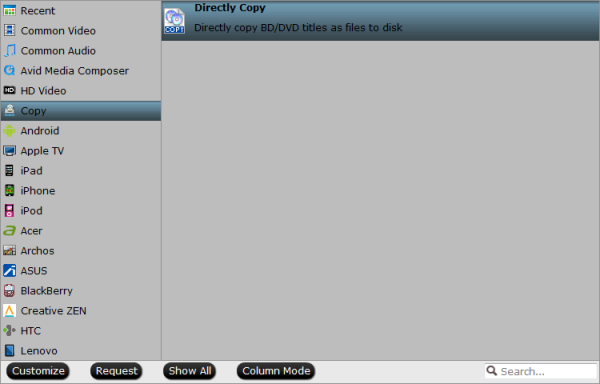 Step 3. Step 3. Change video specs. (Optional) If you are not satisfied with default specs, then click "Settings" to enter Profiles Settings windows. You can customize video frame rate, bitrate, size and other settings freely. (It does not work for directly copy) Step 4. Start conversion. Click the big red "Convert" to start backing up or converting your DVDs. Usually backup will be quicker because it does not need to do trancoding. After the conversion, click "Open output folder" to quick locate converted files. Now start to enjoy your DVD movies on your portable devices with this reliable DVD Ripper. Money Saving Boundles: Video Converter Ultimate($65) + DVD Creater($35) = Only $64.9, Save $35.1 BDMagic($49) + Vidpie($29) = Only $49.9, Save $28.1 BDMagic($49) + DVD Creator($35) = Only $49.9, Save $28.1 DVDAid($35) + Vidpie($29) = Only $49.9, Save $14.1 DVDAid($35) + DVD Creator($35) = Only $35.9, Save $34.1 See also:How to Easily Compress DVD Files with high resolutionRip and Stream Blu-ray/DVD discs for playing on HDTV2014 Top 5 DVD Movie Converter for Portable devices, HDTV and HD Media Players Edit G2M WMV videos in MovieMaker & FCP for Upload VimeoQuickTip: Convert MKV, TiVo, M2TS, VOB to QuickTime MOV on MacSource: http://techmovieshare.blogspot.com/2014/05...dvd-ripper.html
ven. 19 déc. 2014, 11:59
|
Watch 2D-3D Blu-ray movies on PS4 without Blu-ray Drive Tags:convert blu-ray to ps4,watch blu-ray on ps4,rip 3d blu-ray for ps4,ps4 play blu-ray movie,copy blu-ray to ps4 Summary: Is there any way to rip 2D/3D Blu-ray to PS4? This tutorial will guide you to convert your Blu-ray disc to PS4 supported files for enjoying. Whether you choose the 2013 Sony PlayStation 4 or MS Xbox One at last, gamers are the winner. Almost seven years later to the day of the PS3′s release, and now well into the maturity of the Blu-ray format, Sony has released its PlayStation 4 console, again with a built-in Blu-ray playback device as part of the $399 kit, a significant drop in launch day price from the PS3′s $499 base model/$599 expanded hard drive launch models. If you plan to watch Blu-ray movies on PS4 via Blu-ray drive, you will spend much money on PS4s Blu-ray drive. 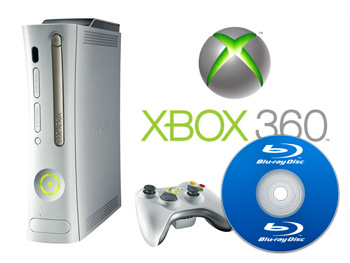 Currently, the PlayStation 4 only plays 2D Blu-ray discs. 3D content is inaccessible at this time, and 3D discs read only a static incompatibility message, which varies by disc. The PS4 does support Blu-ray profiles 1.1 (Bonus View) and 2.0 (BD-Live). Is there another way to stream and play Blu-ray movies on PlayStation 4 (PS4)? How to play 3D Blu-ray on PlayStation 4 (PS4)? Funtunately, here is an easy solution, you can rip and convert them to the PS4 compatible MP4 format and then get a wonderful playback effect on the PlayStation 4. When it comes to ripping a 2D/3D Blu-ray into a MP4 format that could be played on PlayStation 4, an app called Pavtube BDMagic can help you easily rip and convert Blu-ray disc (2D/3D) to PS4 supported video format at super fast speed. Great news for you! To celebrate the upcoming Easter Day, Pavtube Studio is planning to offer unique promotion items at Facebook. If you are interested, please follow us at our Facebook Page to get the latest news. Never miss your awesome Easter gifts and Specials!!! To be honest, the 3D Blu-ray Ripper is easy to use for editing and conversion and makes great quality copies of all 3D Blu-rays. It is capable of ripping 3D Blu-ray discs, 2D Blu-ray Discs and standard DVDs to your required HD and SD media formats in 2D quality. The audio/video synchronization is very good, the size of the subtitles too. For Mac users, try Pavtube BDMagic for MacHow to use it to convert 2D/3D Blu-ray movies to PS4 supported format?Step 1: Load Blu-ray movie to the 2D/3D Blu-ray Converter. Insert your 2D/3D Blu-ray movie to disc drive, and click Load Disc button on Pavtube Blu-ray Ripper for Mac interface to load Blu-ray from ROM; it also support importing Blu-ray ISO and Blu-ray folder. 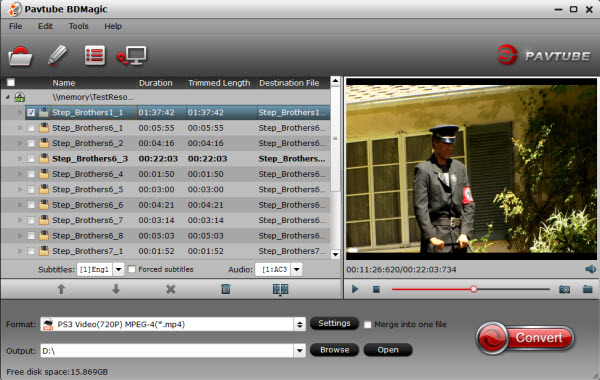 Step 2: Select video format. Here we select mp4 with H.264 codec for PS4. Click the Format drop-down list, and select PS3 Video(720P) MPEG-4(*.mp4)" from PSP/PS3 category. You can select other format from PSP/PS3 option for watching. 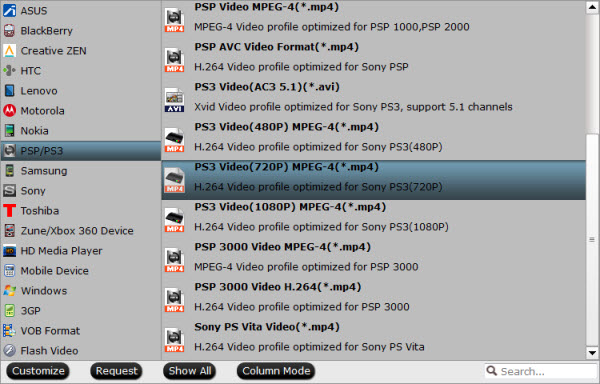 Tips: If you have special requirements on target video, click Settings to customize video size, bitrate, frame rate and sample rate. Step 4. Ripping 2D/3D Blu-ray to 2D MP4 for PS4. Click the red Convert button to start ripping 2D/3D Blu-ray to 2D H.264/MPEG-4 MP4 for PS4. When it finishes, click the Open Output Folder icon to quick locate the converted video. Once get the converted videos, just copy and dump them to PS4 via USB. Then you are ready to play blu-ray movies on PS4 freely. Money Saving Boundles: Video Converter Ultimate($65) + DVD Creater($35) = Only $64.9, Save $35.1 BDMagic($49) + Vidpie($29) = Only $49.9, Save $28.1 BDMagic($49) + DVD Creator($35) = Only $49.9, Save $28.1 DVDAid($35) + Vidpie($29) = Only $49.9, Save $14.1 DVDAid($35) + DVD Creator($35) = Only $35.9, Save $34.1 Related ArticlesHWill PS4 be able to play MKV/AVI video files?How to stream movies to Sony PS4 from USB Flash Drive on Mac?Convert DVD to PS4 without quality loss for enjoying freelyStore MKV M2TS to Sony PS4 Play HD Movies on a Display through PS4 Source: http://mediaconverting.blogspot.com/2014/0...ies-on-ps4.html
ven. 19 déc. 2014, 11:59
|
Rip Blu-ray to SBS 3D MP4 for 3D TV watching on Mac Tags:Blu-ray,Rip blu-ray to 3d sbs mp4,convert 3d blu-ray movie to sbs video,play bd on 3d tv,3d blu-ray ripper for mac,blu-ray ripper with sbs output,3D TV Summary: Want to rip and copy 3D Blu-rays on Mac to 3D SBS MP4 format? This article gives details about how to get it done with the best 3D Blu-ray ripper for Mac. Q: As a BD disc lover, I need a way to rip Blu Ray 3D to SBS MP4 format for watching on 3D TV through apple tv, had been using free handbrake for years and that will not create SBS files. Anyone know of some software or way to rip blu ray 3d to mp4 sbs? As the popularity of 3D Blu-ray movies, more and more problems about how to rip 3D Blu-ray arose. In this article, I will share a step-by-step guide on converting 3D Blu-ray to SBS MP4 format on Mac. Tools needed: 3D TV; any 3D Blu-ray discs; Blu-ray to SBS Converter for Mac; 3D glasses The only thing you need to do is rip your 3D Blu-ray movies to side-by-side 3D MP4 format before playing on the 3D TV. As one of the best BD/DVD disc handling tools on the market, Pavtube 3D Blu-ray Ripper for Mac would be the suitable application with SBS output to complete the process of ripping blu-ray movies to side-by-side 3D MP4 on Mac. Pavtube is simpler to use, less steps, but just as many options if chosen. The equivalent Windows version is 3D Blu-ray Ripper. Full Guide: Rip 3D Blu-ray movies to 3D SBS MP4 format for watching on 3D TV on Mac Step 1: Install and launch the latest Pavtube 3D Blu-ray Converter onto your computer; then click "Load files" to import Blu-ray, Blu-ray ISO/IFO or Blu-ray/DVD folder. Choose subtitle, language or forced subtitles in the main interface. 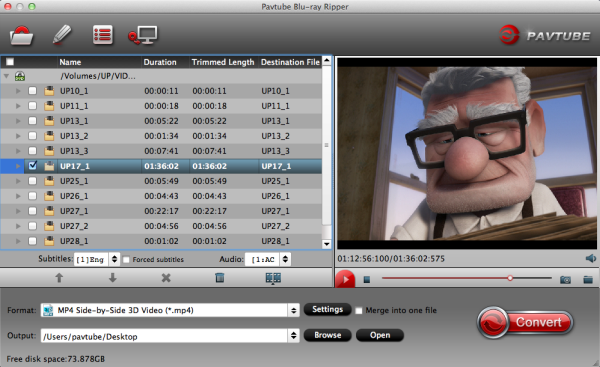 Step 2: Step 2: From the Format bar, find "3D Video" catalogue, you will find several presets for Side-by-Side 3D, Top-Bottom 3D and Anaglyph 3D. You can choose the one according to your device specification. MP4 is usually the recommended one. 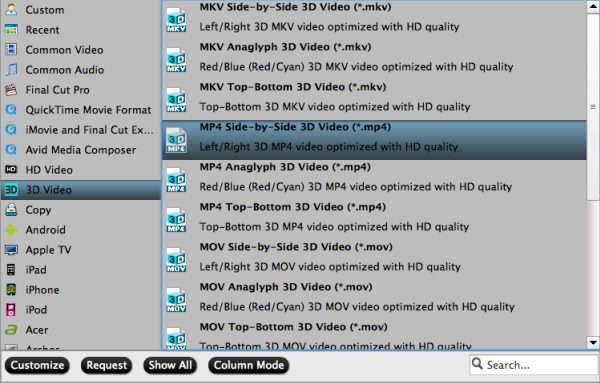 Step 3: Step 3: Click "Settings" to adjust bitrate, frame rate, 3D mode and depth according to your own need. 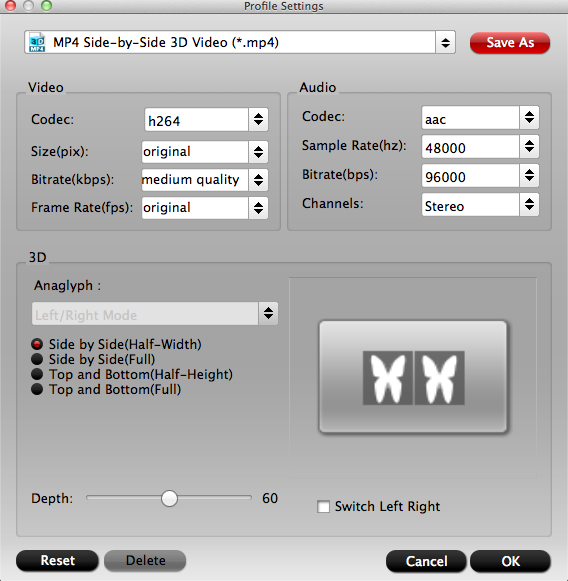 Tip: Tip: If you want to rip Blu-ray movies with multiple audio tracks and subtitle sincluded on Mac, Pavtube ByteCopy for Mac is the best choice. Besides output good 3D effect, it is also able to encode the original soundtracks into 5.1 channels with your wanted language. Step 4: Hit the "Convert" button to rip your 3D Blu-ray movies to SBS 3D MP4 video for 3D TV. When it finishes, click the "Open" option to locate the created 3D video and transfer your 3D Blu-ray movie to 3D TV for entertainment. The process of ripping 3D video may longer than regular disc ripping because of the complicate encoding for data analyzing and processing. Just wait patiently. Money Saving Boundles: BDMagic($49) + Vidpie($29) = Only $49.9, Save $28.1 BDMagic($49) + DVD Creator($35) = Only $49.9, Save $28.1 DVDAid($35) + Vidpie($29) = Only $49.9, Save $14.1 DVDAid($35) + DVD Creator($35) = Only $35.9, Save $34.1 Read more: Ripping 3D Blu-ray to SBS/Top-Bottom/Anaglyph 3D format on Mac Mavericks How to Rip 3D Blu-ray movie to SBS 3D MP4 video for playback on your 3D devices? Rip 2D Blu-ray to 3D for playback on 3D TV on Mac Mavericks Amazon Fire Phone Supported File Formats & Useful TipsGood News: PlayStation 4 Can Now Support 3D Blu-ray DiscsWatch YouTube Videos on iPads/iPhones/iPods (All Models) on MacSource: http://open-mobile-share.com/rip-3d-blu-rays-to-3d-sbs-mp4/
ven. 19 déc. 2014, 11:59
|
Painlessly Convert MKV to Windows 8.1 Tablets for Enjoying Simple Instruction to get MKV working on Windows 8.1 tablet Tags:convert mkv to windows 8.1 tablets,video covnerter for windows 8.1 tablet,windows 8.1 mkv playback This tutorial offers you an easy way to convert MKV video to native format for working on Windows 8.1 tablet with the help of a Windows 8.1 Video Converter. "How to convert H.264 MKV files to Windows 8.1 Tablets without re-encoding to avoid installing different mkv video players over and over? I plan to watch my downloaded mkv video on my new device, to be precise." 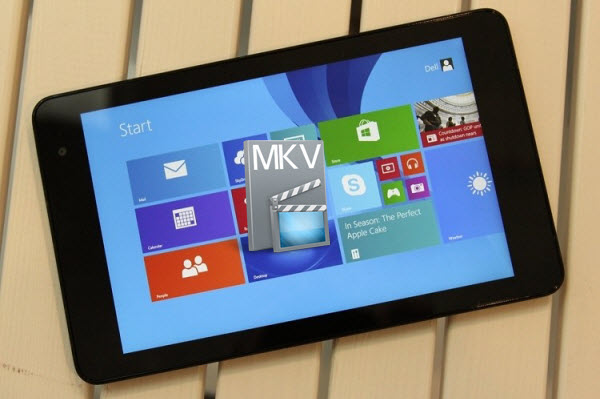 Nowadays many manufacturers have released Windows 8.1 tablets, include Surface Pro 3, Dell Venue 8 Pro, Venue 11 Pro, Asus T100, Acer W4, Toshiba WT8, Lenovo Thinkpad 8, Lenovo Miix2, etc. Enjoy MKV videos on Windows 8.1 Tablets must be quite exciting. This time we will show you how to convert MKV videos to Windows 8.1 Tablets video format for smoothly playback. Now, get back to the question. To convert H.264 MKV files to Windows 8.1 Tablets compatible format without re-encoding, you only need to choose H.264 MP4 as the output format. But before all that, a MKV video converter for Windows 8.1 Tablets should be prepared in advance to do the setting. What kind of video converter for Windows 8.1 Tablets is really helpful? Here Pavtube Video Converter Ultimate is welcomed by many Windows 8.1 users who want to convert videos. More specifically, it is capable of converting various video formats like MKV, AVCHD, AVI, MPEG, WMV, VOB, M4V, FLV and more to Pads or mobile phones like Surface Pro 2, Surface Pro 3, Samsung, iPhone, iPad etc. If you own this Windows 8.1 Tablets Video Converter, you will never worry about spending much time on finding out the suitable video player and install it on Windows 8.1 Tablets for different video formats. Read reviews:Leawo Blu-ray Ripper vs Pavtube Video Converter UltimateTop 5 Best Video Converter Ultimate ReviewBest Windows 10/8.1/8 Video Converter Review Tutorial on Converting MKV to Windows 8.1 Tablets friendly videoStep 1. Add video files to the program Launch the program and add videos in the following two ways: 1> Click Add button to choose video files from your hard drive for converting. 2> Directly drag the movies you want to convert to the left item bar. To save your time, you can add multiple files for converting at a time since batch conversion is well supported. 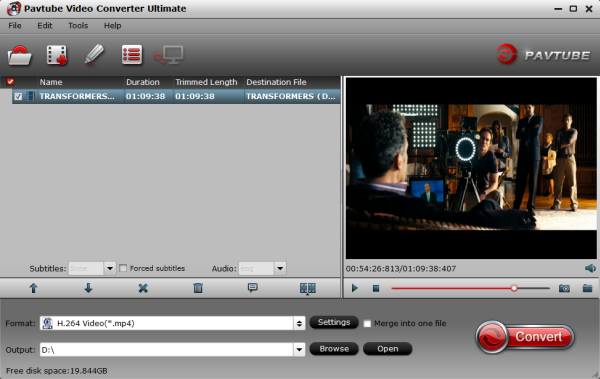 Step 2. Decide output video format Click "Format" bar, you can get optimized videos for your surface under "Windows > Windows 8 Tablet H.264 Video (*.mp4)". The output video fits on Windows 8.1 Tablets perfectly. 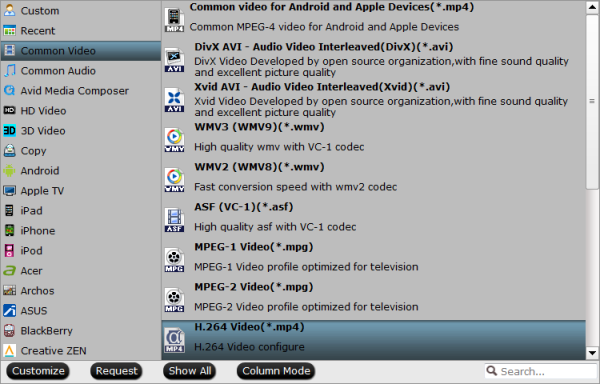 Step 3. Start Windows 8.1 video conversion Finally click on Convert button to start converting MKV to MP4 for Windows 8.1 Tablets. More features of the Windows 8.1 Video Converter:1. Merge- If you want to combine several clips into one, please tick the box Merge into one. 2. Settings-> The default settings may not satisfy you, and you can click the settings button to change the settings by yourself including video resolution, bit rate, audio sample rate, audio channel etc. for full screen playback smoothly or select the corresponding device as the output format. 3. Edit -> Before the conversion, you can edit your videos by trimming, cropping, adding watermarks, inserting subtitles and more to get the exact effect and feel you want. (Click the Edit button to open the video editing window, where you can perform the operations.) 4. Besides mkv video, you can convert your 4K Videos & Movies and rip Blu-ray, DVD to Windows 8.1 tablets for enjoying. Mac vesion is iMedia Converter for Mac. Once the conversion finished, transfer the converted mp4 video files to Windows 8.1 Tablets and you can have MKV movie playback anywhere you want. Money Saving Boundles: Video Converter Ultimate($65) + Vidpie($29) = Only $74.9, Save $19.1 Video Converter Ultimate($65) + DVD Creater($35) = Only $64.9, Save $35.1 BDMagic($49) + Vidpie($29) = Only $49.9, Save $28.1 BDMagic($49) + DVD Creator($35) = Only $49.9, Save $28.1 See also: Recommended Video Formats for iPhone 6 & iPhone 6 PlusWhy We Use MKV for DVD/Blu-ray Backup?Play and Download YouTube Videos Using VLC Media PlayerUse VLC Player to Download & Add SubtitlesHow to Watch YouTube Videos on Roku?Good News: PlayStation 4 Can Now Support 3D Blu-ray Discs Source: http://open-mobile-share.com/convert-mkv-t...ows-8-1-tablet/
ven. 19 déc. 2014, 07:26
|
December 2014 iTunes movie new releases can't play via Roku? Will Roku 3 play December 2014 iTunes movie new releases? Yes. This article is a tutorail on how to stream iTunes movies to play on Roku 3 by roll off the DRM protection. Roku 3 can allows users both to stream video content from the Internet and play movies locally through a USB drive, but the problem is that the supported media file formats are limited. Unlike Apple TV 3 which can access iTunes movies, we can't install iTunes on RoKu 3, let alone playing December 2014 iTunes movie new release like Gone Girl, Jingle All the Way 2, The Good Lie, The Hero of Color City, Frank, etc. on Roku 3 through USB. Why?  Roku has the USB channel that can play back videos attached to the USB port. You could copy videos (1080P, 720P or lower resolution) onto a hard drive or keychain drive and attach them to the USB port on the Roku XDS. But keep in mind a USB port enables local media playback (supported formats include: MP4 (H.264) & MKV (H.264) video / AAC & MP3 audio / JPG & PNG image) to play on Roku 3. Learn how to play Blu-ray, YouTube video and other stored movies on Roku 3. Great News!!! Pavtube Software officially released its 2014 Thanksgiving Deal. UP to 50% off is provided lasting to December 10. Don't miss it! And find more 2014 Thanksgiving Day, Black Friday Holiday Cyber Monday Crazy Promotion at Pavtube Facebook. Videos/Movies purchased or rented from iTunes are in M4V format with DRM protection. That means users could just play the iTunes M4V TV episodes, movies, and music videos in Apple devices but Roku 3 is not included. But no biggie, just as saying goes "There is a problem, there is a solution", I've got a simple workflow to help you roll off the DRM from December 2014 new movie releases and transfer it to most compatible video format for your Roku 3. Basically, we need to get this Pavtube DRM Removal - a software can help you accomplish both the steps above in one go. It is highly recommended for its easy-to-use interface, straight workflow and reliable video quality. Now just download this software and follow the tips below to make your iTunes movies playable on Roku 3.( Get Best Tunebite Alternative to Remove DRM from Music and Videos) Now Pavtube Studio provides free trial without time limit; get one and let's start. How to put iTunes downloaded December 2014 movies on Roku 3 USB ChannelInstall this Pavtube ChewTune on your computer firstly; note to shut down your iTunes firstly. Step 1. Import DRM filesDownload your wanted movies from iTunes Store; click top left two plus icons to import them one by one or from the entire folder. 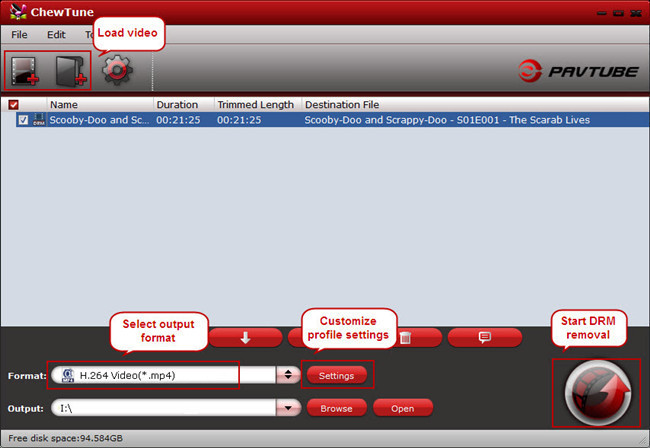 Step 2. Choose format Step 2. Choose formatClick the Format drop-down list and choose Common Video > H.264 Video (*.mp4) as the most compatible with your Roku 3. What's more, it is possible to stream iTunes movies to your Chromecast, WD TV Live, XBMC and Nexus Player. 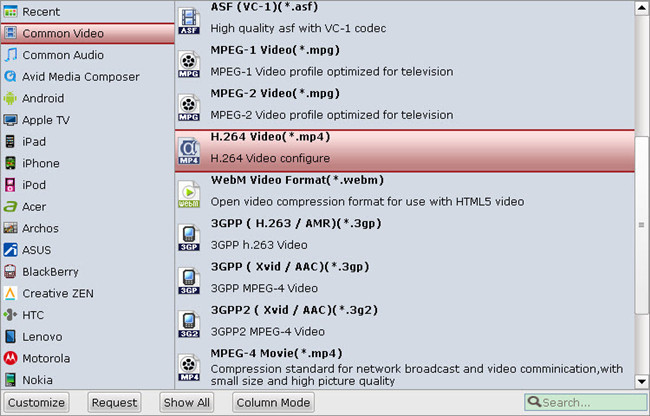 Step 3. Adjust settings (Optional) Step 3. Adjust settings (Optional)If you want to turn up/down file size, bitrate, frame rate and other settings, click "Settings" besides "Format" to enter the profile settings windows. You can also check both source and target video & audio specs there. Step 4. ConvertBack to main interface, hit "Convert" to start converting December 2014 iTunes movie new releases to MP4 format for Roku 3. It will launch your iTunes automatically and start conversion simultaneously. After it completed, click "Open" to quick find the converted files. Connect a USB memory stick or USB cable of a digital device to the RoKu 3 USB port. Now you can play iTunes movies and music on RoKu 3 for free. You can see how easy it is to bypass DRM of iTunes both purchased and rented movies and then convert these M4V videos to MP4 that supported by Roku 3 with Pavtube ChewTune. Here is money-saving trips:ByteCopy($42) + ChewTune($29) = Only $54.9, Save $16.1 Video Converter Ultimate($65) + ChewTune($29) = Only $74.9, Save $19.1 BDMagic($49) + ChewTune($29) = Only $49.9, Save $28.1 DVDAid($35) + ChewTune($29) = Only $49.9, Save $14.1 See also: Convert my DVDs to play on computer in 3D using Stereoscopic PlayerHow to transfer iTunes M4V Movies to Amazon Fire TV?Convert and put Guardians of the Galaxy Blu-ray to Nexus 9Why not Backup personal sci-fi Blu-ray collection on iPad Air 2 keeping 1080p quality?Rip Disney New Xmas DVD Movies for Kids for this ChristmasEdit Blu-ray in Final Cut Pro -Getting closer to my Hollywood dreamSource: http://media-playback.jimdo.com/2014/12/04...vies-to-roku-3/
| |


