|
 jeu. 14 oct. 2010, 10:27 jeu. 14 oct. 2010, 10:27
|
I think so many people have owned an iPhone 4. Sleek design! HD video recording! 3.5-inch screen! Faster, better, and with more coverage! Each detail will attract us. Meantime, some iPhone users must want to put DVD video to iPhone 4 or convert other videos like AVI, WMV, MKV to iPhone 4, So, this guide is designed to help you ripping DVD movies to your iPhone 4 and converting videos to your iPhone 4, and so that you can play your favorite video on your iPhone 4 as you like. Here is the detailed information:1. Things you'll need. 2. How to convert DVD files to MP4/MOV/AAC formats to play on iPhone 4? 3. How to convert AVI, WMV, FLV, MKV, VOB video files to your iPhone 4? 4. How to make these videos syncing to iPhone 4? Part 1: Things you'll need1. Aneesoft DVD to iPhone Converter and Aneesoft iPhone video converter or you can download iPhone Converter Suite (Free for download trial version) 2. iTunes installed on your computer 3. Videos you want to convert Part 2: How to convert DVD files to MP4/MOV/AAC formats to play on iPhone 4Before you transfer DVD videos to iPhone 4, you need to convert DVD to iPhone compatible format first. So, first, I will tell you how to finish it in simple steps. Step 1: Download & install Aneesoft DVD to iPhone ConverterDownload and install Aneesoft DVD to iPhone Converter,With this powerful converter, you can convert your DVD videos to iPhone 4 video MP4 format, and rip DVD to iPhone 4 audio format like MP3, M4A, WAV and AIFF for playback on iPhone 4. Notice: If you are using Mac OS and want to Convert DVD to iPhone 4, you can refer to Aneesoft DVD to iPhone converter for Mac. Step 2: Run Aneesoft DVD to iPhone Converter and load DVD disk to convertRun DVD to iPhone Converter in the following main panel, click "Load..." button on the toolbar to load DVD IFO files or DVD movies from the hard drive. 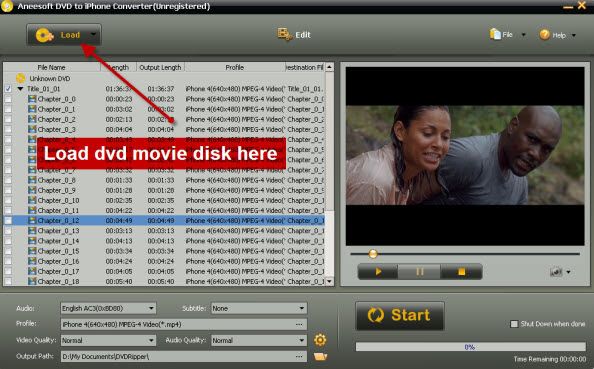 Step 3: Edit your videos: trim, crop, effect, watermark and deinterlace(optional) Step 3: Edit your videos: trim, crop, effect, watermark and deinterlace(optional)This Aneesoft DVD to iPhone video converter allows you to trim, crop your videos, which may help you removing the black edges around your video, so that you can watch your movies in full screen. You can also set different video effect such as grey, invert, gamma, sepia and so on, in addition, if you want to add watermark on your video, you can click "Watermark" tab and then check "Enable Effect" option box. You may add Text or Image watermark onto your video. 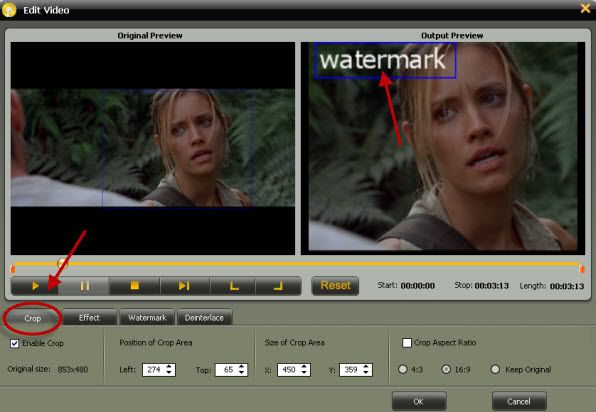 Step 4: Change the output settings and start converting Step 4: Change the output settings and start convertingSelect output video format as .mp4 from the "Profile" drop-down list. You can also adjust other settings such as video quality, audio quality, output path, etc. After all are ready, just click the big button "Start" to begin converting videos to iPhone 4 compatible video files. 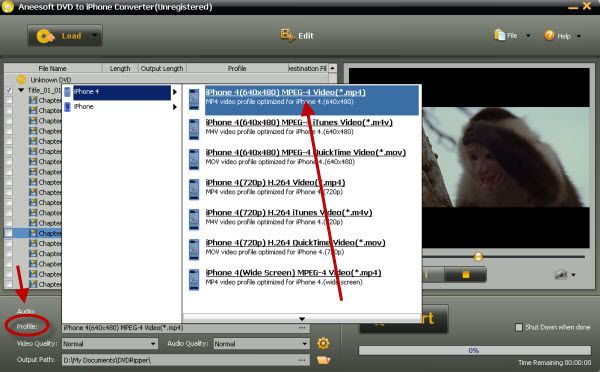 Part 3: How to convert AVI, WMV, FLV, MKV, VOB video files to your iPhone 4? Part 3: How to convert AVI, WMV, FLV, MKV, VOB video files to your iPhone 4?Most kinds of video files like AVI, WMV, FLV, MKV, VOB cant be played directly on iPhone 4, so if you want to play incompatible Video files on iPhone 4, you need to convert them to iPhone 4. That will be very easy if you download Aneesoft iPhone video converter. It is one of the best iPhone Video Converter, which can help you convert video to iPhone 4 MP4/MOV/AAC video and audio formats with high output quality. The steps are very easy, Download and run Aneesoft iPhone 4 video converter and click the big button "Add..." to add videos from your hard disk. The next steps are similar to rip DVD videos to iPhone 4, set output format and start converting. Part 4: How to make these videos syncing to iPhone 4?After convert DVD, WMV, AVI, FLV etc to iPhone 4 compatible formats, now we can import the converted files to iPhone 4. First, you need to launch iTunes, click File option on menu, and add your converted files to iTunes library. Then, connect your iPhone 4 to computer via USB cable, iTunes will detect your iPhone 4. After that, click iTunes "File -> Sync iPhone", and the files will be transferred to your iPhone 4 from iTunes library. When updating completed, you will find the videos on you iPhone 4.
mer. 13 oct. 2010, 03:14
|
Introduction You have an Apple iPod and would like to watch your favorite DVD movies using it? But you do not know how to convert your files into iPod compatible format? Aneesoft DVD to iPod converter is just the program you need to solve this problem now. This simple yet powerful DVD ripper utility enables you to transfer your DVD video library to iPod (MP4/h.264) format with a few mouse clicks. Things you'll need1. Aneesoft DVD to iPod converter (Free for download trial version) 2. DVD video files 3. Your iPod player and Windows PC Step 1: Download & install Aneesoft DVD to iPod converterDownload the free trial version, launch setup and follow instructions on screen. Using Aneesoft DVD to iPod Converter to rip and convert your DVD to iPod video format is just moments away! Notice: If you are using MAC OS and want to convert DVD video to iPod, you can refer to Aneesoft DVD to iPod converter for Mac. Step 2: Run Aneesoft DVD to iPod Converter and load DVD disk to convertRun DVD to iPod Converter in the following main window, click "Load..." button on the toolbar to add videos that you want to convert to iPod video formats. 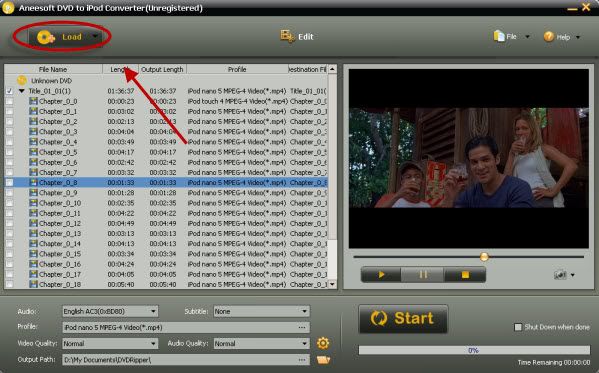 Step 3: Edit your video file (optional): trim, crop, effect, watermark and deinterlaceTrim Video: Step 3: Edit your video file (optional): trim, crop, effect, watermark and deinterlaceTrim Video:This Aneesoft DVD to iPod Converter allows you to trim your video, so you can capture your favorite video clips. Select the video you want to edit, then click the "Edit" button on the top. An Edit window will be prompted. Click the Start Point and End Point to keep your favourite parts of video in Aneesoft DVD to iPod Converter. Crop Video:To watch your movies in full screen, you may crop videos to remove the black edges around your video with this DVD to iPod Converter. Click "Crop" tab to open the Crop Video window, then check the "Enable Crop" option box. There are two methods available to crop your video: crop by a adjusting the crop frame and crop by setting the crop values. After you select an output aspect ratio and finish the crop, you can preview the final visual effect on the right "Output Preview" in real-time. Set Effect:If you want to adjust the video effect of your movie, you can click the "Effect" tab and then check "Enable Effect" option box. Drag each effect adjustment slider to set the video brightness and contrast. You can also choose a special effect from Effect drop-down list to apply to your movie. Add Watermark: If you want to add watermark on your video, you can click "Watermark" tab and then check "Enable Effect" option box. You may add Text or Image watermark onto your video. If you want to add Text watermark for your video, click the Color or Font button to set the color and font your text. Drag and drop the text to anywhere you want. If you want to add image watermark, just check the Image option and select the image you want to add as watermark. 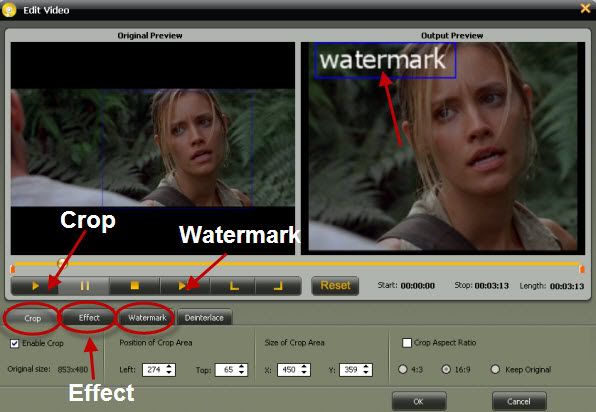 Step 4: Output Setup Step 4: Output SetupChoose the most suitable output settings you want. 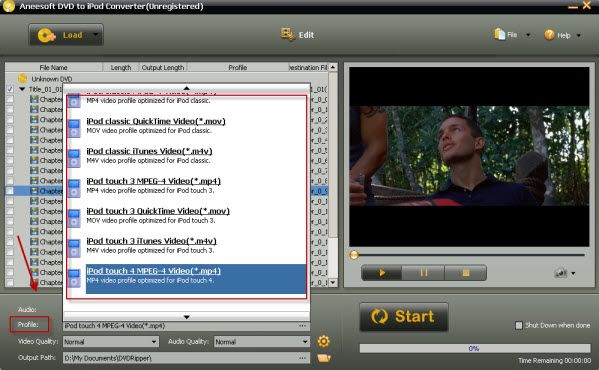 Step 5: Start rpping and converting DVD to iPod video Step 5: Start rpping and converting DVD to iPod videoFinally, click the big "Start" button to start converting DVD to iPod video. If you're using the evaluation version of Aneesoft DVD to iPod Converter, it will only convert the first five minutes of your video. Please purchase full version of Aneesoft DVD to iPod Converter to remove the limitation.
mer. 13 oct. 2010, 03:13
|
Introduction You have an Apple iPod and would like to watch your favorite DVD movies using it? But you do not know how to convert your files into iPod compatible format? Aneesoft DVD to iPod converter is just the program you need to solve this problem now. This simple yet powerful DVD ripper utility enables you to transfer your DVD video library to iPod (MP4/h.264) format with a few mouse clicks. Things you'll need1. Aneesoft DVD to iPod converter (Free for download trial version) 2. DVD video files 3. Your iPod player and Windows PC Step 1: Download & install Aneesoft DVD to iPod converterDownload the free trial version, launch setup and follow instructions on screen. Using Aneesoft DVD to iPod Converter to rip and convert your DVD to iPod video format is just moments away! Notice: If you are using MAC OS and want to convert DVD video to iPod, you can refer to Aneesoft DVD to iPod converter for Mac. Step 2: Run Aneesoft DVD to iPod Converter and load DVD disk to convertRun DVD to iPod Converter in the following main window, click "Load..." button on the toolbar to add videos that you want to convert to iPod video formats. Step 3: Edit your video file (optional): trim, crop, effect, watermark and deinterlaceTrim Video:This Aneesoft DVD to iPod Converter allows you to trim your video, so you can capture your favorite video clips. Select the video you want to edit, then click the "Edit" button on the top. An Edit window will be prompted. Click the Start Point and End Point to keep your favourite parts of video in Aneesoft DVD to iPod Converter. Crop Video:To watch your movies in full screen, you may crop videos to remove the black edges around your video with this DVD to iPod Converter. Click "Crop" tab to open the Crop Video window, then check the "Enable Crop" option box. There are two methods available to crop your video: crop by a adjusting the crop frame and crop by setting the crop values. After you select an output aspect ratio and finish the crop, you can preview the final visual effect on the right "Output Preview" in real-time. Set Effect:If you want to adjust the video effect of your movie, you can click the "Effect" tab and then check "Enable Effect" option box. Drag each effect adjustment slider to set the video brightness and contrast. You can also choose a special effect from Effect drop-down list to apply to your movie. Add Watermark: If you want to add watermark on your video, you can click "Watermark" tab and then check "Enable Effect" option box. You may add Text or Image watermark onto your video. If you want to add Text watermark for your video, click the Color or Font button to set the color and font your text. Drag and drop the text to anywhere you want. If you want to add image watermark, just check the Image option and select the image you want to add as watermark. Step 4: Output SetupChoose the most suitable output settings you want. Step 5: Start rpping and converting DVD to iPod videoFinally, click the big "Start" button to start converting DVD to iPod video. If you're using the evaluation version of Aneesoft DVD to iPod Converter, it will only convert the first five minutes of your video. Please purchase full version of Aneesoft DVD to iPod Converter to remove the limitation.
sam. 9 oct. 2010, 09:57
|
A beautiful 9.7-inch high-resolution display makes iPad perfect for watching any kind of video, from HD movies and TV shows to podcasts and music videos. Since iPad is essentially one big screen - with no distracting keypad or buttons you feel completely immersed in whatever youre watching. And you can keep watching for up to 10 hours, thanks to the lithium-polymer battery in iPad. However, Apple tablet only supports MP4, MOV, M4V video formats (H.264, MPEG-4 video codec). And many people collect a lot of videos with other formats like AVI, MKV, MOV, ASF, RM etc. It is a trouble that how to convert these kinds of videos to iPad for many iPad users. In fact, which is easy enough, here, I'll help you solving this issue just with four steps. Things you'll need1. Videos you need to convert 2. Aneesoft iPad video converter (Free for download trial version) 3. Your windows PC and your iPad Step 1: Download & install Aneesoft iPad video converter and add your videosDownload and run Aneesoft iPad video converter, and click Add
button to select the video files need converted. Aneesoft iPad video converter can convert almost all videos to iPad video formats. You can convert AVI, MKV, WMV, MOV, MPEG, FLV, RM to iPad and more.  Note Note: if you run MAC system, please download the MAC version here. Step 2: Output SettingAfter you finish video source setup, Choose one or more files in the file list, and open Profile drop-down list, then select an output format for selected files(for example, you can select output video format as .mp4 (H.264, MPEG-4 video codec)). Click Browse button, select a destination folder in the dialog box that opens, and click OK. Remember that the output file size and converting speed mostly depends on the bitrate you set. Larger bitrate, larger file size and longer convertion time. 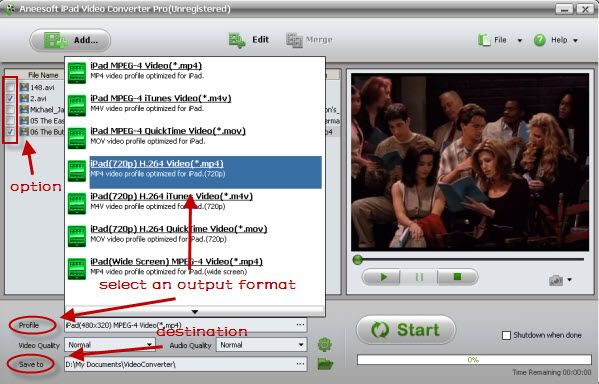 Step 3: Edit your videos: trim, crop, effect, watermark and deinterlace Step 3: Edit your videos: trim, crop, effect, watermark and deinterlaceThis Aneesoft iPad video converter allows you to trim, crop your videos, which may help you removing the black edges around your video, so that you can watch your movies in full screen. You can also set different video effect such as grey, invert, gamma, sepia and so on, in addition, if you want to add watermark on your video, you can click "Watermark" tab and then check "Enable Effect" option box. You may add Text or Image watermark onto your video. 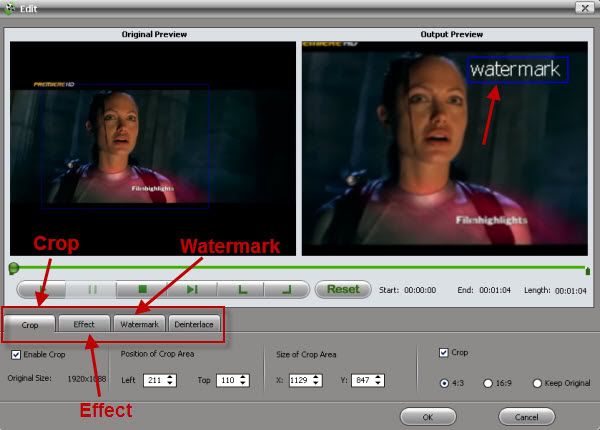 Step 4: Conversion Step 4: ConversionTo start converting, click the Start button. The Progress bar shows the status of the converting task. Aneesoft iPad video converter prompts you when the converting task is completed, then click OK. Learn more about iPad The iPad is a tablet computer designed and developed by Apple. It is particularly marketed as a platform for audio and visual media such as books, periodicals, movies, music, and games, as well as web content. At about 700 grams (25 ounces), its size and weight are between those of most contemporary smartphones and laptop computers. Apple released the iPad in April 2010, and sold 3 million of the devices in 80 days. The iPad runs the same operating system as the earlier iPod Touch and iPhone, albeit a slightly older version. It can run its own applications as well as ones developed for the iPhone. Without modification, it will only run programs approved by Apple and distributed via its online store. Like iPhone and iPod Touch, the iPad is controlled by a multitouch display a break from most previous tablet computers, which used a pressure-triggered stylus. The iPad uses Wi-Fi or a 3G mobile data connection to browse the Internet, load and stream media, and install software. The device is managed and synced by iTunes on a personal computer via USB cable. Media reaction to the device has generally been neutral or positive, with more positive reaction after the device was launched.
jeu. 30 sept. 2010, 04:07
|
I recently treated myself to a HD camcorder as I will be going to South Africa soon for vacation. I got the camcorder a bit early so I could have a chance to play around with it and practice editing the clips, the camcorder records the clips in .MTS format which is a High-definition MPEG Transport Stream video format, commonly called AVCHD used by Sony, Panasonic, and other HD camcorders. Generally, the file extension of AVCHD video is .MTS on camcorder and .M2TS after import to computer. I guess that if someone who have m2ts or other AVCHD videos, he or she would be frustrated that there are few devices which support m2ts video. Normally, you can only play your m2ts video directly from a camcorder on an HDTV with a HDMI, or play them on a Blu-ray Disc player. Why these videos do not play on my PC, laptop, iPod, iPhone or any other portable mp4 players? OK, Here below I will give you an example of how to convert HD, AVCHD (MTS/MT2S) videos to popular devices with iPhone 4. Things you'll need1. HD, AVCHD (MTS/MT2S) video files 2. Aneesoft iPhone 4 video converter 3. Your windows PC and your iPhone 4 Step 1: Download & install Aneesoft iPhone 4 video converter and add HD videosDownload and run Aneesoft iphone 4 video converter, and click Add
button to select the HD video files need converted. Aneesoft iPhone 4 video converter provides a complete solution to convert iPhone 4 video from all popular video formats for your iPhone 4. 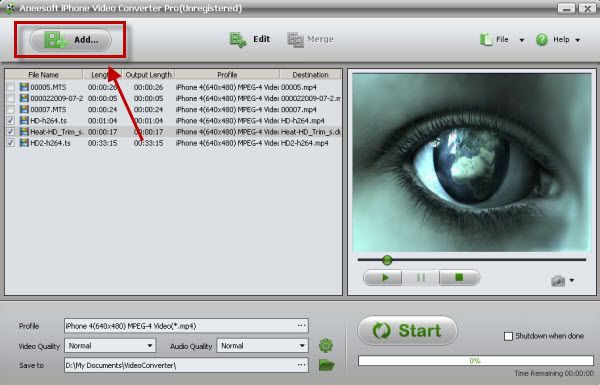 Note Note: if you run MAC system, please download the MAC version here. And if you want to convert HD videos to other devices, please download Aneesoft video converter Pro. Step 2: Output SettingAfter you finish video source setup, you can now select iPhone 4 MPEG-4 video in the drop-down box and specify a directory on your computer to save the output files. Different file formats result in different video compression rates. Bit rate refers to the number of bits processed per unit of time, the larger the number, the more bits processed and the better the quality. Resolution refers to the number of pixels handled by the device display. 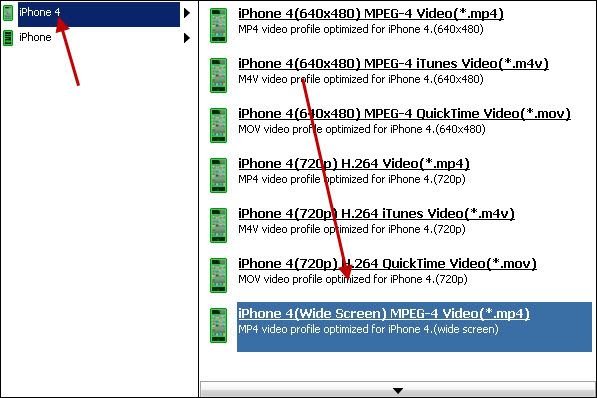 Step 3: Edit your videos: trim, crop, effect, watermark and deinterlace Step 3: Edit your videos: trim, crop, effect, watermark and deinterlaceThis Aneesoft iPhone 4 video converter allows you to trim, crop your videos, which may help you removing the black edges around your video, so that you can watch your movies in full screen. You can also set different video effect such as grey, invert, gamma, sepia and so on, in addition, if you want to add watermark on your video, you can click "Watermark" tab and then check "Enable Effect" option box. You may add Text or Image watermark onto your video. Step 4: ConversionTo start converting, click the Start button. The Progress bar shows the status of the converting task. Aneesoft iPhone video converter prompts you when the converting task is completed, then click OK. In addition, I tell you more about HD formatsWhat is MTS and what is M2TS?MTS and M2TS are included by AVCHD video. AVCHD (Audio and Video Compression for High Definition) is a high-definition and standard-definition recording format for use in digital tapeless camcorders. About AVCHD videoAVCHD (AVC-HD, AVC HD) video is recorded using the MPEG-4 AVC/H.264 video compression codec. Audio is stored in either compressed form (Dolby AC-3), or uncompressed form (multichannel PCM). Aside from recorded audio and video, AVCHD includes features to improve media presentation: menu navigation, slide shows and subtitles. The menu navigation system is similar to DVD-video, allowing access to individual videos from a common intro screen. Slide shows are prepared from a sequence of AVC still frames, and can be accompanied by a background audio track. Subtitles are used in some camcorders to timestamp the recordings.
dim. 26 sept. 2010, 04:41
|
Apple unveiled the 4th generation iPod touch on September 1, 2010. It adds an improved chip, a better display, and two cameras. So, most iPod touch users like to play music and watch movies on this beautiful handset. But as a big Apple fans, I think the best news is that iPod Touch 4 supports 720p HD video which can make us enjoying more high-quality movies with our iPod touch, however, there is a minor issue here, the device does not support all formats of videos. Ok, below I will tell you how to rip and convert DVD movies to your iPod touch step by step.  Things you'll need Things you'll need1. Your iPod touch 2. Aneesoft DVD Ripper Pro (Free for download trial version) 3. DVD video files Step 1: Download & install Aneesoft DVD Ripper Pro Win Aneesoft DVD Ripper Pro Win can help you ripping DVD movie to iPod touch straight with high video quality, so that you can enjoy movies on your iPod touch anywhere and anytime. In addition, Aneesoft DVD Ripper Pro Win also can help you converting DVD movies to iPad, iPhone, PSP, Apple TV, BlackBerry, Zune, Xbox 360 and more. Step 2: Run Aneesoft DVD Ripper Pro Win and load DVD movies Insert your DVD movie into your DVD drive, run Aneesoft DVD Ripper Pro Win, and click "Load" to locate the DVD movies you want to add. This may take up to a minute or two depending on the contents of the DVD and the speed of your optical drive. Step 3: Output SettingIn the Destination-Setup section of the interface, choose the right preset for your iPod touch device in the Convert-to drop-down list. Remember that the output file size mostly depends on the bitrate you set. Larger bitrate, larger file size. Step 4: Start ripping and converting DVD Finally, click the big "Start" button to start converting DVD. The Convert progress bar shows you how much of the convert process is completed. If you're using the evaluation version of Aneesoft DVD Ripper Pro Win, it will only convert the first five minutes of your movies. You need to register it as a full-version to remove this limitation. 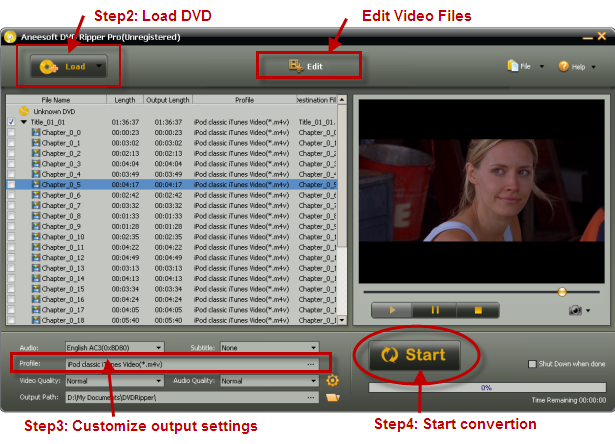 Tips about editing DVD Movies to make perfect video with Aneesoft DVD Ripper Pro WinTip 1: Crop Video Tips about editing DVD Movies to make perfect video with Aneesoft DVD Ripper Pro WinTip 1: Crop VideoTo watch your movies in full screen, you may crop videos to remove the black edges around your video with Aneesoft DVD Ripper Pro Win. Click "Crop" tab to open the Crop Video window, then check the "Enable Crop" option box. Tip 2: Set EffectIf you want to adjust the video effect of your movie, you can click the "Effect" tab and then check "Enable Effect" option box. Drag each effect adjustment slider to set the video brightness and contrast. You can also choose a special effect from the Effect drop-down list to apply to your movie. Tip 3: Add WatermarkIf you want to add watermark on your video, you can click "Watermark" tab and then check "Enable Effect" option box. You may add Text or Image watermark onto your video. Technical Specifications * DVD files: All commercial & homemade DVD movies. * IPod touch supported video formats: M4V, MP4, and MOV. * IPod touch supported audio formats: MP3, AAC/M4A, Protected AAC, AIFF, WAV, Audible audiobook, and Apple Lossless. * System requirements: Windows XP (SP2 or later), Windows Vista, Windows 7, if you runs MAC system, please download the MAC version here.
mar. 21 sept. 2010, 04:26
|
The 4th-Gen iPod touch arrives on Sep.1 with many new features that bring it even closer to the iPhone 4. For starters, there are front and rear cameras that let you make FaceTime video calls over a Wi-Fi connection. Moreover, there's a sweet high-resolution 3.5-inch Retina display that nearly matches the screen on the iPhone 4. 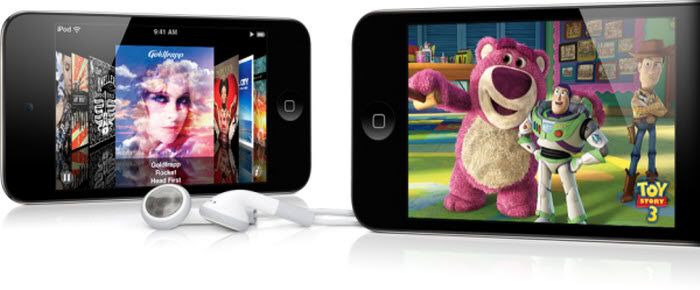 But a lot of friends will meet some troubles when running their new iPod Touch, expecially for those who are not familiar to any of the devices by Apple at all. The biggest challenge that they faced may be to figure out how to convert videos to MP4 Format so they can run on their iPod touch. Ok, if you have many video files ready for iPod Touch on your MAC computer, but have no idea on how to transfer them to the handset, this page will help. You'll be able to bring your movies anywhere and have fun at any time, only after four simple steps. Things you'll need1. Aneesoft video converter for MAC (Free for download trial version) 2. Your iPod touch 3. Video files Step1. Download & install Aneesoft Video Converter Pro for MACHead over to Aneesoft homepage and download the Video Converter Pro for MAC program, next step is to install the program on MAC. That software can help you convert video to WMV/ AVI/ MOV/ MP4/ FLV/ MPEG and iPad, iPhone 4, iPod, PSP, Apple TV and more easily. Notice: If you are using Windows OS and want to convert video to iPod, you can refer to Aneesoft video converter Pro. Step2. Run the Aneesoft Video Converter Pro for MAC and add videos Now run the MAC Video Converter Pro and click the big button "Add..." to add videos from your hard disk, you may add as many videos as you want to convert. Only the titles you checked will be converted. 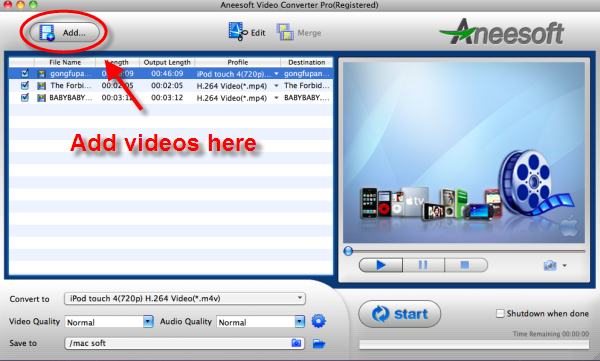 Step3. Set output setting Step3. Set output settingClick the "Convert to" to select iPod format from the drop-down list. This Video Converter Pro for MAC provides lots of profiles sorted by various popular devices, You can easily find the right format you want.  You can also adjust the professional settings like resolution, bit rate, codec to optimize the output quality for your device. 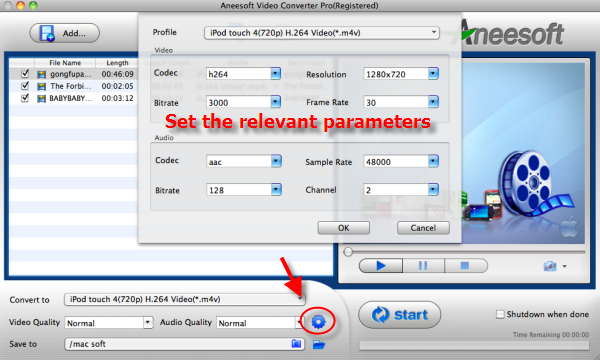 Step4. Start to convert Videos on Mac Step4. Start to convert Videos on MacAfter choosing the format, click "Start" button to start the conversion. The multi-threading and batch processing ensures you the super high conversion speed even if you convert multiple video files at the same time. Tips& TricksTip1: Edit & merge videos: trim, crop, add effect, add watermark. With Aneesoft Video Converter Pro for Mac, you may set movie brightness, contrast, saturation, apply special effects and even add watermark to personalize your video clips before conversion. You also can merge multiple video into one for output. Tip2: You can preview the status of converting from the progress bar and set the actions after conversion. You can also take snapshot and save them as jpg, bmp file while preview. Tip3: HD video converting, can convert HD video between HD AVI, HD MPEG-4 AVC, HD QuickTime MOV, HD WMV, HD FLV, HD MPEG-2, HD ASF, etc. Tip4: Supports Mac OS X 10.5 Leopard or Mac OS X 10.6 Snow Leopard on iMac, Mac Pro, MacBook, MacBook Pro, MacBook Air, etc.
dim. 19 sept. 2010, 09:52
|
A lot of guys are purchasing movies, TV shows, podcasts, audio books and music from iTunes online store, However, the iTunes store videos' volume is too low and they don't have subtitles, so many people have been converting DVD and video files on their Windows PC and Mac computer, then sync to their iPhone 4 so that they can enjoy the content wherever they are and whenever they like. This is a tutorial on how to convert DVD movie to iTunes and sync to iPhone 4 on windows PC. Things you'll need1. Aneesoft DVD to iPhone Converter (Free for download trial version) 2. iTunes installed on your computer 3. DVD video files Below is the step by step guide on how to convert DVD to iTunes and sync to iPhone 4Step 1: Download & install Aneesoft DVD to iPhone ConverterTo convert dvd videos for iPhone 4, you need a video converter. Download and install Aneesoft DVD to iPhone Converter from this link. With this powerful converter, you can convert your DVD videos to iPhone video MP4 format, and rip DVD to iPhone audio formats like MP3, M4A, WAV and AIFF for playback on iPhone. Notice: If you are using Mac OS and want to Convert DVD to iTunes, you can refer to Aneesoft DVD to iPhone converter for Mac. Step 2: Run Aneesoft DVD to iPhone Converter and load DVD disk to convertRun DVD to iPhone Converter in the following main panel, click "Load..." button on the toolbar to load DVD IFO files or DVD movies from the hard drive. Step 3: Output SettingSelect output video format as .mp4 from the "Profile" drop-down list. You can also adjust other settings such as video quality, audio quality, output path, etc. Step 4: Convert DVD to iTunes for iPhone 4 MP4When the settings are done, click the button "Start" to start conversion. And then the program will automatically start DVD conversion. Step 5: put DVD to iPhone 4 via iTunesConnect your iPhone 4 to Windows and sync the converted DVD video to your iPhone 4 with iTunes. Now you could watch your favorite DVD movies on your iPhone 4. That's all, with four steps you can convert any DVD movies to iTunes and sync it to your iPhone 4. It's easy enough for everyone. Enjoy watching DVD with your iPhone 4 anytime and anywhere! Edit your video file (optional): crop, trim, add effects, add watermark (optional)Trim Video:This Aneesoft DVD to iPhone Converter allows you to trim your video, so you can capture your favorite video clips. Select the video you want to edit, then click the "Edit" button on the top. An Edit window will be prompted. Click the Start Point and End Point to keep your favourite parts of video in Aneesoft DVD to iPhone Converter. Crop Video:To watch your movies in full screen, you may crop videos to remove the black edges around your video with this DVD to iPhone Converter. Click "Crop" tab to open the Crop Video window, then check the "Enable Crop" option box. There are two methods available to crop your video: crop by a adjusting the crop frame and crop by setting the crop values. After you select an output aspect ratio and finish the crop, you can preview the final visual effect on the right "Output Preview" in real-time. Set Effect:If you want to adjust the video effect of your movie, you can click the "Effect" tab and then check "Enable Effect" option box. Drag each effect adjustment slider to set the video brightness and contrast. You can also choose a special effect from the Effect drop-down list to apply to your movie. Add Watermark: If you want to add watermark on your video, you can click "Watermark" tab and then check "Enable Effect" option box. You may add Text or Image watermark onto your video. If you want to add Text watermark for your video, click the Color or Font button to set the color and font your text. Drag and drop the text to anywhere you want. If you want to add image watermark, just check the Image option and select the image you want to add as watermark.
mer. 15 sept. 2010, 10:39
|
Apple has just unveiled its 4th-Gen iPod touch, which is a new version of its popular media player with wireless internet access and other touch screen features found on the iPhone 4. If you have got the iPod touch 4th-Gen and would like to watch all your videos on your new iPod touch, just get Aneesoft Video to iPod Converter to rip and convert videos to iPod touch video/music format. Things you'll need1. Aneesoft Video to iPod Converter2. Video files 3. iPod touch Step 1. Download & install Video to iPod Converter Aneesoft Video to iPod Converter allows you to convert almost all popular video formats to iPod touch video and music formats; besides, it also supports the latest released new iPod touch. Step 2. Add videos to the Video to iPod ConverterOpen Aneesoft Video to iPod Converter and click the big button "Add" to add video files on your computer. This software supports batch conversion, so you can add several video clips at one time. 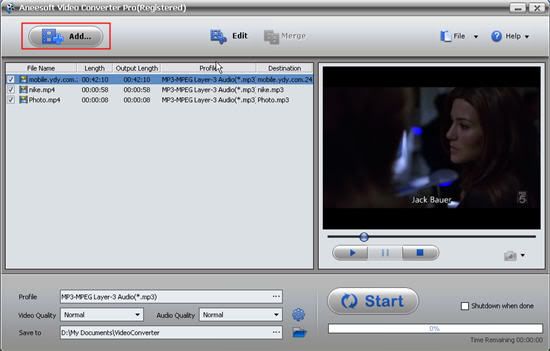 Step 3. Edit videos: crop, trim, add effects, add watermark Step 3. Edit videos: crop, trim, add effects, add watermarkTo personalize your iPod touch videos, you may add picture or text watermark with customized transparency, size and position in your videos in the Aneesoft Video to iPod Converter. Just select the title you'd like to add watermark, then click the button 'Edit' to launch video editing window. You can also adjust the frame brightness and contrast, and even add some artistic effects like old film etc. 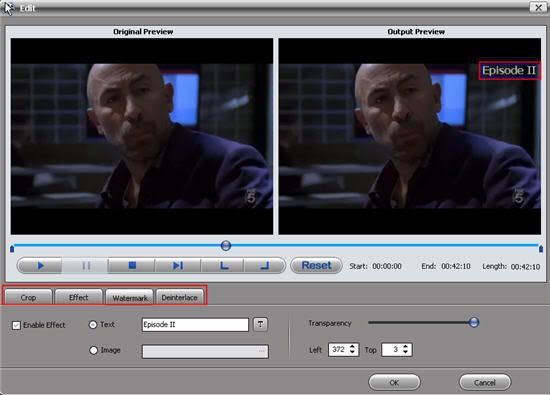 Step 4. Merge some separate videos to 1 single iPod video file (Optional) Step 4. Merge some separate videos to 1 single iPod video file (Optional)This is optional. But if you want to output 1single file for easily playing on iPod touch, simply click 'Merge' button and uncheck the former separate files if you just need the single merged video file. You may see the image below to have an idea.  Step 5. Change output settings in Aneesoft Video to iPod Converter Step 5. Change output settings in Aneesoft Video to iPod ConverterClick the "Profile" drop-down menu to choose which output format you want for your iPod touch; Click the "Save to" menu to find the destination folder for saving output iPod video file. 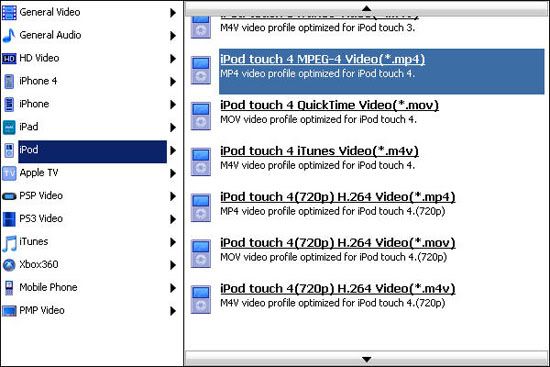 Step 6. Start converting videos to iPod touch video format Step 6. Start converting videos to iPod touch video formatAfter you finish the settings, you can click on 'Start' button to start the conversion. Aneesoft Video to iPod Converter runs fast in video to iPod touch conversion, taking advantage of its support for batch and multi-processing. It is clear to see the progress with estimation of remaining time on display. Tips:* Simplify video and audio quality setting. Aneesoft Video to iPod Converter allows you set the video and audio quality just after the output profile selection. The default Normal quality gets the best compromise between file size and video quality. * Preview and take snapshot. You can preview your source video before you begin the conversion in Aneesoft Video to iPod Converter. You can also capture your favorite pictures when preview. It can be saved in the default folder automatically. * If you are a MAC user, then please refer to Aneesoft Video to iPod Converter for MAC.
lun. 13 sept. 2010, 10:13
|
These days many people are asking how to get the videos on their DVD library onto their iPod, iPad or iPhone. With nearly everyone in the developed world have more than one Apple media device on which you play videosa click wheel iPod, iPod touch, iPhone, iPad, and Apple TV, people are losing patience with media that plays on only one kind of device. Chief among that media is the commercial movie DVD. If you want to rip a DVD you own or encode a video on your hard drive just oncefor all your Apple deviceswhats the best option? In this article I present one of options - Aneesoft DVD Ripper Pro for converting these DVDs to a format playable on your iPad, iPod, and iPhone. Well, someone maybe put Handbrake forward. Yep, HandBrake is a powerful tool, however, it limited in converting to only MPEG-4 and MKV files. If you need to convert to other devices support formats such as AVI, MOV, FLV, DIVX, XVID, WMV, 3GP, WMA etc, for your Xbox, PSP, 3GP, or upload to YouTube, Google Video, it will be useless to looking forward to help from HandBrake. Fortunately, Aneesoft DVD Ripper Pro fills the blank left by HandBrake. Besides rip DVD to MPEG-4, DVD to MKV, Aneesoft DVD Ripper Pro can also rip to almost all popular formats such as AVI, MOV, FLV, DIVX, XVID, WMV, 3GP, WMA, RM, and HD etc. Compare to Handbrake, it's more easy to use with distinct interface, easy to understand, easy to set yourself. Moreover, if you want to edit your videos to be more personalized, like crop, trim, merge, add watermark, set special effect to your videos, Aneesoft will be your great choice. Here will walk you through convert and rip DVD movies to iPad, iPod, iPhone step by step like following. Things youll need1. Apple media device - iPod, iPad, iPhone 2. Aneesoft DVD Ripper Pro 3. DVD video files Step1. Run Aneesoft DVD Ripper Pro and load DVD disk to convertDownload and install Aneesoft DVD Ripper Pro on your PC, launch setup and follow instructions on screen. Then run the DVD Ripper Pro in the following main widow, click "Load..." button on the toolbar to add videos that you want to convert to Apple media device video formats.  Step2. Edit your video file (optional): crop, trim, add effects, add watermark and deinterlaceTrim Video: Step2. Edit your video file (optional): crop, trim, add effects, add watermark and deinterlaceTrim Video:This Aneesoft DVD Ripper Pro allows you to trim your video, so you can capture your favorite video clips. Select the video you want to edit, and then click the "Edit" button on the top. An Edit window will be prompted. Click the Start Point and End Point to keep your favourite parts of video in Aneesoft DVD Ripper Pro. Crop Video:To watch your movies in full screen, you may crop videos to remove the black edges around your video with this DVD to iPod Converter. Click "Crop" tab to open the Crop Video window, and then check the "Enable Crop" option box. There are two methods available to crop your video: crop by a adjusting the crop frame and crop by setting the crop values. After you select an output aspect ratio and finish the crop, you can preview the final visual effect on the right "Output Preview" in real-time. Set Effect:If you want to adjust the video effect of your movie, you can click the "Effect" tab and then check "Enable Effect" option box. Drag each effect adjustment slider to set the video brightness and contrast. You can also choose a special effect from the Effect drop-down list to apply to your movie. Add Watermark: If you want to add watermark on your video, you can click "Watermark" tab and then check "Enable Effect" option box. You may add Text or Image watermark onto your video. If you want to add Text watermark for your video, click the Color or Font button to set the color and font your text. Drag and drop the text to anywhere you want. If you want to add image watermark, just check the Image option and select the image you want to add as watermark. Deinterlace:To remove the DVD movies black sides, just click the "Deinterlace" tab and then check "Enable Deinterlace" box, set up the Start time and End time. 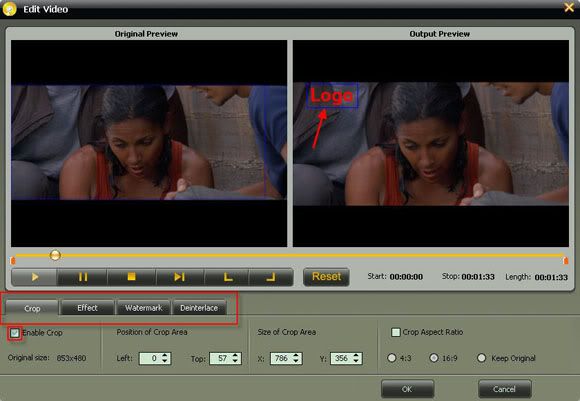 Step3. Output Setup Step3. Output SetupChoose the most suitable output settings you want. 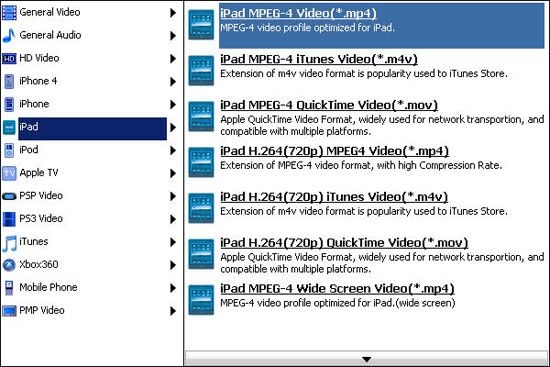 Step4. Start ripping and converting DVD Step4. Start ripping and converting DVD Finally, click the big "Start" button to start converting DVD. The Convert progress bar shows you how much of the convert process is completed. Tips&Tricks* Batch conversion. Aneesoft DVD Ripper Pro support for multi-core processing, multithreading and batch conversion, you can convert multiple files easily and quickly. * Rip DVD movies to HD video formats(HD AVI, HD WMV, HD FLV, HD MOV, HD MP4, etc) made easy with this great DVD ripper. *Extract DVD soundtrack to any audio format. Aneesoft DVD Ripper Pro can convert/extract DVD soundtrack to any audio format, including AAC, MP3, M4A, WAV, WMA, etc. * Preview and capture snapshots from DVD movies. You can preview your source video before you begin the conversion. While you're playing back the DVD movie in Aneesoft DVD Ripper Pro, you also can capture some screenshots from the DVD movies. * The version used in this article is based on Windows, if you are a MAC user, then please refer to Aneesoft DVD Ripper Pro for MAC.
| |


 Rip, Convert Dvd Movies To Iphone 4 Or Convert Video To Iphone 4 Easily