|
 ven. 12 nov. 2010, 04:15 ven. 12 nov. 2010, 04:15
|
Now YouTube get increasingly popular on the internet. Many people want to download their favorite YouTube videos and insert YouTube videos into PowerPoint for presentation. However, how to embed YouTube videos into PowerPoint presentation effectively? Some people may have difficulty in inserting FLV video to PowerPoint. Here I'll show you how to use Aneesoft YouTube Video Converter to download YouTube videos and convert the YouTube video to PowerPoint presentation step-by-step. Step 1: Download & install Aneesoft YouTube Video ConverterPowerPoint supports adding many different types of movies, including AVI, MPEG, and Windows Media. YouTube videos, which are Flash FLV files, aren't directly supported. If you want to embed YouTube video to PowerPoint presentation you can use Aneesoft YouTube Converter to download YouTube videos and convert the YouTube video to PowerPoint supported video format. Step 2: Download YouTube video for the PowerPoint presentationNow run Aneesoft YouTube Converter and click the button "Add URL" to copy the URL of the YouTube video, The YouTube videos will start downloading automatically after you add the YouTube video URLs into Aneesoft YouTube Converter. You may add as many YouTube URLs as you want for embedding to PowerPoint presentation. Step 3: Convert YouTube video to PowerPoint supported format As we have mentioned above that PowerPoint accepts the AVI video format, so select AVI as your output format for your YouTube video to PowerPoint presentation. Simply select the YouTube video you want to convert and Click Convert to start YouTube video to PowerPoint conversion.  Step 4: Embed YouTube video into PowerPoint presentation Step 4: Embed YouTube video into PowerPoint presentationNow, we want to move on to the fun part and actually embed the YouTube video to the PowerPoint presentation. First, navigate to the PowerPoint slide where you wish to add the YouTube video. Open the Insert tab and click Movies and Sounds as shown in the screenshot below. Save your presentation to where you want it. Then open it and check to make sure the YouTube video is working properly.  Note: Note: You need to copy the YouTube video into the same folder as your PowerPoint presentation on your computer. If you later send the PowerPoint presentation to other person, send the YouTube video too. Keeping the YouTube video in the same folder as the presentation ensures the link will still work on other computers. Re-insert the video, if necessary. You may be interested in these topics:How to convert YouTube video to iPadHow to convert WMV video to iPadHow to download YouTube videos in HD formatHow to embed YouTube video to PowerPointHow to convert YouTube to iPadHow to convert AVI to WMV videosHow to convert MP4 to AVI videosHow to convert MP4 to MP3 audios How to convert MKV to XviD videosHow to convert MKV to MPEG videosHow to convert DVD to iPad video formatHow to convert DVD to iPhone video formatHow to rip DVD to BlackBerry video formatHow to convert DVD to MOV video formatHow to convert DVD to PS3 video formatHow to convert DVD to WMV video formatHow to rip DVD to PSP video formatHow to convert HD video for your portable video playerHow to convert video to iTunes format for free
mar. 9 nov. 2010, 07:30
|
Many people are fond of making their own iPhone 4 ringtones as this would give their iPhone 4 a little extra personal touch. But it's not always easy to make ringtones on iPhone 4, Apple took the functionality to buy a ringtone out of iTunes 10 for some reason, but that doesn't mean you can't have custom free iPhone 4 ringtones. You can make your own free iPhone 4 ringtones directly within iTunes 10. This tutorial details how to make free ringtones for your iPhone 4 using only iTunes 10 and songs you already have on your computer (only works with songs that are DRM free). This method works for both Mac and Windows users, but before starting the process you need to download iTunes 10. Part1: How to make custom free iPhone 4 ringtones using iTunes 10 Step 1: Launch iTunes 10 and find the song you want to make an iPhone 4 ringtone out of in iTunes 10. Right-click on the song name and select "Get Info", then click on the "Options tab" in iTunes 10, Select the playback period of the song that you want for your free iPhone 4 ringtone, make sure it's 30 seconds. Step 2: Click "OK" and then right click on the song again, and select "Create AAC version" in iTunes 10 to create a new version of the song with the 30 second interval you specified. After that locate the newly created 30 second clip in iTunes 10.  Step 3 Step 3: Now in the Finder, rename the file extension from .m4a to .m4r. After that go back in iTunes 10 and remove the file from the playlist (do NOT move to Trash, select 'keep file') and then re-import the file into iTunes 10 by double clicking the .m4r file within the Finder or Windows. The file will now be added back into iTunes 10 as an iphone 4 ringtone and you can do what you want with it.  Step 4 Step 4: Now you can sync it with your iPhone 4 and assign to contacts as usual with custom iPhone 4 ringtones. Part2: How to make custom free iPhone 4 ringtones from DVD movies?If you are fond of some short audio clip of a DVD movie, TV show or video file and want to customize it as your iPhone 4 ringtone, you need to extract the audio from the DVD or video and then import the audio to your iTunes Library. DVD to iPhone 4 Converter can help you to extract audio from DVD to MP3 format. Then you can use iTunes 10 to make iPhone 4 Ringtones as the steps above. Follow this tutorial; you can set movie quotes as your iPhone 4 ringtone. Step 1: Load DVD you want to extract the audio clips for making a iPhone ringtoneFree download Aneesoft DVD to iPhone 4 Converter and then click on "load" to load DVD movies that you want to convert to MP3 formats for your iPhone 4 ringtones.  Step 2: Converter DVD videos to MP3 for iphone 4 ringtone making Step 2: Converter DVD videos to MP3 for iphone 4 ringtone makingChoose the MP3 format as your output settings. After that click "Start" button to convert DVD to MP3 audio for your iPhone 4 ringtone making. Then you can use iTunes 10 to make your own custom free iPhone 4 Ringtones as the steps above. You may be interested in these topics:How to convert YouTube video to iPadHow to convert WMV video to iPadHow to download YouTube videos in HD formatHow to embed YouTube video to PowerPointHow to convert YouTube to iPadHow to convert AVI to WMV videosHow to convert MP4 to AVI videosHow to convert MP4 to MP3 audios How to convert MKV to XviD videosHow to convert MKV to MPEG videosHow to convert DVD to iPad video formatHow to convert DVD to iPhone video formatHow to rip DVD to BlackBerry video formatHow to convert DVD to MOV video formatHow to convert DVD to PS3 video formatHow to convert DVD to WMV video formatHow to rip DVD to PSP video formatHow to convert HD video for your portable video playerHow to convert video to iTunes format for freeHow to convert video to Zune video format for freeHow to convert video to PSP video format for freeHow to convert videos to BlackBerry format for freeHow to convert VOB videos to WMV videosHow to convert FLV to iPod MP4 video
sam. 6 nov. 2010, 03:29
|
I think you may be collecting some videos as AVI, FLV, M2TS, AVCHD, WMV etc. files. And It becomes a big issue that how to play them on my iPad, iPod touch, Nokia, PS3 or Apple TV?. In fact, that is very easy, and I will show you the easiest way to convert any videos for you media device. OK, here I will tell you how to solve this problem step by step. Things you'll need1. Your media device (iPad, iPod touch, Apple TV, Nokia or PSP) 2. Aneesoft video converter Pro(If you are using Mac OS, please download Aneesoft video converter Pro for Mac) 3. iTunes installed on your computer Step 1: Download & install Aneesoft video converter ProIf you want to finish it, you need to download the best and easiest software called Aneesoft video converter Pro which can convert among all kinds of videos. Aneesoft Video Converter Pro can be used like iPad video converter, iPhone 4 Video Converter, iPod video converter, PSP video converter, Zune video converter, PS3 Video Converter, Apple TV Converter and more. With the preset output profiles of Aneesoft Video Converter Pro, you can easily convert video to iPad, video to iPod touch,video to Nokia, video to PS3,video to Apple TV. Step 2: Run Aneesoft video converter Pro and add videos Now run the program and click the big button "Add..." to add videos that you wanna convert from your hard disk, only the titles you checked will be converted. 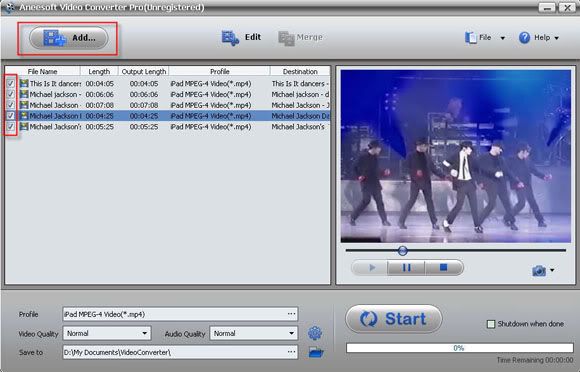 Step 3: Edit your video file (optional): trim, add effects, add watermark and deinterlace Step 3: Edit your video file (optional): trim, add effects, add watermark and deinterlaceThis Aneesoft video converter Pro allows you to trim, crop your videos, which may help you removing the black edges around your video, so that you can watch your movies in full screen. You can also set different video effect such as grey, invert, gamma, sepia and so on, in addition, if you want to add watermark on your video, you can click "Watermark" tab and then check "Enable Effect" option box. You may add Text or Image watermark onto your video. 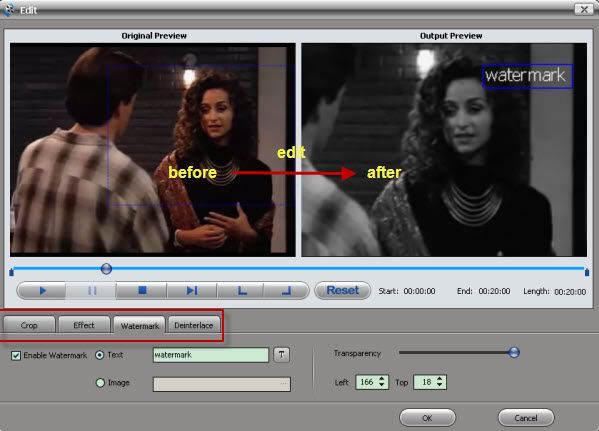 Step 4: Change the output settings and start converting Step 4: Change the output settings and start convertingYou'll find a wide range of preset video setting options available for your media device. Such as your iPad, you may select "iPad (Wide Screen) MPEG-4 Video (*.mp4)" for converting AVI or MKV or others to iPad. Remember that the output file size and converting speed mostly depends on the Bitrate you set. Larger bitrate, larger file size and longer convertion time. 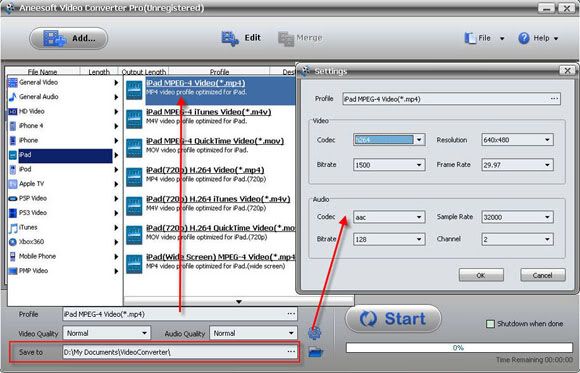 After all are ready, just click the big button "Start" to begin converting videos. Once the convert is complete, Aneesoft video converter Pro will place on your Desktop a new iPad format version of your video that will play on the iPad. Double-click the new file and play it to make sure it looks as you expect. Notice:If you want to convert video to iPad, iPod touch or Apple TV, you must finish the last step. First, you need to launch iTunes, click File option on menu, and add your converted files to iTunes library. Then, connect your media device (iPad, iPod touch, Apple TV) to computer via USB cable, iTunes will detect your media device. After that, click iTunes "File -> Sync (iPad, iPod touch or Apple TV)", and the files will be transferred to your (iPad, iPod touch or Apple TV) from iTunes library. When updating completed, you will find the videos on you (iPad, iPod touch or Apple TV). Some knowledge you may want to knowHow to convert AVCHD video for the iPadHow to convert YouTube video to iPadHow to convert WMV video to iPad How to download YouTube videos in HD formatHow to embed YouTube video to PowerPoint How to convert YouTube to iPadHow to convert AVI to WMV videos
jeu. 4 nov. 2010, 03:28
|
More and more video sharing sites have gone Hi-Def. YouTube launched its user-generated HD channel in last December. Recent good news is that BBC iPlayer introduced HD program in this July. Amazon and CBS also go with the flow in the industry to stream HD videos on the web. HD video has higher resolution than SD (standard-definition) video, and most commonly involves display resolutions of 1280×720 pixels (720p) or 1920×1080 pixels (1080i/1080p), which is richer, clearer, and more vivid than SD video. As we know, PS3, Xbox 360 and Apple TV are the most popular HD multimedia devices on the market. At the same time, you may want to change one HD format to another. Well, check out the tips below. Before you start, you'll need to gather these elements: Aneesoft HD Video Converter HD video files, almost any size, shape, or formats Follow these simple steps:Step 1: Open the HD video you wish to convert using the Aneesoft HD Video Converter Run the program and click Add... button to select HD videos. The Aneesoft HD Video Converter software supports most of the popular HD video formats including HD AVI, AVCHD M2TS, MTS, HD MOV, HD WMV, HD MP4, HD FLV and more. 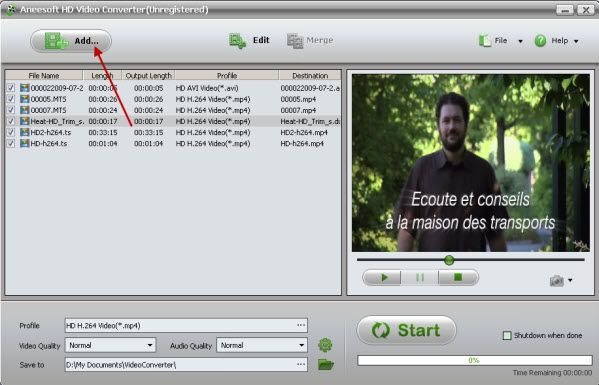 Step 2: Crop, trim or add special effects to the HD video Step 2: Crop, trim or add special effects to the HD videoThis step is optional. But when you come to review the HD video you taken, how often do you find it's too dark, or the focus is blurred? Now you can fix these flaws and apply artistic effects with the Edit Video module of the program. Plus, with just a few clicks, you can crop the HD video to remove black sides and trim the video easily as below. 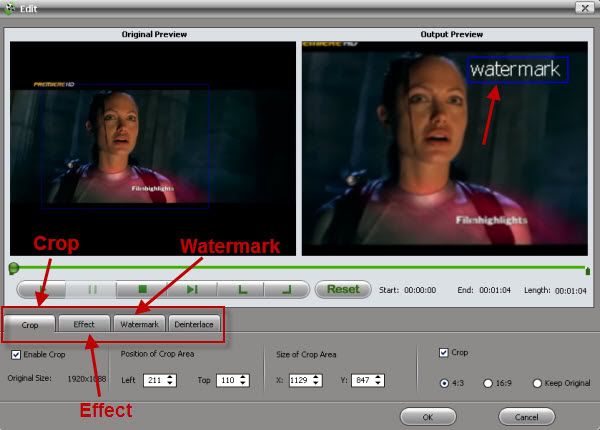 Step 3: Choose your preferred preset Step 3: Choose your preferred presetAfter you finish video source setup, you can select an output format for each video file and specify a directory on your computer to save the output files. In the left-hand section of the Aneeosft HD video converter interface, select the right preset for your device in the drop-down menu. With the personalized profile provided in Aneesoft HD Video Converter, you can easily select the format according to the device name, even if you don't know what formats your device supports. 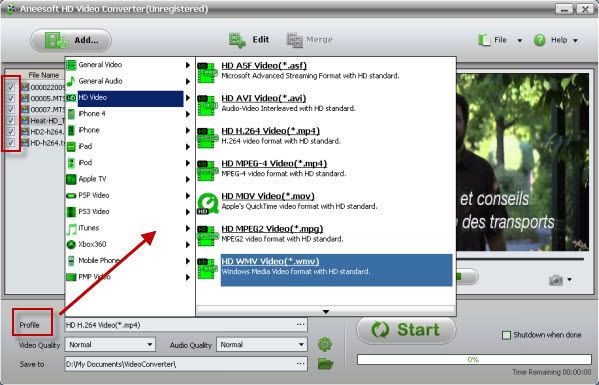 Step 4: Start Conversion in the Aneesoft HD Video Converter Step 4: Start Conversion in the Aneesoft HD Video ConverterClick Start and step away from the computer (processor performance will be seriously affected during conversion). See how easy it is!? Tips & TricksTips1: With batch conversion supported, you can append many tasks at one time and Aneesoft HD Video Converter will convert them one by one for saving your time. Tips2: You can preview the video by selecting the video and clicking Play in the preview pane. You can also take snapshot and save them as jpg, bmp file while preview. Tips3: Join multiple video files into one by clicking "Merge" in Source Setup section. You need select the files first in the source list. You may be interested in these topics: How to convert AVCHD video for the iPad How to convert YouTube video to iPadHow to convert WMV video to iPadHow to download YouTube videos in HD formatHow to embed YouTube video to PowerPointHow to convert YouTube to iPadHow to convert AVI to WMV videosHow to convert MP4 to AVI videosHow to convert MP4 to MP3 audios How to convert MKV to XviD videosHow to convert MKV to MPEG videosHow to convert DVD to iPad video formatHow to convert DVD to iPhone video formatHow to rip DVD to BlackBerry video formatHow to convert DVD to MOV video formatHow to convert DVD to PS3 video formatHow to convert DVD to WMV video formatHow to rip DVD to PSP video formatHow to convert HD video for your portable video playerHow to convert video to iTunes format for freeHow to convert video to Zune video format for freeHow to convert video to PSP video format for freeHow to convert videos to BlackBerry format for freeHow to convert VOB videos to WMV videosHow to convert FLV to iPod MP4 video
lun. 1 nov. 2010, 09:46
|
iPad is so popular today, once you get it, I'm sure you want to enjoy your favorite movie on it. Since you already have some DVD movies, it's not fair to buy them on iTunes store again for iPad. Or you get some videos from website, camera, VHS, YouTube, Limewire, Torrent, etc. If your DVD movie or video are already compatible with iPad, you can drag it into iTunes library directly, connect your iPad to computer, and sync iPad with iTunes, the video will be transferred to your iPad. If your video has the wrong format, you need to convert it at first. I have tried many iPad converters, some are free, they are either work poor, or the conversion speed is really slow, some even has virus which cause my macbook pro crash. I'd like to recommend this Aneesoft DVD to iPad converter for Mac.It's safe and the conversion speed is fast. And here is a step by step guide will show you how to convert DVD movie and put them on iPad. Part 1: Things you'll need1. Aneesoft DVD to iPad Converter for Mac (download trial version) 2. Your iPad and iTunes installed on your computer 3. DVD files you want to convert Part 2: How to convert DVD files to iPad supported formats on MAC?Step 1: Download & install Aneesoft DVD to iPad Converter for MacDownload and install Aneesoft DVD to iPad Converter for Mac, with this powerful converter, you can easily rip and convert DVD to iPad H264/MPEG4 videos with small file size and good quality. Notice: If you are using Windows OS and want to Convert DVD to iPad, you can refer to Aneesoft DVD to iPad Converter. Step 2: Run Aneesoft DVD to iPad Converter for Mac and load DVD disk to convertRun DVD to iPad Converter for Mac in the following main panel, then, just insert your favorite DVD on the DVD-ROM and load your DVD files to Aneesoft DVD to iPad converter for Mac through "Load DVD". Alternatively, you can hit "Load IFO" to import IFO files. In a minute, your DVD files will be listed at the main panel. 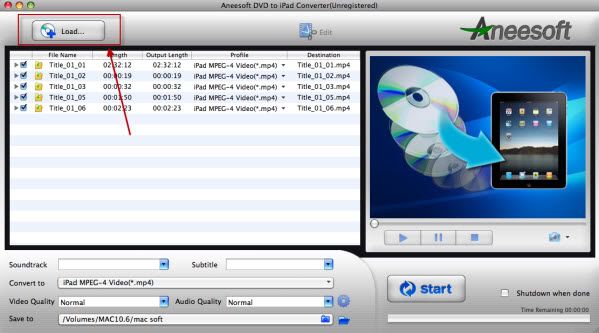 Step 3: Edit your videos: trim, crop, effect, watermark and deinterlace(optional) Step 3: Edit your videos: trim, crop, effect, watermark and deinterlace(optional)This Aneesoft DVD to iPad video converter for Mac allows you to trim, crop your videos, which may help you removing the black edges around your video, so that you can watch your movies in full screen. You can also set different video effect such as grey, invert, gamma, sepia and so on, in addition, if you want to add watermark on your video, you can click "Watermark" tab and then check "Enable Effect" option box. You may add Text or Image watermark onto your video. 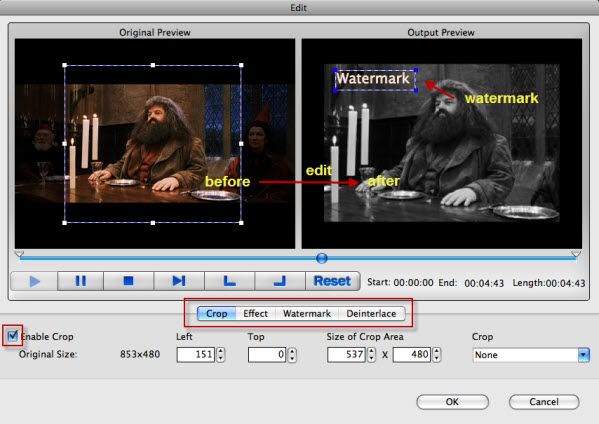 Step 4: Change the output settings and start converting Step 4: Change the output settings and start convertingSelect output video format as iPad H.264 video (*mp4) from the "Convert to" drop-down list. You can also adjust other settings such as video quality, audio quality, output path, etc. After all are ready, just click the big button "Start" to begin converting videos to iPad compatible video files.  Part 3: How to make these videos syncing to iPad? Part 3: How to make these videos syncing to iPad?After convert DVD to iPad compatible formats, now we can import the converted files to iPad. First, you need to launch iTunes, click File option on menu, and add your converted files to iTunes library. Then, connect your iPad 4 to computer via USB cable, iTunes will detect your iPad. After that, click iTunes "File -> Sync iPad", and the files will be transferred to your iPad from iTunes library. When updating completed, you will find the videos on you iPad. At last, you need to know what video is compatible with iPad, here are the details. * H.264 video up to 720p, 30 frames per second, Main Profile level 3.1 with AAC-LC audio up to 160 Kbps, 48kHz, stereo audio in .m4v, .mp4, and .mov file formats; * MPEG-4 video, up to 2.5 Mbps, 640 by 480 pixels, 30 frames per second, Simple Profile with AAC-LC audio up to 160 Kbps, 48kHz, stereo audio in .m4v, .mp4, and .mov file formats; * Motion JPEG (M-JPEG) up to 35 Mbps, 1280 by 720 pixels, 30 frames per second, audio in ulaw, PCM stereo audio in .avi file format
ven. 29 oct. 2010, 04:51
|
Please note, not all videos are compatible with iPad. iPad supports H.264, MPEG-4 video in mp4, mov format. If iTunes couldn't recognize the video or you want to play this video on iPad, please follow the simple tutorial in part 1 and part 2. Things you'll need1. Your iPad 2. Aneesoft video converter Pro (If you are using Mac OS, please download Aneesoft video converter Pro for Mac) 3. iTunes installed on your computer Part 1: How to convert any videos to iTunesStep 1: Download & install Aneesoft Video Converter ProWe'll use the very nice video converter software called Aneesoft Video Converter Pro for converting videos to iTunes format, head over here and download the free trial version. Next step is to install the program. Step 2: Run Aneesoft Video Converter Pro and add videos Now run Aneesoft Video Converter and click the big button "Add..." to add videos from your hard disk, you may add as many videos as you want to convert to iTunes format. Only the titles you checked will be converted. 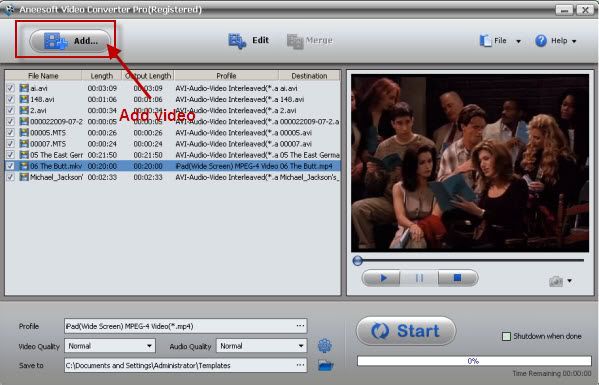 Step 3: Edit your video file (optional): trim, add effects, add watermark and deinterlace Step 3: Edit your video file (optional): trim, add effects, add watermark and deinterlaceThis Aneesoft video converter Pro allows you to trim, crop your videos, which may help you removing the black edges around your video, so that you can watch your movies in full screen. You can also set different video effect such as grey, invert, gamma, sepia and so on, in addition, if you want to add watermark on your video, you can click "Watermark" tab and then check "Enable Effect" option box. You may add Text or Image watermark onto your video. Step 4: Set the output iTunes format and start convertingiTunes supports MOV, MP4 (MPEG-4), M4V, MPEG video formats. So we set the output format to MP4-MPEG4 Video File (*.mp4) for iTunes. You may also find a wide range of preset video formats for iPod, iPhone, PSP for pro version. At last, you can click the big button "Start" to begin converting videos to iTunes compatible video files. 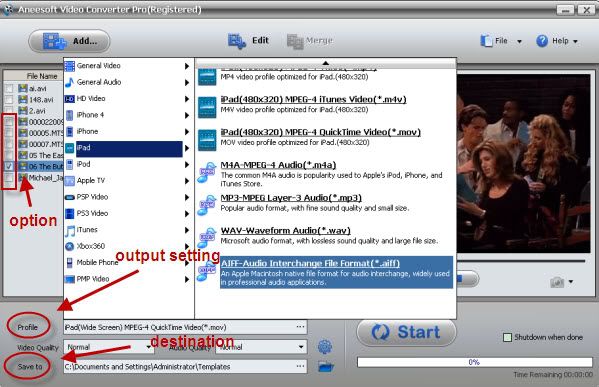 Part 2: How to sync video to iPad Part 2: How to sync video to iPadStep1. Connect iPad with your computer and open iTunes and Click "File" on iTunes menu and select "Add File to Library" to add movies to iTunes library. Step2. On LIBRARY section of iTunes source list, click "Movies", and you could see the movie you added just now. Step3. Select iPad in DEVICES section of iTunes source list. Drag the movie you want to transfer to iPad in library list and drop to iPad Movies. Step4. You will see the video in iPad Movies list and at the same time iTunes will sync the newly added video to your iPad automatically. Tips &Tricks*Aneesoft video converter Pro can convert video to any video formats, such as MP4, AVI, WMV, MPG, MPEG, MOV, TS, FLV and HD video like AVCHD(MTS/M2TS), MOD/TOD, HD WMV. *Aneesoft video converter Pro can convert video for most portable devices: iPad, iPhone 4, iPod touch 4, Apple TV, PSP, Mobile Phone and more. *Aneesoft video converter Pro can edit video, trim, crop, merge, add watermark and apply special effects to your video files. *Aneesoft also offered a free version, you can try Aneesoft free video converter. But this version limits the import video format and the output video format, only the official verison can convert almost any kinds of video. Some nice articleHow to convert video to Zune video format for freeHow to convert video to PSP video format for free How to convert videos to BlackBerry format for free
mar. 26 oct. 2010, 04:36
|
I think so many people have owned an iPad. The large (9.7-inch LED-backlit IPS display), high-resolution screen makes iPad absolutely perfect for watching any kind of video from HD movies and TV shows to podcasts and music videos including MPEG-4 (MP4, M4V), H.264, MOV, etc. At the same time, I think so many iPad users are collecting some videos as AVI, FLV, M2TS, AVCHD, WMV etc. And you may already have a bundle of DVD, you don't want to carry around bulky DVD cases or disc wallets when travelling. OK, this guide is designed to help you ripping DVD movies to your iPad supported format and converting any video to your iPad, and so that you can play your favorite video on your iPad as you like. Here is the detailed information:1. Things you'll need. 2. How to convert DVD files to iPad supported formats on Windows OS? 3. How to convert AVI, WMV, FLV, MKV, VOB video files to your iPad on Windows OS? 4. How to make these videos syncing to iPad 4? Part 1: Things you'll need1. Aneesoft DVD to iPad Converter and Aneesoft iPad video converter or you can download Aneesot iPad Converter Suite(free for download trial version) 2. iTunes installed on your computer 3. Videos you want to convert Part 2: How to convert DVD files to iPad supported formats on Windows OS?Step 1: Download & install Aneesoft DVD to iPad ConverterDownload and install Aneesoft DVD to iPad Converter,this powerful converter, you can convert your DVD videos to iPad MP4 format, and rip DVD to iPad audio format like MP3, M4A, WAV and AIFF for playback on iPad. Notice: If you are using Mac OS and want to Convert DVD to iPad, you can refer to Aneesoft DVD to iPad converter for Mac. Step 2: Run Aneesoft DVD to iPad Converter and load DVD disk to convertRun DVD to iPad Converter in the following main panel, then, just insert your favorite DVD on the DVD-ROM and load your DVD files to Aneesoft DVD to iPad converter through "Load DVD". Alternatively, you can hit "Load IFO" to import IFO files. In a minute, your DVD files will be listed at the main panel. 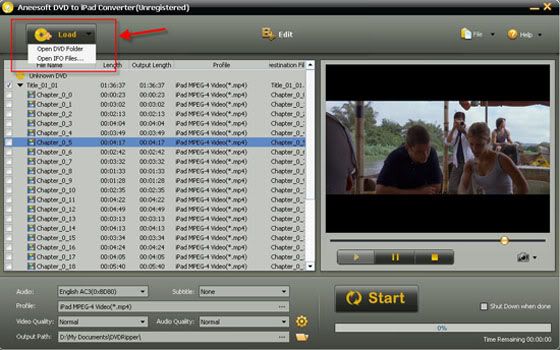 Step 3: Edit your videos: trim, crop, effect, watermark and deinterlace(optional) Step 3: Edit your videos: trim, crop, effect, watermark and deinterlace(optional)This Aneesoft DVD to iPad video converter allows you to trim, crop your videos, which may help you removing the black edges around your video, so that you can watch your movies in full screen. You can also set different video effect such as grey, invert, gamma, sepia and so on, in addition, if you want to add watermark on your video, you can click "Watermark" tab and then check "Enable Effect" option box. You may add Text or Image watermark onto your video. 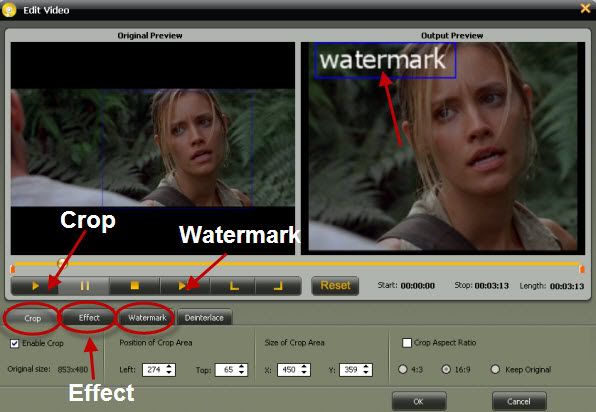 Step 4: Change the output settings and start converting Step 4: Change the output settings and start convertingSelect output video format as .mp4 from the "Profile" drop-down list. You can also adjust other settings such as video quality, audio quality, output path, etc. After all are ready, just click the big button "Start" to begin converting videos to iPad compatible video files. 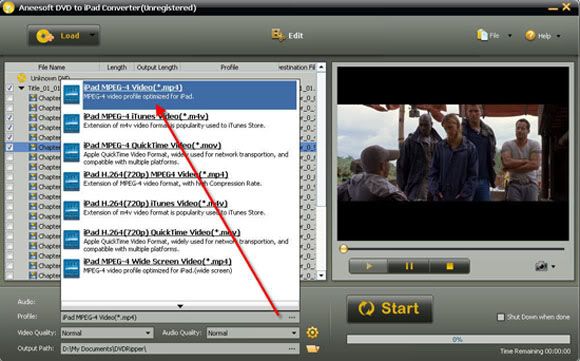 Part 3: How to convert AVI, WMV, FLV, MKV, VOB video files to your iPad on Windows OS? Part 3: How to convert AVI, WMV, FLV, MKV, VOB video files to your iPad on Windows OS?Most kinds of video files like AVI, WMV, FLV, MKV, VOB can't be played directly on iPad, so if you want to play incompatible Video files on iPad, you need to convert them to iPad. That will be very easy if you download Aneesoft iPad video converter.one of the best iPad Video Converter, which can help you convert video to iPad supported video and audio formats with high output quality. The steps are very easy, Download and run Aneesoft iPad video converter and click the big button "Add..." to add videos from your hard disk.The next steps are similar to rip DVD videos to iPad, set output format and start converting. Notice: If you are using Mac OS and want to Convert DVD to iPad, you can refer to Aneeosft iPad video converter for Mac. 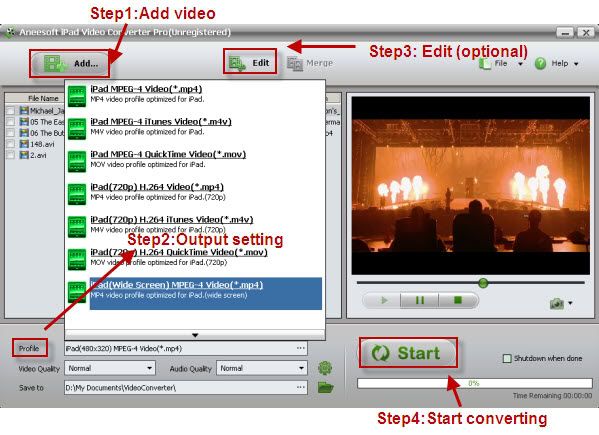 Part 4: How to make these videos syncing to iPad? Part 4: How to make these videos syncing to iPad?After convert DVD, WMV, AVI, FLV etc to iPad compatible formats, now we can import the converted files to iPad. First, you need to launch iTunes, click File option on menu, and add your converted files to iTunes library. Then, connect your iPad 4 to computer via USB cable, iTunes will detect your iPad. After that, click iTunes "File -> Sync iPad", and the files will be transferred to your iPad 4 from iTunes library. When updating completed, you will find the videos on you iPad.
sam. 23 oct. 2010, 08:29
|
Almost everyone know YouTube, and most of all prefer to watch movies on YouTube, however, sometimes you may want to watch offline, want to download to your portable media player such as iPad, iPod, iPhone, want to avoid buffering problems while viewing on a slow connection, want to view when traveling, want to archive videos that might be subsequently removed from YouTube, want to share in places where YouTube is blocked or banned. In a word, you just download YouTube video to your hard disk or convert YouTube video to other format. If you confused about that, this tutorial will show you how to download YouTube to your hard drive easily for free and convert YouTube to MP4. Things you'll need1. Favourite YouTube videos 2. Aneesoft YouTube Converter (download the free trial version) 3. Enough free space on hard disk Step 1: Download & install Aneesoft YouTube Converter We'll be using the all-in-one YouTube downloading software called Aneesoft YouTube Converter to download YouTube videos and convert the videos to most video formats, You can search Aneesoft YouTube Converter on Google or go to Aneesoft home to download. Then, install this YouTube Converter. Step 2: Run Aneesoft YouTube Converter and add YouTube video URLsNow run Aneesoft YouTube Converter and click the button "Add URL" to copy the URL of YouTube video, you may add as many YouTube URLs as you want for downloading to your computer. Now HD videos from YouTube are available for download with Aneesoft YouTube Converter. 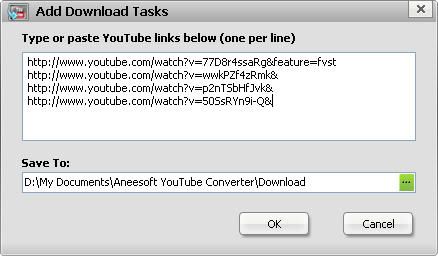 Step 3: Start downloading YouTube videos Step 3: Start downloading YouTube videos The YouTube videos will start downloading automatically after you add the YouTube videos URLs into Aneesoft YouTube Converter. Make sure your Internet is connected to YouTube website and the URLs of YouTube videos are correct. You're able to download multiple YouTube videos all at once in YouTube Converter.  Step 4: Convert YouTube videos to MP4 format Step 4: Convert YouTube videos to MP4 formatOnce the YouTube video has been downloaded successfully, it'll be removed from the "Download" tab and transferred to "Convert" tab. Change the output settings to MP4 format to convert videos with best quality. You may convert YouTube FLV videos to any other common video formats for video editing or playback on your mobile devices, such as iPad, iPod, iPhone, PSP etc. Remember that the output file size mostly depends on the bitrate you set. Larger bitrate, larger file size.  Step 5: Transfer and watch the YouTube videos anywhere Step 5: Transfer and watch the YouTube videos anywhereAfter the YouTube videos has been converted successfully, you may transfer the converted YouTube videos to your PC, Mac or most mobile devices, like iPad, iPod, PSP for watching the YouTube videos.  Tips &Tricks Tips &Tricks* You can extract audios from YouTube video in the help of Aneesoft YouTube Converter. * With multi-threading supported by Aneesoft YouTube Converter, you can download and converter multiple YouTube videos all at once easily with great speed. *If you just want to download YouTube videos, you can download the free version-Aneesoft free YouTube downloader. * You can runs this software on all windows OS * Aneesoft YouTube converter can convert YouTube videos to any common video format, such as AVI, MPEG, WMV, MOV, VOB, ASF and more. * Aneesoft YouTube Converter can easily convert YouTube videos for playing back on the mobile devices, such as YouTube to iPad, YouTube to iPod, YouTube to iPhone, YouTube to PSP and more.
jeu. 21 oct. 2010, 07:12
|
I think so many iPad users are collecting some videos as AVI, FLV, M2TS, AVCHD, WMV etc. files. And It becomes a big issue that how to play them on my iPad? for iPad users. In fact, that is very easy, and I will show you the easiest way to convert any videos for you iPad. OK, here I will tell you how to solve this problem step by step. Things you'll need1. Your iPad 2. Aneesoft iPad video converter (If you are using Mac OS, please download Aneesoft iPad video converter for Mac) 3. iTunes installed on your computer Part 1: How to convert any videos to iPad compatible formatsBefore you convert any video for your iPad, you need to convert video to iPad compatible format first. So, first, I will tell you how to finish it in simple steps. Step 1: Download & install Aneesoft iPad Video Converter If you want to finish it, you need to download the best and easiest software called Aneesoft iPad video converter which can convert almost all videos to iPad video formats. You can convert AVI to iPad , MKV to iPad , WMV to iPad , MOV to iPad, MPEG to iPad, FLV to iPad , RM to iPad and more. Free trial version of Aneesoft iPad Video Converter from its official page or download site, then install it to your PC. Step 2: Run iPad Video Converter and add videos Now run the program and click the big button "Add..." to add videos that you wanna convert from your hard disk, only the titles you checked will be converted. 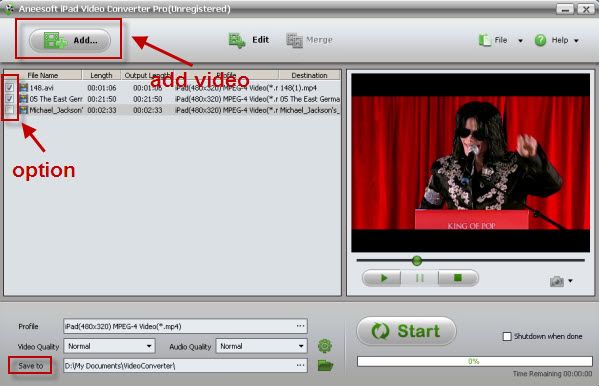 Step 3: Edit your video file (optional): trim, add effects, add watermark and deinterlace Step 3: Edit your video file (optional): trim, add effects, add watermark and deinterlaceThis Aneesoft iPad video converter allows you to trim, crop your videos, which may help you removing the black edges around your video, so that you can watch your movies in full screen. You can also set different video effect such as grey, invert, gamma, sepia and so on, in addition, if you want to add watermark on your video, you can click "Watermark" tab and then check "Enable Effect" option box. You may add Text or Image watermark onto your video. 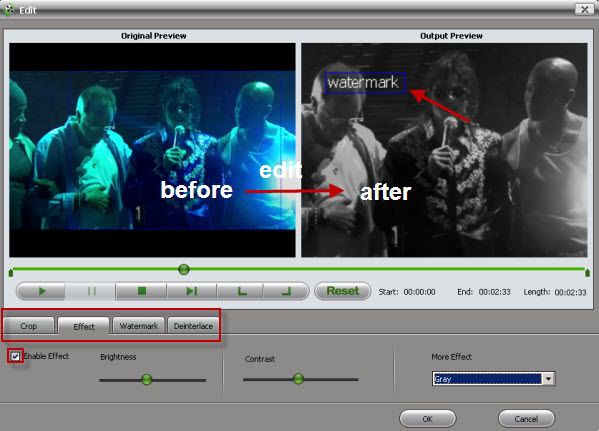 Step 4: Change the output settings and start converting Step 4: Change the output settings and start convertingYou'll find a wide range of preset video setting options available for Apple iPad. You may select "iPad (Wide Screen) MPEG-4 Video (*.mp4)" for converting AVI or MKV or others to iPad. Remember that the output file size and converting speed mostly depends on the Bitrate you set. Larger bitrate, larger file size and longer convertion time. 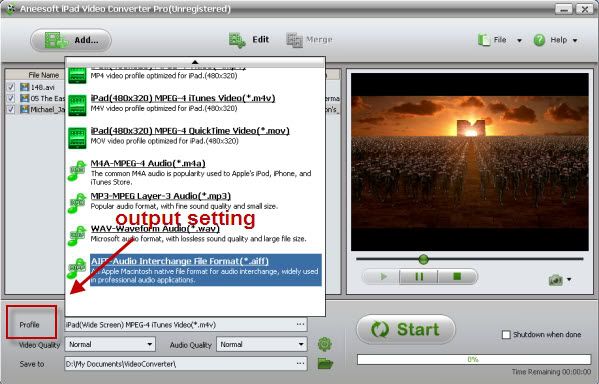 After all are ready, just click the big button "Start" to begin converting videos to iPad compatible video files. Once the convert is complete, Aneesoft iPad Video Converter will place on your Desktop a new iPad format version of your video that will play on the iPad. Double-click the new file and play it to make sure it looks as you expect. Part 2: How to make these videos syncing to iPad?After convert WMV, AVI, FLV etc to iPad compatible formats, now we can import the converted files to iPad. First, you need to launch iTunes, click File option on menu, and add your converted files to iTunes library. Then, connect your iPad to computer via USB cable, iTunes will detect your iPad. After that, click iTunes "File -> Sync iPad", and the files will be transferred to your iPad from iTunes library. When updating completed, you will find the videos on you iPad.
mar. 19 oct. 2010, 04:40
|
Hello, I am a apple enthusiast, recently, I found a new brand "Aneesoft" when I read daily news, I found that many Apple fans are using the Aneesoft products and give a high evaluation. Then I am very curious about this brand, I search from the Google and found this website home, there are so many Apple auxiliary tools and practical tutorials. Below is the company introduction: Aneesoft is dedicated to developing and providing easy and affordable multimedia software for both Windows and Mac users, including video converting, DVD ripping tools and digital photography software for all the users around the world. Aneesoft.com is constantly trying to expand into more forms of multimedia software for users. They will keep improving the functions and performance of our products. They believe that with your support, Aneesoft of much higher quality and stability is just around the corner. That is so great! I download some products and read many tutorial on iPhone, iPad and iPod, it really a huge treasure for us Apple fans. At last, I recommend a good tutorial to every apple user, which shows how to rip or convert DVD movies to iPhone 4 or convert video to iPhone 4 easily. Things you'll need1. Apple media device - iPod, iPad, iPhone 2. Aneesoft DVD Ripper Pro for Mac (If you are using Windows OS, please download Aneesoft DVD Ripper Pro) 3. iTunes installed on your computer 4. DVD video files Step1. Run Aneesoft DVD Ripper Pro for Mac and load DVD disk to convertDownload and install Aneesoft DVD Ripper Pro for Mac on your PC, launch setup and follow instructions on screen. Then run the DVD Ripper Pro in the following main window, click "Load..." button on the toolbar to add videos that you want to convert to Apple media device video formats. 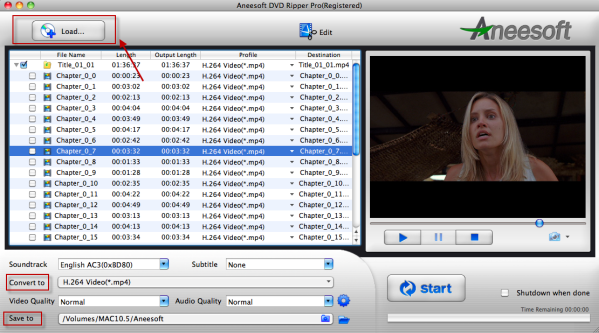 Step2. Output Setup Step2. Output SetupChoose the most suitable output settings you want. 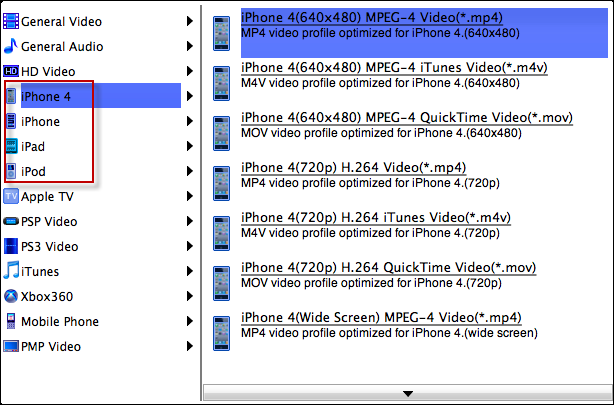 Step3. Start ripping and converting DVD Step3. Start ripping and converting DVD Finally, click the big "Start" button to start converting DVD. The Convert progress bar shows you how much of the convert process is completed. Step4. Make these videos syncing to iPhone 4, iPad, iPodAfter convert DVD videos to iPhone 4, iPad, iPod compatible formats, now we can import the converted files to iPhone 4, iPad, iPod. First, you need to launch iTunes, click File option on menu, and add your converted files to iTunes library. Then, connect your media device to Mac computer via USB cable, iTunes will detect your media device. After that, click iTunes "File -> Sync iPhone (iPad, iPod)", and the files will be transferred to these devices from iTunes library. When updating completed, you will find the videos on you media device. Edit your video file (optional): trim, add effects, add watermark and deinterlace Crop Video: Crop Video:To watch your movies in full screen, you may crop videos to remove the black edges around your video with this Aneesoft DVD Ripper Pro for Mac. Click "Crop" tab to open the Crop Video window, and then check the "Enable Crop" option box. There are two methods available to crop your video: crop by a adjusting the crop frame and crop by setting the crop values. After you select an output aspect ratio and finish the crop, you can preview the final visual effect on the right "Output Preview" in real-time. Set Effect:If you want to adjust the video effect of your movie, you can click the "Effect" tab and then check "Enable Effect" option box. Drag each effect adjustment slider to set the video brightness and contrast. You can also choose a special effect from the Effect drop-down list to apply to your movie. Add Watermark: If you want to add watermark on your video, you can click "Watermark" tab and then check "Enable Effect" option box. You may add Text or Image watermark onto your video. If you want to add Text watermark for your video, click the Color or Font button to set the color and font your text. Drag and drop the text to anywhere you want. If you want to add image watermark, just check the Image option and select the image you want to add as watermark. Deinterlace:To remove the DVD movies black sides, just click the "Deinterlace" tab and then check "Enable Deinterlace" box, set up the Start time and End time.
| |


