|
 mer. 26 janv. 2011, 08:34 mer. 26 janv. 2011, 08:34
|
Taking a short video with your Canon HR10, you may want to edit it on your Mac. Due to the AVCHD video, which stored with the "M2TS (MTS)" file extension, are not compatible with QuickTime player, you may need to convert your AVCHD M2TS MTS files to MOV with an AVCHD Converter for Mac from iFunia. You don't need to be familiar with HD Video Converter, video formats or settings - just run the iFunia HD (AVCHD) video converter, choose your M2TS video, select a ready-made preset, and hit Start to convert M2TS videos. Let's go through the easy steps. Step 1. Source SetupDownload and run iFunia HD Video Converter for Mac, and click Add
button to select AVCHD M2TS video files. 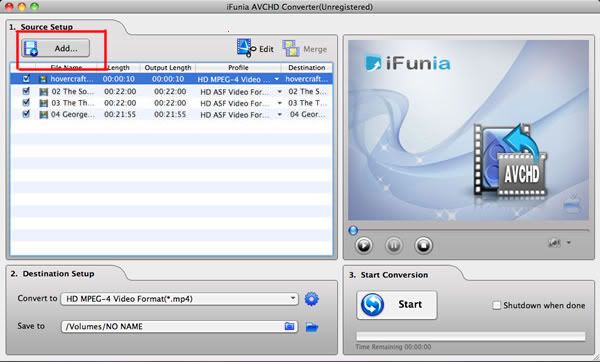 Tip: You can add your AVCHD M2TS video by drag-n-drop. And the software has a feature of previewing and playing your AVCHD video files. Simply select a file which you want to preview in the Source File area and click Play button; you can also take snapshot at will to store the image you like. Step 2. Destination SetupAfter you finish video source setup, you can select your preferred video format from the Output format drop-down menu. Here we choose MOV-QuickTime Video File(*.mov) video, and click the folder icon to specify a directory on your computer to save the output files. 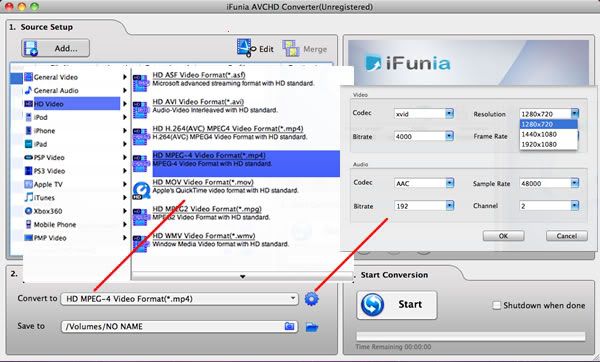 There are various format/bit rate/screen resolution options in the Setting window. Different file formats result in different video compression rates. Bit rate refers to the number of bits processed per unit of time, the larger the number, the more bits processed and the better the quality. Resolution refers to the number of pixels handled by the device display. Step 3. Start ConversionTo start converting, click the Start button. The Progress bar shows the status of the converting task. iFunia HD Video Converter prompts you when the converting task is completed, then click OK. Other tutorials to solve problem of video limitation about iDevice: * Convert AVCHD M2TS to AVI on Mac* Convert AVCHD video to portable files on Mac* Play AVCHD video on Mac OS* iFunia HD Video Converter for Mac Review* Convert MKV to iPhone 4 on Mac* Convert video to iPhone on Mac* How to convert TOD to iPad on Mac?* How to convert DVD to Apple TV on Mac?
lun. 24 janv. 2011, 09:58
|
Here, I'll recommend you three software suites, 2010 special offer of iFunia. The iFunia discounted software packs should be very useful for users who would like to convert holiday video(including HD!) or movie into any formats and enjoy the video entertainment on iPad, iPhone, iPod or other portable device. Highlights of the iFunia 2010 holiday special offer include:iFunia MediaConverter Suite, SAVE $21, now only $49 instead of $70; MediaConverter Suite is an all-in-one video converter package that includes two converter tools: Video Converter Pro and DVD Ripper Pro. With this suite, it's easy to convert all of your DVD movies and videos to any video formats for playing back on portable mobile devices. Key Features of iFunia Video Converter for Mac and iFunia DVD Ripper ProiFunia Video Converter for Mac is a groundbreaking Mac video format converter you can use to convert video of all popular formats like AVI, WMV, AVCHD, MKV, FLV, H.264/AVC, MP4, MOV, 3GP,etc. Convert video and save for iPod, iPhone 4, iPad, Apple TV and other portable devices. It also provides a series of practical editing tools: trim, crop, add watermark & effects. iFunia DVD Ripper Pro for Mac lets you enjoy your DVD movie anywhere you want, on the playback device of your choice. It is simple enough to use and powerful enough to rip and convert DVD into the formats you need. Now with batch video conversion, support for a broad range of portable devices, and exclusive support for movie editing, your DVD movie will go everywhere you do. 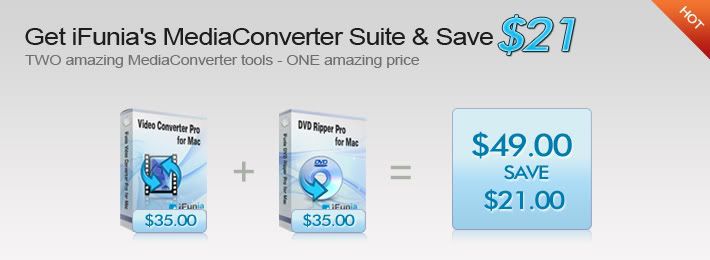 iFunia iPadConverter Suite iFunia iPadConverter Suite, SAVE $20, now only $38 instead of $58; iPad Converter Suite is an all-in-one iPad video converter package for iPad, including two iPad tools: iPad Video Converter & DVD to iPad Converter, to convert DVD movies and videos to iPad supported video format. Key Features of iFunia iPad Video Converter for Mac and iFunia DVD to iPad Converter for MaciFunia iPad Video Converter for Mac is newly designed especially for the latest Apple iPad. It is the best iPad video converter Mac that helps you convert all popular video formats such as AVCHD M2TS/MTS, MOD, TOD, MPEG, AVI, MKV, FLV, MOV, WMV to iPad supported formats including MP4, M4V, MOV, MP3, AAC, etc. The iPad Video Converter Mac is also possessed with basic video editings of trimming, cropping, joining, etc. With iFunia DVD to iPad Converter for Mac, you can follow three steps to rip and convert your loved Hollywood DVD movies to iPad-ready MP4, M4V and MOV video formats and M4A, MP3, AIFF, WAV audio formats. iFunia DVD to iPad Converter Mac also allows you to trim DVD movie, crop DVD and select DVD subtitle and audio track to convert your movie with any available languages.  iFunia iPhoneConverter Suite iFunia iPhoneConverter Suite, SAVE $20, now only $38 instead of $58; iPhone Converter Suite is an all-in-one video converter package, including two converter tools: iPhone Video Converter and DVD to iPhone Converter, to convert all your DVD movies and videos to iPhone supported video formats and enjoy it on-the-go. Key Features of iFunia iPhone 4 Video Converter for Mac and iFunia DVD to iPhone 4 Converter for MaciFunia iPhone 4 Video Converter for Mac is a simple conversion solution that helps you converts all popular video formats such as M2TS/MTS, MOD, AVI, MKV, FLV, MOV, WMV, M4V, RMVB to iPhone, iPhone 3G, iPhone 3GS and iPhone 4 supported formats including MP4, MP3, M4A, etc. iFunia iPhone 4 Video Converter for Mac is possessed with basic editing functions of trimming, cropping, joining, etc. With iFunia DVD to iPhone 4 Converter for Mac, you can easily rip and convert your loved Hollywood DVD movies to iPhone, iPhone 3GS and iPhone 4 MP4 video on Mac. iFunia DVD to iPhone 4 Converter Mac also allows you to trim DVD movie, crop DVD and select DVD subtitle and audio track to convert your DVD movie with any available languages. 
sam. 22 janv. 2011, 09:52
|
YouTube has released high quality MP4 video for users to have the option of watching some videos in 1080p HD. The ability to watching higher quality videos means improved sharpness and visual clarity for some YouTube videos. It's very noticeable in videos that contain text or fast movement and also in full-screen mode. And it will be really satisfying if those YouTube HD videos can be downloaded. Here I'll show you how to download YouTube HD Video with iFunia Free YouTube Downloader for Mac. iFunia Free YouTube Downloader for Mac is a totally FREE YouTube downloader for Mac OS X Leopard and Snow Leopard which enables you to batch download YouTube(including HD YouTube video) and many other flash videos to your Mac computer. But if you want to put the HD YouTube Video to iPad, iPod touch, iPhone or other portable device, you must use iFunia YouTube Converter which can not only download YouTube HD video, but also convert them to all popular formats like avi, wmv, mp4 etc. Step1. Run iFunia Free YouTube video downloader for MacNow download iFunia Free YouTube video downloader and run it. Click the button "Add URL" to add the URL of YouTube HD video; you may add as many YouTube HD video URLs as you want for saving onto your Mac. And then specify a directory on your Mac to save the output FLV files. 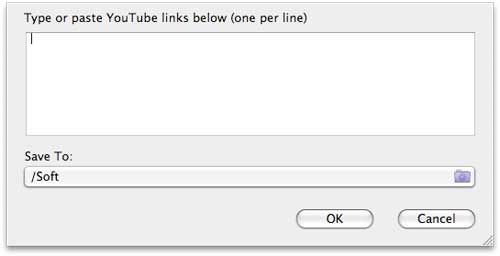 Step 2: Start downloading YouTube HD videos on Mac Step 2: Start downloading YouTube HD videos on MacThe YouTube HD videos will start downloading automatically after you add the YouTube HD video URLs. Make sure your Internet is connected to YouTube website and the URLs of YouTube videos are correct. You're able to download multiple YouTube videos all at once. 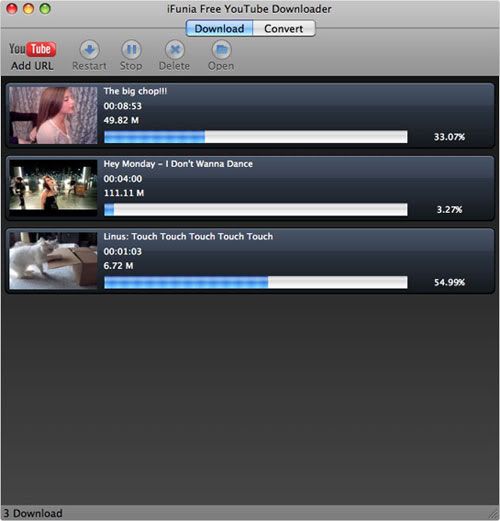 Step 3: Convert YouTube HD videos to other video format Step 3: Convert YouTube HD videos to other video formatThis free version doesn't support this feature. You must upgrade to iFunia YouTube Converter to convert all HD YouTube videos to other video format, like YouTube to AVI, YouTube to MOV, YouTube to MP4, YouTube to MKV, YouTube to MP3 and more. Related tutorials and article to iFunia YouTube Converter:How to Download and Converter YouTube 4K VideosHow to convert YouTube videos to iMovieHow to Put YouTube Videos on PSPHow to embed YouTube video to Keynote on MacHow to use the best YouTube Video Converter for MacThe Best YouTube Video Format for Uploading
mar. 18 janv. 2011, 10:35
|
So you have a Sony camcorder and record lots of beautiful memories of your family, friends and trips, want to save it on your Mac for playback or for sharing with your friends? However, as the MTS/M2TS video format is for the HD camcorders, and the portable multimedia devices do not support playing the M2TS video directly, we have to convert M2TS to videos that supported by those players.  If you want to enjoy the MTS video on your portable device, iFunia AVCHD Video Converter will be the best assistant of you. It can help you convert MTS with perfect output quality. And the use-friendly interface can make the operation quite easy. Free download AVCHD Converter for Mac ( Intel Version ) To install it, simply mount the .dmg archive by double-clicking it, and copy the application to your applications folder (or wherever you want). Step 1: Run Sony MTS Video Converter for Mac and import M2TS or MTS video filesFree download iFunia AVCHD Video Converter for Mac. Install it in your computer and launch, transfer the MTS/M2TS video from your Sony camcorder to your computer, then Drag & drop or click "Add..." button to add MTS/M2TS videos into Sony MTS Video Converter for Mac, after adding the files, you can preview them in the preview pane on the right of the main interface.  Step 2: Select an output format and set other settings as you like Step 2: Select an output format and set other settings as you likeUse the "Convert to" on the bottom of the window to control the output format. Select the video output format for each video file and specify a directory on your computer to save the output files. You can change the output settings as you need. Remember that the output file size mostly depends on the Bitrate you set. Larger Bitrate, larger file size. Step 3: Start converting Sony MTS/M2TS files to your MacNow you may click the big button "Start" to begin converting AVCHD M2TS/MTS to PS3 MP4 video. The convert progress bar shows you how much of the encoding is completed. The encoding time will depend on several variables including: the duration of the video file, the speed of your computer, what other activity your computer is currently doing and the bitrate you set. (Optional) Edit videos: crop, trim, add effects, add watermarkThis step is optional step. But when you come to review the HD MTS video your taken and find it's too dark or the focus is blurred, you may wanna fix these flaws and apply artistic effects with the Edit Video module of the program. Plus, with just a few clicks, you can crop the MTS video to remove black sides, trim the video and add text or image watermark easily as below. 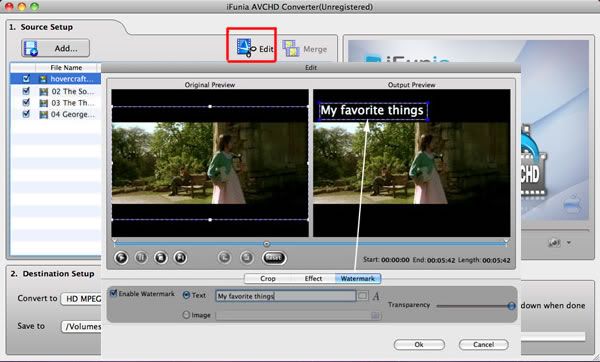 Related links: * How to convert MTS to AVI on Mac?* How to convert MTS to MP4 on Mac?* How to convert MTS to MOV on Mac?* How to convert MTS to MPEG2 on Mac?* How to convert MTS to WMV on Mac?* How to convert AVCHD M2TS/MTS to iPad on Mac?* How to convert M2TS MTS to iPhone on Mac?* How to convert M2TS MTS to PS3 on Mac?* How to import/convert M2TS MTS to iMovie on Mac?* How to import/convert M2TS MTS to FCP on Mac?* How to import/convert M2TS MTS to iDVD on Mac?* How to convert MTS to iPod on Mac?* How to convert Canon MTS/M2TS on Mac?* How to convert M2TS MTS to QuickTime on Mac?* How to convert M2TS to DVD on Mac?* How to convert MTS to FLV on Mac?* How to convert MTS to M4V on Mac?* How to convert MTS to MKV on Mac?* How to convert MTS to YouTube on Mac?* How to convert Panasonic MTS/M2TS on Mac?* How to convert Sony MTS/M2TS on Mac?* How to convert AVCHD M2TS MTS to MOV on Mac?* How to convert M2TS files to AVI/MP4/MPEG on Mac?* How to convert TS to MP4, MOV, etc. on Mac OS X?
ven. 14 janv. 2011, 09:26
|
Before showing you guy the text about how to convert DVD to iPhone 4 (IOS 4), let's make a quick review of the Apple iPhone 4 which attracts the globe public in 2010. Apple iPhone 4 has an all-new display, as well. Apple is calling the LED backlit, 960 x 640 IPS screen the "Retina Display" due to its high resolution and pixel density. At the same 3.5-inches as the older screens, the new display manages an insane 326ppi pixel density along with an 800:1 contrast ratio. Steve made a huge point about the science behind this technology during his keynote, claiming that the resolution of the screen essentially tops what is perceivable by the human eye. There have been some debates as to whether or not this argument holds water, but we can tell you this: to our eyes, there has never been a more detailed, clear, or viewable screen on any mobile device. All these things make it be definitely perfect for watching videos on the go with it. Then, I will give you guys a detailed account of converting DVDs to iPhone 4... 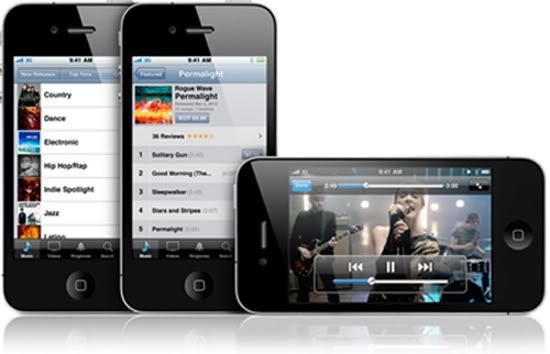 Things You'll Need: Things You'll Need:* An iPhone 4 * A DVD movie you want to copy * iFunia DVD to iPhone 4 Converter ( download the free trial version) * iTunes 6 or later * QuickTime 7.0.4 or later * Free space on your hard drive Now get iPhoneConverter Suite and save $20! This iPhoneConverter Suite includes two programs: iPhone 4 Video Converter and DVD to iPhone 4 Converter. Step 1 Launch iFunia DVD to iPhone 4 Converter and load your DVDNow get your DVD disc and insert it. Then run iFunia DVD to iPhone 4 Converter on your Mac and click the big button "Load..." to load your DVD disk, you may see the name of DVD Movie disk if you insert DVD disk before running this DVD ripper tool (see the image below to have an idea). This may take up to a minute or two depending on the contents of the DVD and the speed of your optical drive. 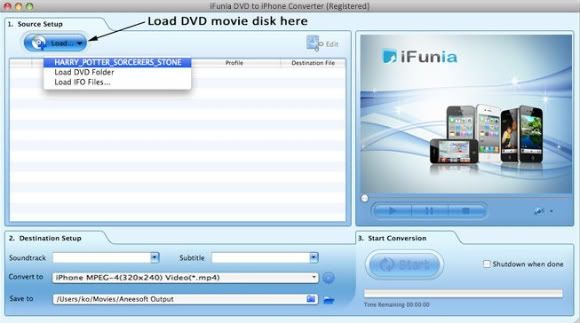 Step 2 Output Settings for iPhone 4 Step 2 Output Settings for iPhone 4In the Destination-Setup section of the interface, choose the right preset for your iPhone device in the Convert-to drop-down menu. You can also change the output settings to make the video look the best on iPhone. Here I set the output video format to 'iPhone MPEG-4 (640*480) Video (*.mp4)', Video Codec as 'H.264', Resolution as '640*480', Bitrate as '768', Frame Rate as '30', Audio Codec as 'AAC' by default. Remember that the output file size mostly depends on the Bitrate you set. Larger Bitrate, larger file size.  Step 3 Convert DVD to iPhone 4 on Mac and Transfer/Sync to iTunes Step 3 Convert DVD to iPhone 4 on Mac and Transfer/Sync to iTunesNow you may click the big button "Start" to begin converting DVD movies onto your hard disk. The Convert progress bar shows you how much of the convert process is completed. Please note the ripping time will depend on several variables including: the duration of the video file, the speed of your computer, what other activity your computer is currently doing, the codec you selected (H264 or MP4) and the bitrate you set. After conversion, you can minimize the DVD to iPhone converter's window. Then attach your iPhone to the computer and sync it with iTunes. Check the option "Automatically sync songs and videos to my iPhone" so your music and video from the iTunes library will automatically snyc to your iPhone. Read the detailed guide from here. Now that youve converted the DVD video into a usable iPhone 4 ready-format, you can do what you like with it. Pull it into iMovie and create e-mail, Web, YouTube, iPhone 3G, iPhone 3GS and iPhone 4-compatible versions of it and share it with the world. After all, its your video! Tips & TricksTip 1: You can select any subtitle and audio track on DVD for ripping to iPhone MP4 video. Tip 2: You can do simple editing like trimming, cropping, adding special effects and watermark to video by clicking "Edit". Real-time preview provided while editing. Tip 3: With batch conversion supported, you can append many tasks at one time and iFunia iPhone Video Converter for Mac will convert them one by one for saving your time. Tip 4: You can preview the video by selecting the video and clicking Play in the preview pane. You can also take snapshot and save them as jpg, bmp file while preview. Related articles:* Convert MKV to iPhone 4 on Mac* Rip, Convert and Put DVD to iPhone 4 on Mac* Copy iPhone 4 iMovies To iPad* Handbrake Presets for iPhone 4 and iPad* iOS 4 Upgrade Guide: Install iOS 4 on Your iPhone* Jailbreak iPhone 4 iOS 4.1 with GreenPois0n on Mac* Convert YouTube FLV to iPhone 4 on Mac* Convert WMV to iPhone 4 on Mac* Convert video to iPhone 3G and iPhone 3GS on Mac* Transfer video from iPhone to Mac quickly* Rip DVD movie to MP4 video for sync to iPhone 3G(S)* Turn off and reset /restart iPhone* Sync iPhone and iTunes* Make iPhone Ringtones on Mac for Free
mer. 12 janv. 2011, 10:31
|
Mac users will need in fact to purchase, albeit at a small price, something that will allow them to read convert MOD and TOD to AVI, MOV, MP4, DV, MKV, etc. for playback or editing on OS X (Snow Leopard included). So, I have taken the time to put together this simple guide on how to convert MOD, TOD files on Mac with iFunia MOD Converter for Mac. Step 1: Add the MOD/TOD video filesFirst copy the MOD, TOD file from your video camera to your hard drive. Then install and run iFunia MOD Converter for Mac, Click the "Add..." button to browse your computer hard disc and load the MOD/TOD video files you want to convert to the software. 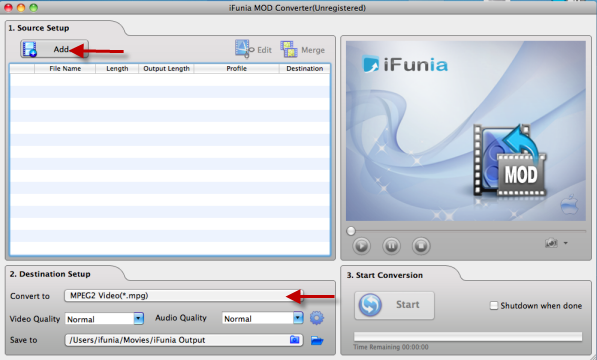 Step 2: Choose output format Step 2: Choose output formatClick the "Convert to" drop-down button to choose "iPad MPEG-4 (*.mp4)" as output formats. (Advanced users can click "Settings" to customize output video audio parameters like bit rate, frame rate, etc) 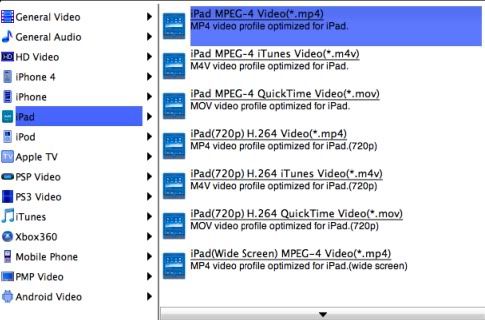 Step 3: Start to convert MOD TOD to iPad Step 3: Start to convert MOD TOD to iPadClick "Start" to convert MOD TOD files to MP4, the whole conversion will take a few minutes. Tags:* MKV Converter for Mac, iPad Video Converter for Mac, iPhone 4 Video Converter Mac, FLV Converter for Mac, MOV Converter for Mac, iPod Video Converter for Mac, PSP Video Converter for Mac, Apple TV Video Converter for Mac, AVI Converter for Mac, Mobile Phone Converter for Mac, WMV Converter for Mac, Video Converter Pro for Mac
mar. 11 janv. 2011, 08:28
|
YouTube is a wonderful place you can find a good amount of interesting videos in various topics. And to enjoy your favorite ones on your iDevice( iPad, iPhone 4, and iPod...) to reduce boredom on bus or train etc., you can download them off with free video downloader for Mac. Or, if you have stored them on your Mac, the only thing you need do is making sure your YouTube files are accepted by iDevice. And if your YouTube files are unplayable on iDevice, this guide will show you how to download video content from numerous sites (YouTube, etc.) and convert videos to iPad on Mac with iFunia YouTube Converter for Mac. It is pretty simple once you get the hang of it! Step 1: Free download and install iFunia YouTube Converter for MaciFunia YouTube Converter provides a perfect solution to convert YouTube videos to iPad as it capable of converting YouTube videos to iPad supported formats like .m4v, .mp4, and .mov file formats. Now HD videos from YouTube are available for download with iFunia YouTube Converter. Step 2: Go to YouTube.com and find videos you want to convert Launch the YouTube Video Converter on your Mac after installation click the button "Add URL" to copy the URL of the YouTube video, you may add as many YouTube video URLs as you want for downloading to your computer. 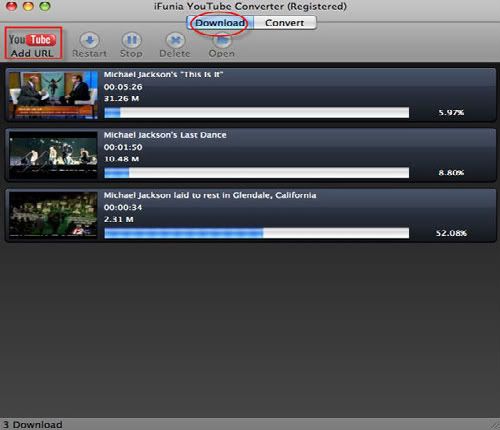 Step 3: Convert YouTube Video to iDevice supported format Step 3: Convert YouTube Video to iDevice supported formatIn order to import YouTube video into iDevice, you need to convert YouTube video to iDevice compatible format. Click the "Gear" button at the right side and change the output format you like from the "Convert to" drop-down menu list. Select the best video format for each video file and specify a directory to save the YouTube video files. After all settings has done hit the "Convert" button to start YouTube video to the video you wanted conversion. 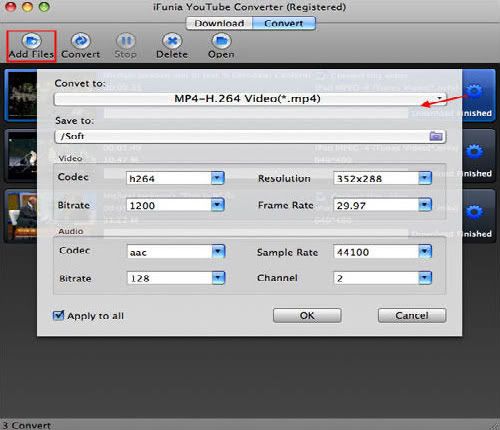 Free download iFunia Free YouTube Downloader for MacTips and Tutorials: Free download iFunia Free YouTube Downloader for MacTips and Tutorials:* How to Free Download YouTube HD Video on Mac* How to Put YouTube Videos on PSP* How to Upload and Edit YouTube videos* How to Download and Converter YouTube 4K Videos* How to Convert YouTube Videos to iMovie* Use the Best YouTube Video Converter for Mac* Prepare Your AVCHD Video for YouTube?* Download and Embed YouTube video to Keynote on Mac* The Best YouTube Video Format for Uploading
sam. 8 janv. 2011, 09:05
|
As the development of society, more and more portable devices are overflowing in our life, like iPad, iPhone 4, iPod, PSP, Zune, PS3, cell phones, etc. When we want to enjoy DVD and video on your iPad, iPhone 4, iPod, PSP, PS3, Zune, etc. we may encounter the problem of adding and playing DVDs and videos on them. In fact, most of DVD has CSS copyright protection, so we need a professional program to rip DVD to other popular video formats acceptable to iPad, iPhone 4, iPod, PSP, PS3, Zune, etc. like mp4. Here I will demonstrate the best solution to fix these problems via a powerful tool suite, iFunia MediaConverter Suite, which contents not only a strong ripper to rip any DVD to other popular video formats, but also a wonderful video converter to convert video of all popular formats like AVI, WMV, AVCHD, MKV, FLV, H.264/AVC, MP4, MOV, 3GP, etc. Convert video and save for iPad, iPhone 4, iPod, Apple TV and other portable devices. First, you should know which video format is your device supports. Actually, mp4 is the popular video format workable to most of portable devices, like, iPad, iPhone 4, iPod, PSP, PS3, etc. And if you don't know which one is the supported video format on your device, just do a Google search or ask for help. Now, let's start the guide about ripping DVD and converting video. Guide: Converting VideoStep 1. Add the video filesClick the "Add
" button to add video files to the iFunia Video Converter Pro for Mac. This iFunia Video Converter Pro for Mac supports batch conversion, so you can import and convert several multimedia files at a time. 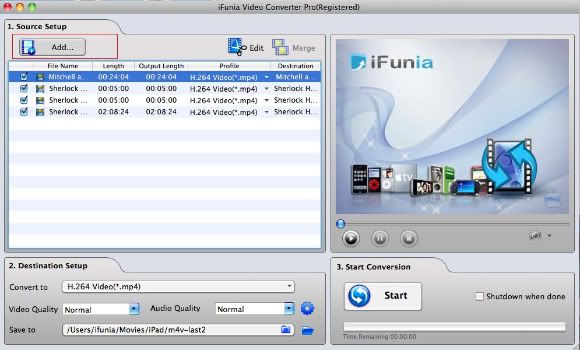 Step 2. Output Settings Step 2. Output Settings Use the "Profile" on the bottom of the Window to control the output format. Step 3. Start ConversionAt last, just click the "Start" button to start the video to your devices compatible format conversion and get the video you wanted. In addition, iFunia Video Converter Pro for Mac support auto shut down function, you can choose this option and your computer will shut down while the task is completed. Guide: Ripping DVDStep 1. Select the titles you'd like to convertA movie DVD usually has several titles. The shorter titles on the DVD are usually the video backgrounds used in the DVD menu screens and DVD extras like movie trailers. Unless you are a graphic artist, you probably don't want to convert these titles. * Movie: If you are ripping a movie, the longest title is usually the main feature. * TV Shows: If you are ripping a DVD containing TV shows, you should see a list of several titles all about the same length. Step 2. Change the output settings to convert videos with best qualityI set the output video format to 'iPad MPEG-4 Video (*.mp4)', Video Codec as 'H264', Resolution as '640*480', Bitrate as '1500', Frame Rate as '30', Audio Codec as 'aac' by default. Remember that the output file size mostly depends on the Bitrate you set. Larger Bitrate, larger file size. 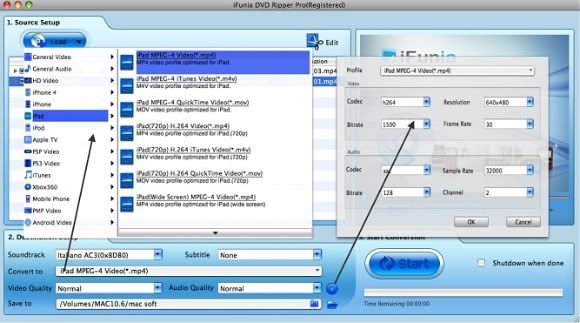 Step 3. Start converting DVD movies Step 3. Start converting DVD moviesNow you may click the big button "Start" to begin converting DVD movies onto your hard disk. The Convert progress bar shows you how much of the convert process is completed. Now you can enjoy those files on your device. For more information about how iFunia MediaConverter Suite can do for you, please go to the Full Guide pages: iFunia Video Converter Pro for Mac and iFunia DVD Ripper Pro for Mac. Other Holiday Special Offers from iFunia* iFunia iPhoneConverter Suite $20 saving * iFunia FlashGallery Suite $30 saving * iFunia iPadConverter Suite $20 saving Related Tips and Tutorials:* Adding a Non-Protected DVD into iTunes Library on Mac * Use MacTheRipper to Rip DVD to iPod, iPhone, etc. on Mac * Tips to Make Successful Video Conversion on Mac * How to Create 3D Flash Photo Gallery with Music on Mac * How to Make a Web Flash Gallery on Mac with Songs * More tips and tutorials
mer. 5 janv. 2011, 10:14
|
One of the many useful functions of the PlayStation Portable (PSP) is the ability to watch videos of course. When you need a break from playing games, listening to music, or browsing the Web, it's always nice to kick back and watch your favorite movies or videos on its generous screen anywhere you go. As far as YouTube goes, without custom firmware, you won't be able to play videos from the site on the PSP's browser. Dont worry; you're not out of luck just yet, though. It's very easy to get YouTube videos onto your PSP. With just a few simple steps, you will be watching your favorite YouTube clips in the palm of your hand in no time. Let's find out how to get it done. Step 1: Download the YouTube Video Converter Install and launch itiFunia YouTube Converter for Mac is recommended as one of the most useful YouTube downloader and YouTube to PSP converter software which can download YouTube videos to PC and convert YouTube video to PSP formats. With just a few simple steps, you will be watching your favorite YouTube clips in the palm of your hand in no time. Download iFunia YouTube Converter for Mac nowStep 2: Download the YouTube videos you want to put on your PSPGo to YouTube.com and find the YouTube videos which you want to put on your PSP. Copy the URL address of your favorite YouTube Video, then the download window of YouTube Converter will be popped up automatically. Paste the address into the Video URL blank. You may add as many YouTube video URLs as you want for downloading to your Mac. Now HD videos from YouTube are available for download with iFunia YouTube Converter. Step 3: Convert YouTube Videos to PSP video formatAfter the YouTube videos are downloaded completely in YouTube Video Converter for Mac, you can now convert the videos to PSP supported video formats that you want. Click the "Gear" button at the right side and change the output format you like from the "Convert to" drop-down menu list. Select the best video format for each video file and specify a directory to save the YouTube video files. Remember that the output file size mostly depends on the Bitrate you set. Larger Bitrate, larger file size. Step 4: Save the YouTube video to PSP Memory StickFinally, once the file has been downloaded and converted to PSP supported video format, connect the PSP to your computer via a USB cable. On the PSP's main menu, make sure it's set to USB Connection (under Settings) so that you can browse the Memory Stick Duo. Now, just save the YouTube videos to the "VIDEO" folder of your PSP's Memory Stick and you're all set. Related articles:* How to use the best YouTube Video Converter for Mac* How to download and convert YouTube 4K video* How to convert YouTube videos to iMovie* How to Free Download YouTube HD Video on Mac* How to embed YouTube video to Keynote on Mac
ven. 31 déc. 2010, 10:17
|
Get an iPad? Watch HD movies on iPad's 9.7 inch screen are amazing, right? Actually, you cant put everything in your iPad. For video files, you have to make sure that your videos are in iPad acceptable formats. For your DVD collections, you need a third party tool because there is no build in DVD-ROM in iPad. Here, I will show you how to convert videos to iPad and convert DVD for iPad. Tool Required:iFunia iPadConverter Suite can help you convert video, audio, and rip DVD to iPad supported formats. The Suite includes two easy media converters: iPad Video Converter and DVD to iPad Converter. Both support over a hundred video and audio formats, allow you to enjoy DVD movies, videos and audios anytime anywhere. More important, iFunia releases a promotion iPadConverter Suite with $20 saving so as to help users to fully enjoy the video entertainment on their iPad without any limitation. Get iFunia iPad Video Converter and DVD to iPad Converter for one low price! Buy TWO iPad tools - worth $58.00 - for just $38.00 and enjoy a complete set of video & DVD to iPad tools. All products have free trials so you can give them a try before buying the suite. Also Mac version & PC version are available with the same price, and the application may be launched by selecting the installed icons. Guide: Convert videos to iPad1. Load and convert video files for iPad
Click the "Add" button to add videos on your hard drive to iPad Video Converter.
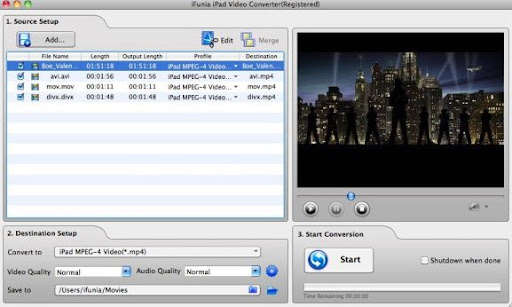
[b]2. Output SettingsUse the "Convert to" on the bottom of the window to control the output format. 3. Start ConversionJust click the "Start" button; wait a minute and you can get the video with proper format. Guide: Convert DVD movies to iPad1. Load DVD movies into iFunia DVD to iPad ConverterClick the big button "Load..." to load your DVD disk. 2. Output SettingsIn the Destination-Setup section of the interface, choose the right preset for your iPad device in the Convert-to drop-down menu. 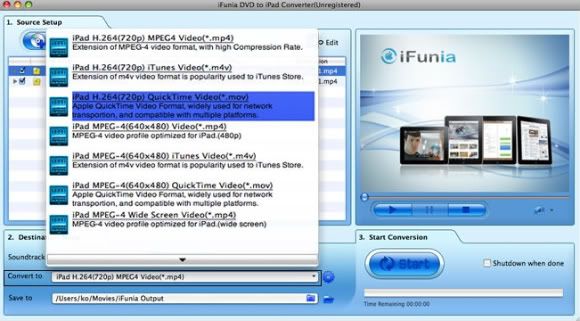 3. Hit Start to rip DVD to iPad for Mac 3. Hit Start to rip DVD to iPad for MacClick "Start" button to start converting DVD to iPad. Now you can enjoy those files on your iPad. For more information about how iFunia iPadConverter Suite can do for you, please go to the Full Guide articles: Rip DVD movies to iPad on Mac and Convert video for your iPad on Mac. Other Holiday Special Offers from iFunia* iFunia iPhoneConverter Suite $20 saving * iFunia FlashGallery Suite $30 saving * iFunia MediaConverter Suite$21 saving Related Tips:* How to Rip Encrypted or copy-protected DVD to iPad* Convert a Movie Compatible to iPad Movie Format* How to Watch DVD Movies on iPad for Mac* Best Christmas Movies to Watch on Your iPad* How to convert WMV to iPad on Mac* How to convert MKV to iPad on Mac* How to convert FLV to iPad on Mac* How to convert VOB to iPad on Mac* How to convert AVI to iPad on Mac* More tips
| |


